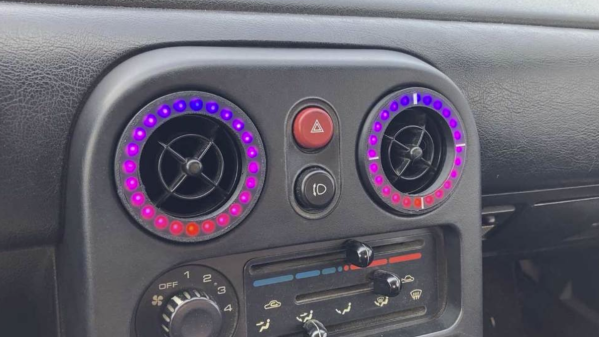
The design is simple. It relies on 3D printing a replacement bezel for the Mazda Miata’s stock round air vents. This bezel is designed to hold a NeoPixel ring from Adafruit. When built with the optional laser-cut diffuser, the parts have a near-stock look when the LEDs are turned off. It’s a classy, stealthy mod – exactly the sort of thing Miata owners need but never seem to have! (Author Note: don’t be mad, I was once one of you!)
With 24 addressable RGB LEDs, it’s possible to display all kinds of data by turning the LEDs on and off and varying the colors. For example, you could readily build a boost gauge that turns on more LEDs at higher boost pressure. It could then be set up to flash red in the event that you surpass safe thresholds. [ktanner] hasn’t specified any particular microcontroller for the setup — but just about any part you like can be used to drive NeoPixels, after all.
One of the hardest, but sometimes best, things you can do for a project is to walk away. [Jroobi] had spent hundreds of hours crafting the digital dash for his MX5 Miata (video, embedded below) and after spending far too long chasing down I2C bugs, he made the difficult decision to step away for a while. However, as of May 2021, [Jroobi] returned to the project and found a power supply was under-specified and was causing brownouts that resulted in crashes.
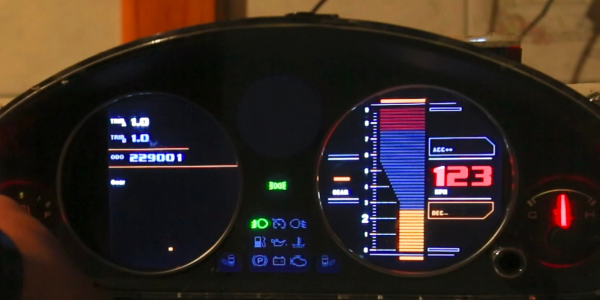
All in all, it’s an incredible work of engineering. Everything from the massive codebase that describes all the different states to the tasteful graphic design is masterfully done. The Star-Trek-inspired theme and attention to detail really show in the different modes on the tachometer. The dynamic soft RPM limit based on engine temperature is particularly ingenious.
Under the hood of this custom dash are two Ardunios running the show. The center media console offers more controls with a generous touch screen while the instrument cluster shows most of the data. They talk over I2C to each other and communicate with other parts in the car, such as the RGB cabin lighting and the TEIN electronic suspension dampeners. Fuel and temperature levels come in as voltage levels which can be read via an ADC. The gear position is calculated based on RPMs and speed given the wheel size and the transmission in the vehicle.
We’ve seen several so-called “digital dash” upgrades over the years that either augment, or completely replace, a vehicle’s original dashboard indicators with new displays. Whether its seven segment LEDs or a full-on graphical interface powered by the Raspberry Pi, the end result is the same: a dashboard that looks wildly different than it did when the car rolled off the assembly line.
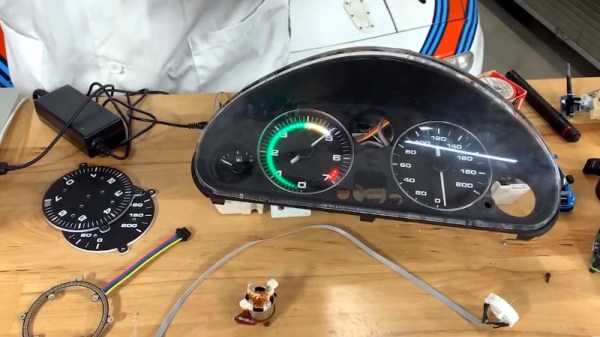
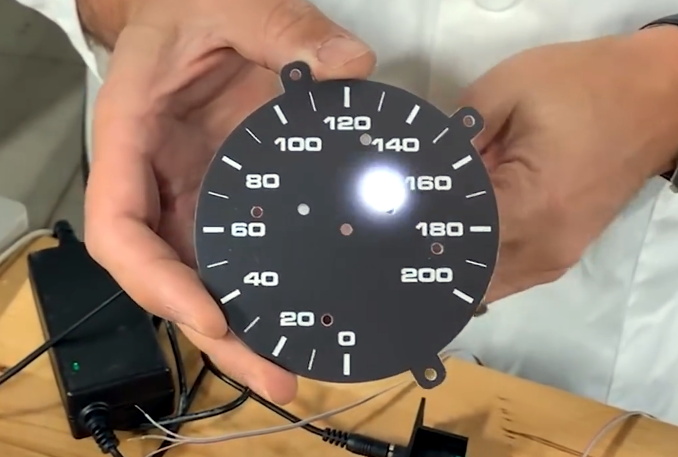
But this LED dashboard project from [Flyin’ Miata] takes a slightly different approach. Rather than replace the analog gauges entirely, rings of RGB LEDs of the same diameter were placed behind their matte black faces. When the LEDs are off you’d never notice them, but once they kick on, the light is clearly visible through the material.
LEDs can easily shine through the gauge face.
So far, it looks like most of the work seems to have been put into the tachometer. The firmware running on the CAN equipped Adafruit Feather M4 can do things such as light up a dynamic redline based on current engine temperature. It will also light up the LEDs to follow the analog gauge as it moves around, which might not have much practical application, but certainly looks cool.
On the speedometer side, the LEDs seem to be used primarily as warning indicators. As demonstrated in the video below, the whole gauge can light up bright red to indicate a critical situation such as low oil pressure. If you wanted to, the system could also be configured with different colors corresponding to various possible fault conditions.
Carburettors versus electronic fuel injection (EFI); automotive fans above a certain age will be well versed in the differences. While early EFI systems had their failings, the technology brought with it a new standard of reliability and control. By the early 1990s, the vast majority of vehicles were sold with EFI, and carburettors became a thing of the past.
The Mazda Miata was no exception. Shipping in 1989, it featured not only multiport fuel injection, but also a distributorless ignition system. Consisting of two coilpacks in a wasted spark configuration, with computer-controlled timing, the system was quite advanced for its time, especially for a budget sports car.
Despite the Miata’s technological credentials, those in the modified car scene tend to go their own way. A man by the name of Evan happened to be one such individual and decided to do just this — scrapping the EFI system and going with a retro carburetor setup. It was around this point that this I got involved, and mechanical tinkering ensued.
The modern internal combustion engine is an engineering marvel. We’re light-years ahead of simple big blocks and carburetors, and now there are very fast, very capable computers sensing adjusting the spark timing, monitoring the throttle position, and providing a specific amount of power to the wheels at any one time. For the last few years [Josh] has been building a fully-featured engine management system, and now he’s entered it in the Hackaday Prize.
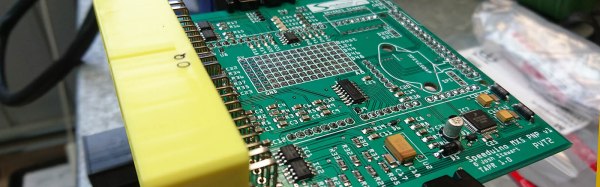
The Speeduino project is, as the name would suggest, built around the Arduino platform. In this case, an Arduino Mega. The number of pins and PWMs is important — the Speeduino is capable of running the fuel and ignition for eight cylinder engines.
The Speeduino is designed to do everything an engine control unit can do, including rev limiting (although if you’re building your own ECU, why?), and reading ethanol sensors. Right now [Josh] is working on a beta run of the Speeduino designed for the 1.6L Miata. That’s an excellent platform for firmware performance tuning, and there’s still a lot of work to be done on the firmware side of things before everything’s all set to go. Still, this is a great project and sure to impress the bros at track day, bro.
As ever, I am fighting a marginally winning battle against my 1991 Mazda MX-5, and this is the story of how I came to install a wideband oxygen sensor in my Japanese thoroughbred. It came about as part of my ongoing project to build myself a viable racecar, and to figure out why my 1990s Japanese economy car engine runs more like a late 1970s Malaise-era boat anchor.
I’ve always considered myself unlucky. My taste for early 90s metal has meant I’ve never known the loving embrace of OBD-2 diagnostics, and I’ve had to make to do with whatever hokey system was implemented by manufacturers who were just starting to produce reliable fuel injection systems.
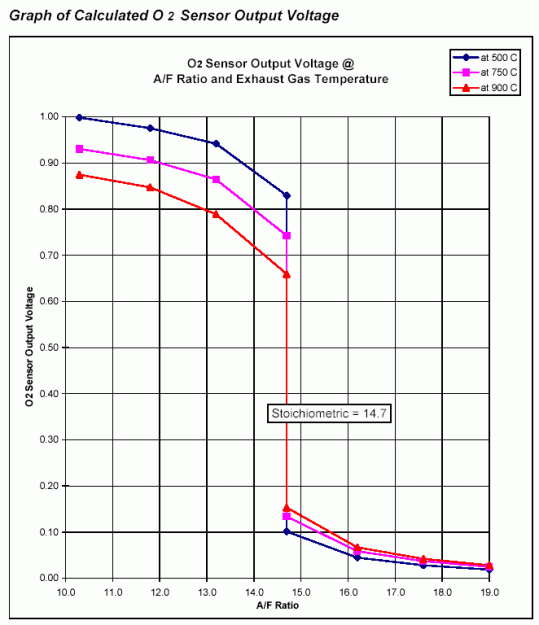
Narrowband oxygen sensor voltage output. The output is heavily dependent on sensor temperature and highly non-linear, making these sensors unsuitable for delivering a true AFR reading.
This generally involves putting in a wire jumper somewhere, attaching an LED, and watching it flash out the trouble codes. My Mazda was no exception, and after putting up with a car that was running rich enough to leave soot all over the rear bumper, I had to run the diagnostic.
It turned up three codes – one for the cam angle sensor, and two for the oxygen sensor. Now, a cam angle sensor (CAS) fault will normally prevent the car running at all, so it’s safe to assume that was an intermittent fault to keep an eye on.
The oxygen sensor, however, was clearly in need of attention. Its job is to allow the engine control unit (ECU) to monitor the fuel mixture in the exhaust, and make sure it’s not too rich or too lean. As my car was very obviously running too rich, and the diagnostic codes indicated an oxygen sensor failure, a repair was in order.
I priced up replacement sensors, and a new oxygen sensor could be had for under $100. However, it wasn’t exactly what I wanted, as not all oxygen sensors are created equal. Cars in the 80s and 90s typically shipped from the OEM fitted with what’s called a narrowband oxygen sensor. These almost always consist of a zirconia dioxide cell that outputs a voltage depending on the difference in oxygen concentration between the exhaust gas and the free air. These sensors generally sit at 0.45 V when the fuel mixture is stoichiometric, but rapidly change to 0.1 V in a lean condition and 0.9 V in a rich condition. The response is highly non-linear, and changes greatly with respect to temperature, and thus is only good for telling the ECU if it’s rich or lean, but not by how much. ECUs with narrowband sensors tend to hunt a lot when running in closed loop O2 control – you’ll see an engine at idle hunt either side of the magical 14.7 stoichiometric air fuel ratio, never able to quite dial in on the correct number.
As I intend to switch to an aftermarket ECU in the future, I’ll need to tune the car. This involves making sure the air/fuel ratios (AFRs) are correct, and for that I need to be able to properly measure them. Just knowing whether you’re rich or lean isn’t enough, as often it’s desirable to run the engine intentionally rich or lean at certain engine loads. To get a true AFR reading requires fitting a wideband oxygen sensor. These are a little more complicated.
I dig cars, and I do car stuff. I started fairly late in life, though, and I’m only just starting to get into the whole modification thing. Now, as far as automobiles go, you can pretty much do anything you set your mind to – engine swaps, drivetrain conversions, you name it – it’s been done. But such jobs require a high level of fabrication skill, automotive knowledge, and often a fully stocked machine shop to match. Those of us new to the scene tend to start a little bit smaller.
So where does one begin? Well, there’s a huge realm of mods that can be done that are generally referred to as “bolt-ons”. This centers around the idea that the install process of the modification is as simple as following a basic set of instructions to unbolt the old hardware and bolt in the upgraded parts. Those that have tread this ground before me will be chuckling at this point – so rarely is a bolt-on ever just a bolt-on. As follows, the journey of my Mazda’s differential upgrade will bear this out.
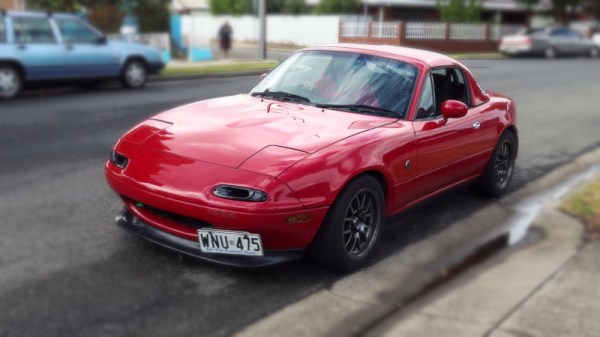
The car in question, currently known as the “Junkbox MX-5” until it starts running well enough to earn a real name. It somehow looks passable here, but in person I promise you, it looks awful. Credit: Lewin Day
It all started when I bought the car, back in December 2016. I’d just started writing for Hackaday and my humble Daihatsu had, unbeknownst to me, just breathed its last. I’d recently come to the realisation that I wasn’t getting any younger, and despite being obsessed with cars, I’d never actually owned a sports car or driven one in anger. It was time to change. Continue reading “Different Differentials & The Pitfalls Of The Easy Swap”→