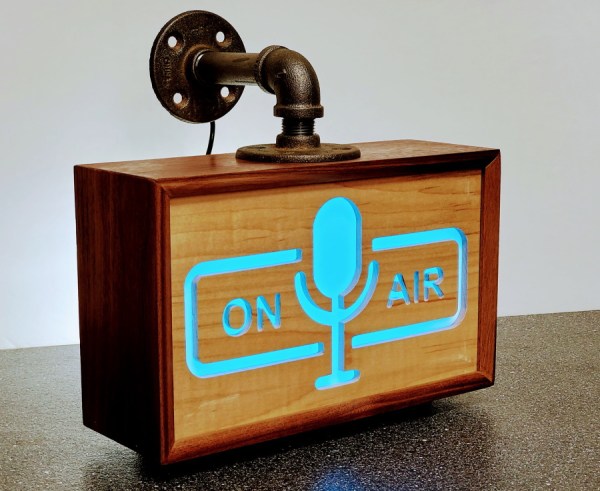
This Super Realistic LED Candle Is Smoking Hot

Over the last few years, LED candles have become increasingly common; and for good reason. From a distance a decent LED candle is a pretty convincing facsimile for the real thing, providing a low flickering glow without that annoying risk of burning your house down. But there’s something to be said for the experience of a real candle; such as that puff of fragrant smoke you get when you blow one out.

Which is why [Keith] set out on an epic three year quest to build the most realistic LED candle possible, with a specific focus on the features that commercial offerings lack. So not only does it use real wax as a diffuser for the LEDs, but you’re able to “light” it with an actual match. It even ejects a realistic bit of smoke when its microphone detects you’ve blown into it. Ironically, its ability to generate smoke means it doesn’t completely remove the possibility of it setting your house on fire if left unattended, but we suppose that’s the price you pay for authenticity.

As you might have gathered by now, [Keith] is pretty serious about this stuff, and has gone to great lengths to document his candle’s long development process. If you’d care to build a similar candle, his written documentation as well as the video after the break will certainly get you on the right track. He’s even broken the design down into “milestones” of increasing complexity, so for example if you don’t care about the smoking aspect of the candle you can just skip that part of the build.

So what did [Keith] put into his ultimate LED candle? In the most basic form, the electronics consist of a Arduino Pro Mini and a chunk of RGB WS2812B strip holding six LEDs. Add in an IR sensor if you want the candle to be able to detect the presence of a match, and a microphone if you want to be able to blow into the candle to turn it off. Things only get tricky if you want to go full smoke, and let’s be honest, you want to go full smoke.

To safely produce a puff of fragrant smoke, [Keith] is using a coil of 28 gauge wire wrapped around the wick of a “Tiki Torch”, and a beefy enough power supply and MOSFET to get it nice and hot. The wick is injected with his own blend of vegetable glycerin and aromatic oil, and when the coil is fired up it produces an impressive amount of light gray smoke that carries the scent of whatever oil you add. Even if you’re not currently on the hunt for the ultimate electronic candle, it’s a neat little implementation that could be used come Halloween.

You might be surprised to learn that LED candles are a rather popular project within the hacking community. From the exceptionally simple to the exceedingly complex, we’ve seen an impressive array of electronic candles over the years. Perfect for setting the mood when listening to the smooth sounds of the latest Hackaday podcast episode. Continue reading “This Super Realistic LED Candle Is Smoking Hot”

Old Meets New In 3D Printed Telegraph

We often think of 3D printing as a way to create specific components in our builds, everything from some hard-to-find little sprocket to a custom enclosure. More and more of the projects that grace the pages of Hackaday utilize at least a few 3D printed parts, even if the overall build itself is not something we’d necessarily consider a “printed” project. It’s the natural progression of a technology which at one time was expensive and complex becoming increasingly available to the maker and hacker.

But occasionally we see 3D printing used not to create new devices, but recreate old ones. A perfect example is the almost entirely 3D printed telegraph system created by [Matt]. Projects like this help bring antiquated technology back to a modern audience, and can be an excellent educational tool. Showing someone a diagram of how the telegraph worked is one thing, but being able to run off a copy on your 3D printer and putting a working model in their hands is quite another.

[Matt] acknowledges that he’s hardly the first person to 3D print a telegraph key, but says that he’d never seen the complete system done before. The key is perhaps the component most people are familiar with from film and old images, but alone it’s really nothing more than a momentary switch. To actually put it to use, you need a telegraph sounder on the receiving end to “play” the messages.

The sounder is a somewhat more complex device than the key, and uses an electromagnet to pull down a lever and produce an audible clicking noise. In the most basic case, the coil is directly connected to the key, but in a modern twist [Matt] has added a MOSFET into the circuit so the electromagnet is triggered locally within the sounder. This prevents sparks from eroding the contacts in the key, and alleviates problems associated with current loss over long wire runs.

We’ve previously seen 3D printing used to revive vintage games which are no longer available such as “The Amazing Dr. Nim”, and how modern techniques such as additive manufacturing can help put World War II aircraft back in the air. While there was never much question that 3D printing would be a big part of our future, it would seem to be taking a fairly active role in preserving our past as well.

Chris Gammell Talks Circuit Toolboxes

Chris Gammell wants to know: What’s in your circuit toolbox?

Personally, mine is somewhat understocked. I do know that in one of my journals, probably from back in the 1980s, I scribbled down a schematic of a voltage multiplier I had just built, with the classic diode and capacitor ladder topology. I probably fed it from a small bell transformer, and I might have gotten a hundred volts or so out of it. I was so proud at the time that I wrote it down for posterity with the note, “I made this today!”

I think the whole point of Chris’ 2018 Hackaday Superconference talk is precisely what I was trying to get at when I made my “discovery” — we all have circuits that just work for us, and the more you have, the better. Most readers will recognize Chris from such venues as The Amp Hour, a weekly podcast he hosts with Dave Jones, and his KiCad tutorial videos. Chris has been in electrical engineering for nearly twenty years now, and he’s picked up a collection of go-to circuits that keep showing up in his designs and making life easier, which he graciously shared with the crowd.

As Chris points out, it’s the little circuits that can make the difference. Slide after slide of his talk had schematics with no more than a handful of components in them, covering applications from dead-simple LED power indicators and switch debouncing to IO expansion using a 74HC595. And as any sensible engineer might, Chris’ toolbox includes a good selection of power protection circuits, everything from polarity reversal protection with a MOSFET and a zener to a neat little high-side driver shutoff using a differential amp and an optoisolator.

My favorite part of the talk was the “Codeless” section — things you can do with discrete components that make microcontroller circuits better. We see the “You could have used a 555!” comments from readers all the time, and Chris agrees, at least to a point. He aptly notes that microcontrollers can wake up with their IO pins in unknown states, and offered several circuits to keep the potential for mischief at bay, such as Schmitt trigger power-on reset or the simple addition of a pull-down resistor to default a MOSFET to a safe state. There’s a lot that code can accomplish, but adding just a few parts can make a circuit much safer and useful.

Chris acknowledges that in any audience, everyone is always at different places with regard to their hardware learning curve, so what’s old hat to someone might be a fresh revelation to another. Still, everything is new to someone at some point, and that’s often the best time to write it down. That’s what I did all those years ago with that voltage multiplier, and it never left me as a result. It’s good advice, and if you haven’t started building your own circuit toolbox, now’s the time.

Continue reading “Chris Gammell Talks Circuit Toolboxes”

Turn Old Pinball Parts Into A Unique Digital Clock

It’s getting ever harder to build a truly unique digital clock. From electronic displays to the flip-dots and flip-cards, everything seems to have been done to death. But this pinball scoring reel clock manages to keep the unique clock ball in play, as it were.

It’s not entirely clear whom to credit with this build, but the article was written by [Lucky]. Nor do they mention which pinball machine gave up its electromechanical scoring display for the build. Our guess would be a machine from the ’60s, before the era of score inflation that required more than the four digits used. And indeed, the driver for the display is designed so that a scoring unit from any pinball machine from the electromechanical era can be used. An ESP8266 keeps the time with the help of an RTC and drives the coils of the scoring unit through a bunch of MOSFETs. The video below shows that it wouldn’t make a great clock for the nightstand; thankfully, it has a user-configured quiet time to limit the not inconsiderable noise to waking hours. It also flashes the date every half hour, rings solenoid operated chimes, and as a bonus, it can be used to keep score in a pinball game built right into the software.

We like the idea of honoring the old pinball machines with clock builds like this. We’ve seen a word clock built from the back-glass of an old machine, and one that uses a four-player back to display the date and alarm time too.

Continue reading “Turn Old Pinball Parts Into A Unique Digital Clock”

Thrift Store Razor Scooter Gets More Kick

Beyond pride, the biggest issue keeping adults off small motorized scooters is the fact that their tiny motors usually don’t have the power to move anything heavier than your average eighth grader. That didn’t stop [The_Didlyest] from snapping up this $7 thrift store find, but it did mean the hot pink scooter would need to be beefed up if it had any hope of moving 170 lbs of hacker.

Logically, the first step was fitting a more capable motor. [The_Didlyest] used an electric wheelchair motor which had a similar enough diameter that mounting it was fairly straightforward. The original sprocket and chain are still used, as are the mounting holes in the frame (though they had to be tapped to a larger size). That said, the new motor is considerably longer than its predecessor so some frame metal had to be cut away. This left the scooter without a kickstand and with a few inches of motor hanging out of its left side, but it’s all in the name of progress.

Naturally the upgraded motor needed similarly upgraded batteries to power it, so [The_Didlyest] put together a custom pack using eighteen 18650 cells spot welded together for a total output of 25V. Coupled with a 60A battery management system (BMS), the final 6S 3P configured pack is a very professional little unit, though the liberal application of duct tape keeps it from getting too full of itself.

Unfortunately the original motor controller consisted of nothing but relays, and didn’t allow adjusting speed. So that needed to go as well. In its place is a homebrew speed controller made with three parallel MOSFETs and an Arduino to read the analog value from the throttle and convert that into a PWM signal.

[The_Didlyest] says the rear tire is now in need of an upgrade to transmit all this new power to the road, and some gearing might be in order, but otherwise the scooter rebuild was a complete success. Capable of mastering hills and with a top speed of about 10 MPH, the performance is certainly better than the stock hardware.

Of course this is far from the first time we’ve seen somebody put a little extra pepper on a scooter. Some of them even end up being street-legal rides.

The Crustacean Battle Bot Of Your Nightmares

We’ve all seen a movie or TV show that got our imagination going, and the more studious of us might get fired up over a good book (one without pictures, even). You never know were inspiration might come from, which is why it’s so hard to track down in the first place. But one place we don’t often hear about providing many hackers with project ideas is the grocery store. But of course the more we learn about [Michael Kohn], the more we realize he’s got a very unique vision.

On a recent trip to the grocery store, [Michael] saw a two pack of frozen lobsters and thought they would make fine battling robots. You know, as one does. Unfortunately the process of taking a frozen lobster and turning it into a combat droid (which incidentally does include eating the thing at some point in the timeline) ended up being so disgusting that he only finished one of them. Whether that makes this poor fellow the winner or loser though…that’s a question that will require some contemplation.

The first step was cooking and eating the beast, and after that came cleaning the shell of as much remaining meat and innards as possible. He then baked it in a toaster oven for 40 minutes and let it sit for a couple of days to make sure it didn’t have any residual smell. Once he confirmed the shell was clean, he glued it back together and got started on mounting it to his hardware.

A wooden frame under the lobster holds the dual HD-1711MG mini servos that power the karate chop action of the claws, as well as the electronics. [Michael] used a ATtiny85 and NTD4963N MOSFETs to make a basic RC platform which responds to IR from a Syma S107 toy helicopter controller. He tried to power everything with AAA and then AA batteries, but found they just didn’t give him the juice he needed once the bot got going. So the final version utilizes a 5 V regulator and a standard RC 7.2v LiPO battery pack.

If you’re not big on shellfish, never fear. He’s created similar roving contraptions based around sausages and carrots too. One could say he’s truly a man of refined…taste.

Continue reading “The Crustacean Battle Bot Of Your Nightmares”

LED “Candle” Gets The 555 Treatment

Regular readers may recall we recently covered a neat Arduino trick that allowed you to “blow out” an LED as if it was a candle. The idea was that the LED itself could be used as a rudimentary temperature sensor, and the Arduino code would turn the LED on and off when a change was detected in its forward voltage drop. You need to oversample the Arduino’s ADC to detect the few millivolt change reliably, but overall it’s pretty simple once you understand the principle.

But [Andrzej Laczewski], like many of our beloved readers, feels the Arduino and other microcontrollers can be a crutch if used exclusively. So he set out to replicate this hack with that most cherished of ICs, the 555 timer. In the video after the break, he demonstrates his “old-school” LED candle for anyone who thinks the only way to control an LED is with digitalWrite.

Not to say it’s easy to replicate the original Arduino project with a 555, or that it’s even practical. [Andrzej] simply wanted to show it was possible, which is something we always respect around these parts. He goes into great detail on how he developed and tested the circuit, even including oscilloscope screenshots showing how the different components work together in real-time. But the short version is that a MOSFET is used to turn the LED on and off, a comparator detects change in the LED’s voltage drop, and the 555 is used to control how long the LED stays off for.

Ever the traditionalist, [Andrzej] wrapped up this build by etching his own PCB using a variation of the classic laser toner transfer method. If this all looks a bit too much like Black Magic to you, there’s no shame in sticking with the Arduino version. At 1/20th of the parts count, and with no calibration required, who’s to say which version is “simpler”.

Continue reading “LED “Candle” Gets The 555 Treatment”