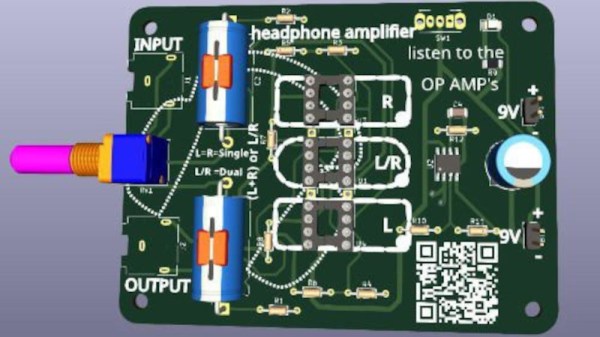
Hackaday Links Column Banner

Hackaday Links: June 12, 2022

“Don’t worry, that’ll buff right out.” Alarming news this week as the James Webb Space Telescope team announced that a meteoroid had hit the space observatory’s massive primary mirror. While far from unexpected, the strike on mirror segment C3 (the sixth mirror from the top going clockwise, roughly in the “south southeast” position) that occurred back in late May was larger than any of the simulations or test strikes performed on Earth prior to launch. It was also not part of any known meteoroid storm in the telescope’s orbit; if it had been, controllers would have been able to maneuver the spacecraft to protect the gold-plated beryllium segments. The rogue space rock apparently did enough damage to be noticeable in the data coming back from the telescope and to require adjustment to the position of the mirror segment. While it certainly won’t be the last time this happens, it would have been nice to see one picture from Webb before it started accumulating hits.

Continue reading “Hackaday Links: June 12, 2022”

Gaze Inside These Nanopower Op-Amps

[Robo] over at Tiny Transistor Labs has a fascinating look at what’s inside these modern, ultra low-power devices that consume absolutely minuscule amounts of current. Crank up the magnification, and go take a look at the dies on these two similar (but internally very different) devices.

Texas Instruments LPV801, under the hood.

The first unit is the Texas Instruments LPV801, a single-channel op-amp that might not be very fast, but makes up for it by consuming only a few hundred nanoamps. Inside, [Robo] points out all the elements of the design, explaining how a part like this would be laser-trimmed to ensure it performs within specifications.

The second part is the Texas Instruments LPV821 which uses a wee bit more power, but makes up for it with a few extra features like zero-drift and EMI hardening. Peeking inside this device reveals the different manufacturing process this part used, and [Robo] points out things like the apparent lack of fuses for precise trimming of the part during the manufacturing process.

Seeing these structures up close isn’t an everyday thing for most of us, so take the opportunity to check out [Robo]’s photos. Tiny Transistor Labs definitely takes the “tiny” part of their name seriously, as we’ve seen with their 555 timer, recreated with discrete transistors, all crammed into a package that’s even the same basic size as the original.

DIY Metal Detector Gives You The Mettle To Find Some Medals

Hurricane season is rapidly approaching those of us who live in the northern hemisphere. While that does come with a good deal of stress for any homeowners who live in the potential paths of storms it also comes with some opportunities for treasure hunting. Storms tend to wash up all kinds of things from the sea, and if you are equipped with this DIY metal detector you could be unearthing all kinds of interesting tchotchkes from the depths this year.

The metal detector comes to us from [mircemk] who is known for building simple yet effective metal detectors. Unlike his previous builds, this one uses only a single integrated circuit, the TL804 operational amplifier. It also works on the principle of beat-balance which is an amalgamation of two unique methods of detecting metal.  When the wire coils detect a piece of metal in the ground, the information is fed to an earpiece through an audio jack which rounds out this straightforward build.

[mircemk] reports that this metal detector can detect small objects like coins up to 15 cm deep, and larger metal objects up to 50 cm. Of course, to build this you will also need the support components, wire, and time to tune the circuit. All things considered, though it’s a great entryway into the hobby.

Want to learn more about metal detecting? Check out this similar-looking build which works on the induction balance principle.

Continue reading “DIY Metal Detector Gives You The Mettle To Find Some Medals”

How To Spot A Fake Op-Amp

We’re all aware that there are plenty of fake components to be found if you’re prepared to look in the right places, and that perhaps too-good-to-be-true chip offers on auction sites might turn out to have markings which rub off to reveal something completely different underneath. [IMSAI Guy] saw a batch of OP-07 laser-trimmed op-amps at a bargain price, so picked them up for an investigation. You can take a look at the video below the break.

A perfect op-amp has a zero volt output when both of its inputs are at the same voltage, but in practice no real device approaches this level of perfection. It’s referred to as the offset voltage, and for instrumentation work where a low offset voltage is important there are parts such as the OP-07 which have each been adjusted using a laser to trim their components for the lowest offset. This process is expensive, so naturally so are genuine OP-07s.

Identifying real versus fake op-amps in this case is as simple as hooking the chip up as a unity gain non-inverting amplifier and measuring the voltage on the output (we can’t help a tinge of envy at that Keithley 2015 THD multimeter!), from which measurement the fakes should be clearly visible. First up are some 741s with their > 1 mV offsets (though an outlier 741 had a 40μV offset) to show what a cheap op-amp could be expected to do, then we see the OP-07s. Immediately with an offset of > 1.2 mV  we can tell that they’re fake, which as he admits for the price is hardly a surprise. Meanwhile we’ll keep an eye out for Korean-made 741s like the outlier low-offset device.

If you’re interested by op-amp internals may we suggest a look at the first IC op-amp, meanwhile this isn’t the first fake chip we’ve seen.

Continue reading “How To Spot A Fake Op-Amp”

PsyLink An Open Source Neural Interface For Non-Invasive EMG

We don’t see many EMG (electromyography) projects, despite how cool the applications can be. This may be because of technical difficulties with seeing the tiny muscular electrical signals amongst the noise, it could be the difficulty of interpreting any signal you do find. Regardless, [hut] has been striving forwards with a stream of prototypes, culminating in the aptly named ‘Prototype 8’

The current prototype uses a main power board hosting an Arduino Nano 33 BLE Sense, as well as a boost converter to pump up the AAA battery to provide 5 volts for the Arduino and a selection of connected EMG amplifier units. The EMG sensor is based around the INA128 instrumentation amplifier, in a pretty straightforward configuration. The EMG samples along with data from the IMU on the Nano 33 BLE Sense, are passed along to a connected PC via Bluetooth, running the PsyLink software stack. This is based on Python, using the BLE-GATT library for BT comms, PynPut handing the PC input devices (to emit keyboard and mouse events) and tensorflow for the machine learning side of things. The idea is to use machine learning from the EMG data to associate with a specific user interface event (such as a keypress) and with a little training, be able to play games on the PC with just hand/arm gestures. IMU data are used to augment this, but in this demo, that’s not totally clear.

An earlier prototype of the PsyLink.

All hardware and software can be found on the project codeberg page, which did make us double-take as to why GnuRadio was being used, but thinking about it, it’s really good for signal processing and visualization. What a good idea!

Obviously there are many other use cases for such a EMG controlled input device, but who doesn’t want to play Mario Kart, you know, for science?

Checkout the demo video (embedded below) and you can see for yourself, just be aware that this is streaming from peertube, so the video might be a little choppy depending on your local peers. Finally, if Mastodon is your cup of tea, here’s the link for that. Earlier projects have attempted to dip into EMG before, like this Bioamp board from Upside Down Labs. Also we dug out an earlier tutorial on the subject by our own [Bil Herd.]

Continue reading “PsyLink An Open Source Neural Interface For Non-Invasive EMG”

A 7805 Regulator puts out 6.3 Volts

Simple Electronic Hacks Inspire Doing More With Less

It’s late at night. The solder smoke keeps getting in your tired eyes, but your project is nearly done. The main circuit is powered by your 13.8 V bench supply, but part of the circuit needs 9 V. You dig into your stash to find your last LM7809 voltage regulator, but all you have is a bunch of LM7805’s. Are you done for the night? Not if you’ve watched [0033mer]’s Simple Electronic Circuit Hacks video! You know just what to do. The ground pin of a LM7805 connects to the cathode of a TL431 programmable Zener diode pulled from an old scrapped TV. The diode is referenced to a voltage divider, and voila! Your LM7805 is now putting out a steady 9 V.

How did [0033mer] become adept at doing more with less? As he explains in the video below, his primary source of parts in The Time Before The Internet was old TV’s that were beyond repair. Using N-Channel MOSFETs to switch AC, sensing temperature changes with signal diodes, and even replacing a 555 with a blinking LED are just a few of the hacks covered in the video below the break.

We especially appreciated the simple, to-the-point presentation that inspires us to keep on hacking in the truest sense: Doing more with less! If you enjoy a good diode hack like we do, you will likely appreciate learning Diode Basics by W2AEW, or a Diode Based Radiation Detector.

Thank you [DSM] for the tip! Be sure to submit your the cool things you come across to our Tips Line!

Continue reading “Simple Electronic Hacks Inspire Doing More With Less”

Vacuum Tube Magic Comes To The 741

Some of you may remember a recent project that featured on these pages, a 555 timer reproduced using vacuum tubes. Its creator [Usagi Electric] was left at loose ends while waiting for a fresh PCB revision of the 555 to be delivered, so set about creating a new vacuum tube model of a popular chip, this time the ubiquitous 741 op-amp. (Video, embedded below.)

The circuit is fairly straightforward, using six small pentodes. The first two are  a long-tailed pair as might be expected, followed by two gain stages, then a final gain stage feeding a cathode follower with feedback. It’s neatly built on a PCB with IC-style “pins” made from more PCB material, then put in a huge replication of an IC socket on a wooden baseboard.

The result is an op-amp, but not necessarily a good one. He looks at the AC performance instead of the DC even though it’s a fully DC-coupled circuit, and finds that while it performs as expected in a classic op-amp circuit it still differs from the ideal at higher gain. The frequency response is poor too, something he rectifies by replacing the feedback capacitor with a smaller value. Sadly he doesn’t look at its common mode performance, though we’d expect that without close matching of the tubes it might leave something to be desired.

It’s obvious that this project would never be selected as an op-amp given the quality of even the cheapest silicon op-amp in comparison. But its value is in a novelty, a talking point, and maybe a chance to learn about op-amps. For that, we like it.

We covered the vacuum tube 555 when details of it emerged, but if op-amps are your bag we’ve looked at a simple one very closely indeed.

Continue reading “Vacuum Tube Magic Comes To The 741”