Perfect Jump Shots With OpenCV And Processing

jumpshot

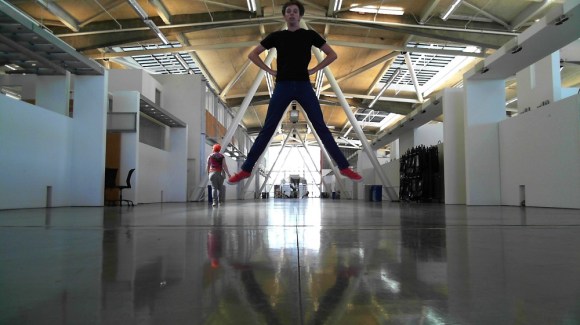
[ElectricSlim] likes taking “Jump Shots” – photographs where the subject is captured in midair. He’s created a novel method to catch the perfect moment with OpenCV and Processing. Anyone who has tried jump shot photography can tell you how frustrating it is. Even with an experienced photographer at the shutter, shots are as likely to miss that perfect moment as they are to catch it. This is even harder when you’re trying to take jump shots solo. Wireless shutter releases can work, but unless you have a DSLR, shutter lag can cause you to miss the mark.

[ElectricSlim] decided to put his programming skills to work on the problem. He wrote a Processing sketch using the OpenCV library. The sketch has a relatively simple logic path: “IF a face is detected within a bounding box AND the face is dropping in height THEN snap a picture” The system isn’t perfect, A person must be looking directly at the camera for the photo the face to be detected. However, it’s good enough to take some great shots. The software is also repeatable enough to make animations of various jump shots, as seen in [ElectricSlim’s] video.

We think this would be a great starting point for a trigger system. Use a webcam to determine when to shoot a picture. When the conditions pass, a trigger could be sent to a DSLR, resulting in a much higher quality frame than what most webcams can produce.

Continue reading “Perfect Jump Shots With OpenCV And Processing”

Hacked Interactive R2D2 Controlled By Raspberry Pi

hacked-R2D2-controlled-by-raspberry-pi

Ah R2D2. Probably one of the most recognized little robots on the planet. There have to be a hundred different toys of R2 out there, but one of the more impressive is the 30th Anniversary Interactive edition. Complete with all kinds of bells and whistles, it’s about as realistic as they come. One Star Wars fan found himself in possession of a broken Interactive R2, and with his girlfriend’s birthday coming up, decided to do a little droid surgery to create the ultimate gift.

Giving Anakin a run for his money, all the controls for this R2 unit were custom built.  A Raspberry Pi running Rasbian acts as the brain. Facial recognition was implemented using OpenCV. Voice commands in either English or Chinese were made possible by PocketSphinx. Some of the other features he included are: message recording and playback, ultrasonic distance detection, motion detection, wifi, and a rechargeable battery. Many of those features were included in the original toy, but since this unit was broken, had to be rebuilt from scratch.

In the end, it must have impressed his girlfriend – she’s now his wife. Good work Jedi. Check out some build photos and a video demonstration after the break.

Continue reading “Hacked Interactive R2D2 Controlled By Raspberry Pi”

Using OpenCV With The Raspberry Pi

When we first heard of the Raspberry Pi we were elated that projects that once required a full-blown computer could now be done on a tiny, and cheap board running Linux. Unfortunately, we haven’t seen much in the way of using computer vision algorithms on the Raspi, but thanks to [Lentin] the world of OpenCV is now accessable to Raspberry Pi users everywhere.

[Lentin] didn’t feel like installing OpenCV from its source, a process that takes the better part of a day. Instead, he installed it using the synaptic package manager. After connecting a webcam, [Lentin] ssh’d into his Raspi and installed a face detection example script that comes with OpenCV.

It should be noted that [Lentin]’s install of OpenCV isn’t exactly fast, but for a lot of projects being able to update a face tracker five times a second is more than enough. Once the Raspberry Pi camera module is released the speed of face detection on a Raspi should increase dramatically, though, leading to even more useful computer vision builds with the Raspberry Pi.

Quantifying Cloudiness With OpenCV

What Can I see From the Shard?

The Shard is the tallest building in Western Europe, and has a great view of London.  The condos in the building are very expensive, and a tourist ride to the top of the building costs £24.95.

Since the value of the view is so high, [Willem] wanted to quantify the quality of the view at any given time. His solution is the Shard Rain Cam. This device combines a Logitech webcam with a Raspberry Pi to capture a time-lapse set of images. These images are fed to a Python script using OpenCV which quantifies the cloudiness.

[Willem] also had to build a weatherproof enclosure with a transparent window for the camera and RPi. ‘Clingfilm’, which is British for saran wrap, and mineral oil is used to improve the waterproofing of an IP54 rated enclosure.

The resulting data is displayed on www.whatcaniseefromtheshard.com, which provides an indication of whether or not the view is worth £24.95. All of the Python code is available, and is a good starting point for learning about image processing with OpenCV.

Finding 1s And 0s With A Microscope And Computer Vision

ROM

One day, [Adam] was asked if he would like to take part in a little project. A mad scientist come engineer at [Adam]’s job had just removed the plastic casing from a IC, and wanted a little help decoding the information on a masked ROM. These ROMs are basically just data etched directly into silicon, so the only way to actually read the data is with some nitric acid and a microscope. [Adam] was more than up for the challenge, but not wanting to count out thousands of 1s and 0s etched into a chip, he figured out a way to let a computer do it with some clever programming and computer vision.

[Adam] has used OpenCV before, but the macro image of the masked ROM had a lot of extraneous information; there were gaps in the columns of bits, and letting a computer do all the work would result in crap data. His solution was to semi-automate the process of counting 1s and 0s by selecting a grid by hand and letting image processing software do the rest of the work.

This work resulted in rompar, a tool to decode the data on de-packaged ROMs. It works very well – [Adam] was able to successfully decode the ROM and netted the machine codes for the object of his reverse engineering.

Giving The Hexbug Spider A Set Of Eyes

spider

The Hexbug Spider is a neat little robot toy available at just about any Target or Walmart for about $20. With a few extra parts, though, it can become a vastly more powerful robotics platform, as [eric] shows us with his experiments with a Hexbug and OpenCV.

Previously, we’ve seen [eric] turn a Hexbug spider into a line following robot with a pair of IR LEDs and a drop-in replacement motor driver. This time, instead of a few LEDs, [eric] turned to an Android smartphone running an OpenCV-based app.

The smartphone app detects a user-selectable hue – in this case a little Android toy robot – and sends commands to the MSP430-powered motor control board over the headphone jack to move the legs. It’s a neat build, and surprisingly nimble for a $20 plastic hexapod robot.

You can see the OpenCV-controlled Hexbug in action after the break, along with a video build log with [eric] showing everyone how to tear apart one of these robot toys.

Continue reading “Giving The Hexbug Spider A Set Of Eyes”

Reading Piano Rolls Without A Player Piano

detection-example

A while back, [Jacob] played around with a player piano. After feeding a roll into the machine and trying to figure out how a fifty year old machine using hundred year old technology can replicate a skilled pianist, he decided to take a crack at decoding piano rolls for himself. He came up with a clever way of doing it over Christmas break, using a camera and a few bits of OpenCV.

The old-school mechanics of a player piano use a bellows and valve system to suck air through dozens of holes, making the action hit a string whenever a hole is present in the piano roll. To bring this mechanism into the modern age, [Jacob] pointed a video camera at the active part of the piano roll and used OpenCV to translate holes in a piece of paper to a MIDI file.

The synthesized version sounds just as good as the original paper scroll-based version, as seen in the video after the break. There are a few sync issues in the video and the resulting MIDI file isn’t in the right key, but that’s easily fixed by anyone willing to replicate this project.

Continue reading “Reading Piano Rolls Without A Player Piano”