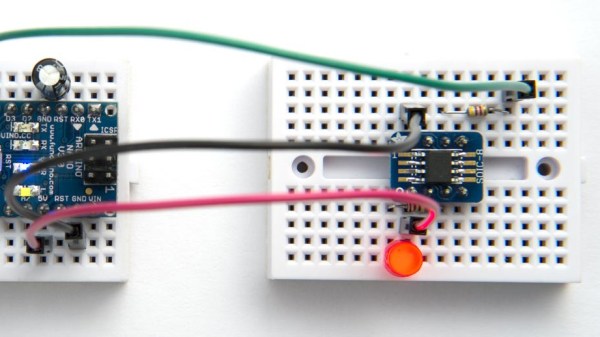
Showing a new generation ATTiny on an SMD breakout plugged into a breadboard, being programmed

Come Learn About New ATtiny Generations

As the chip shortage hit, a lot of the familiar ATtiny chips have become unavailable and overpriced, and it mostly stayed the same since then. If you ever searched for “ATtiny” on your favourite electronics component retailer website, however, you’d notice that there’s quite a few ATtiny chips in stock most of the time – just that they’re from a much newer generation than we commonly see, with incompatible pinouts, slightly different architecture and longer model numbers like 412 and 3227. [David Johnson-Davies] from [technoblogy] is here to clarify things, and provide a summary of what the new ATtiny generations have to offer.

In 2019, he posted about 0- and 1-series ATtiny chips, comparing them to the ATtiny series we knew, decyphering the part numbering scheme for us, and providing a comparison table. Now, he’s returned to tell us about the 2- series ATtiny chips, merging the comparison tables together so that you can quickly evaluate available parts by their ROM/RAM size and the SMD package used. He also describes which peripherals are available on which series, as well as nuances in peripheral operation between the three generations. In the end, he reminds us of a simple way to program all these new parts – as it stands, you only need a USB-UART adapter and a 4.7K resistor.

Over the last decades, we’ve seen plenty of inspiring ATtiny projects – squeezing out everything we could out of 5 GPIOs, or slightly more for larger-package ATtiny chips. [David] has been setting an example for us, bringing projects like this function generator, this continuity tester, or an IR receiver with an OLED screen for diagnostics – all with an ATtiny85. It’s not the just pin count that’s a constraint, but the RAM and flash amounts as well – nevertheless, people have fit machine learning and an entire graphics stack into these chips before. If you’re stuck at home unable to do anything, like many of us were during lockdowns, you can always breadboard an ATtiny and see just how much you can get done with it.

A Hacker Walks Into A Trade Show: Electronica 2022

Last week, the world’s largest electronics trade fair took place in Munich, so I had to attend. Electronica is so big that it happens only once every two years and fills up 14 airplane hangars. As the fairly generic name suggests, it covers anything and everything having to do with electronics. From the producers of your favorite MLCC capacitors to the firms that deliver them to your doorstep, from suppliers of ASIC test equipment to the little shop that’ll custom wind toroids for you, that’s a pretty wide scope. Walking around, I saw tomorrow’s technology today from the big players, but I also picked up some ideas that would be useful for the home gamer.

When I first walked in, for instance, I ran into the Elantas booth. They’re a company that makes flexible insulation and specialty industrial coatings. But what caught my eye was a thermoformed plastic sheet with circuit traces on it. To manufacture them, they cut out copper foil, glue it to a flat plastic sheet with a glue that has a little give, and then put it all together into a vacuum former. The result is a 3D circuit and organically formed substrate in one shot. Very cool, and none of the tech for doing that is outside of the reach of the determined hacker.

The Cool Stuff

All of the stands, big or small, try to lure you in with some gimmick. The big fish, firms with deep pockets, put up huge signs and open bars, and are staffed by no shortage of salespeople in suits. The little fish, on the other hand, have to resort to showing you the cool stuff that they do, and it’s more often the application engineers sitting there, ready to talk tech. You can guess which I found more interesting.

For instance when I walked up to an obviously DIY popcorn popper that was also showing 5000 FPS footage of kernels in mid-pop, I had to ask. The company in question was a small UK outfit that made custom programmable power supplies and digital acquisition gear that interfaced with it. You could plug in their box to some temperature probes, fire off the high-speed video camera, and control the heating and cooling profile without writing any code. Very sweet. Continue reading “A Hacker Walks Into A Trade Show: Electronica 2022”

Bottoms Up: Soda Can Help With Almost Any Project

If there’s any one thing that the average hacker is short on at a given moment (besides chips), it’s transient small part storage. Just as new projects are built from small parts, diagnostics and teardowns of commercial equipment invariably result in small parts. We think [amenjet] may have the answer — small parts holders made from the bottoms of soda cans.

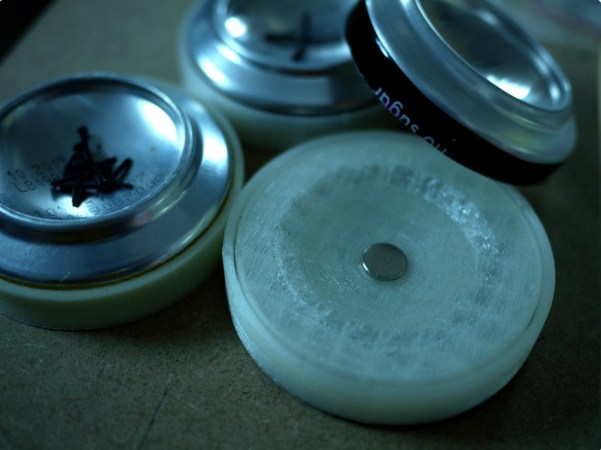
You start by cutting the bottom off of an empty can however you like. In the first video after the break, [amenjet] scores the can on what could be a purpose-built jig before cutting along the line with tin snips, but you could use regular scissors if that’s all you have. Then it’s just a matter of shoving it into the circle around the perimeter of the print to secure the sharp edge.

The underside of the print is graduated and ends with a small hole fit for a disc magnet. To keep the prints from scratching the table, [amenjet] covered the bottoms with crushed velvet. After making about a dozen of these things, they CNC’d a tray to hold three of them, which you can see in the second video. Each cavity in the tray is lined with more crushed velvet for elegance and stability.

Between the concavity of the can bottom and that little lip, it should be particularly easy to actually retrieve a tiny part from the pile and grab on to it. Between the utility and the recycled aspect, this could easily be an entry into the second Challenge of the 2022 Hackaday Prize, which runs now until Sunday, June 12th. This round is all about reusing, recycling, and revamping anything and everything to keep it out of the landfill. Start your entry today!

Continue reading “Bottoms Up: Soda Can Help With Almost Any Project”

RIP John Birkett, Parts Vendor Extraordinaire

It is with sadness that we note the passing of John Birkett, proprietor of the legendary eponymous surplus radio and electronics store on an unassuming street in the British city of Lincoln, at the age of 93. He has been a fantastic source of esoteric parts and electronic assemblies for many decades, and though many of you from beyond where this is being written may never have heard of him the chances are that if you follow electronics enthusiasts from the UK you will have unwittingly seen parts which passed through his hands.

A typical Birkett advert from 1986
Gateway to a world of wonders: a typical Birkett advert from 1986.

There was a time when surplus stores were a relatively common sight, given their window of opportunity by the huge quantity of post-war and Cold War military gear at knock-down prices. My town had one when I was a kid, but though it sold its share of electronic goodies it was more of a place for sturdy olive green outdoor wear or all the 1930s British military uniform items you might ever need. J. Birkett was different, as a purely electronics store the shop rapidly became the go-to place for both the most necessary and the most unexpected of parts.

His motto was “Not a piece of junk in sight”, and though as with much surplus equipment there is plenty of junk to be found it was his eye in managing to stock the junk which was most interesting and useful that made his selection special. Such was its reach that most of his customers including me never made it to Lincoln and the store itself, instead we came to him through his mail-order business and attendance at radio rallies. I fondly remember the anticipation of receiving a Birkett parcel, and I still have plenty of parts that came from him. An FM tuner converted for use as a 2 meter receiver is still in a box somewhere, and I’m pretty certain my storage unit still holds a pair of Pye Cambridge VHF transceivers he supplied.

According to Google the shop remains open, and we hope that state of affairs will continue. Surplus may not be what it once was, but we thank John Birkett for what he gave to generations of British hardware hackers. May he rest in peace.

Header image: Oliver Mills, (CC BY-SA 2.0).

Finding The Right Hack Is Half The Battle

Sometimes you just get lucky. I had a project on my list for a long time, and it was one that I had been putting off for a few months now because I loathed one part of what it entailed — sensitive, high-accuracy analog measurement. And then, out of the blue I stumbled on exactly the right trick, and my problems vanished in thin air. Thanks, Internet of Hackers!

The project in question is a low-vacuum regulator for “bagging” fiberglass layups. What I needed was some way to read a pressure sensor and turn on and off a vacuum pump accordingly. The industry-standard vacuum gauges are neat devices, essentially a tiny little strain gauge on a membrane between the vacuum side and the atmosphere side, in a package the size of a dime. (That it’s a strain gauge is foreshadowing, but I didn’t know that at the time.) I bought one for $15 ages ago, and it sat on my desk, awaiting its analog circuitry.

See, the MPX2100 runs on 12 V and puts out a signal around 40 mV on top of a 6 V offset. That voltage level is inconvenient for modern 3.3 V microcontroller ADCs, and the resolution would get clobbered by the 6 V signal if I just put a voltage divider on it. This meant whipping together some kind of instrument amplifier circuit to null out the 6 V and amplify the 40 mV for the ADC. The circuits I found online all called for 1% resistors in values I didn’t have, and mildly special op-amps. No fun, for me at least. So there it sat.

Picture of sketchy-looking vacuum apparatus.
Cut the blue wire or the red wire? HX711 module and pressure sensor on the left.

Until I ran into this project that machetes through the analog jungle with one part, and it happened to be one I had on hand. A vacuum pressure sensor is a strain gauge, set up like a Wheatstone bridge, just like you would use for weighing something with a load cell. The solution? A load-cell ADC chip, the HX711, found in every cheap scale or online for under a buck. The only other trick was finding a low-voltage pressure sensor to work with it, but that turns out to be easy as well, and I had one delivered in two days.

In all, this project took months of foot-dragging, but only a few clicks and five minutes of soldering once I got the right idea. The industrial applications and manufacturers’ app notes all make sense if you are making hundreds or millions of these devices, where the one-time cost of prototyping up the hard bits gets amortized, but the hacker solution of using a weight-scale chip was just the ticket for a one-off. That just goes to show how useful sharing our tips and tricks can be — you won’t get this from the industry. So send us your success stories, and your useful failures too, and Read More Hackaday!

Should You Be Able To Repair It? We Think So.

You own it, you should be able to fix it. So much equipment on sale today has either been designed to be impossible to maintain, unnecessarily too complex to maintain, maintainable only with specialist tooling only available to authorised service agents, or with no repair parts availability. It’s a hot-button issue in an age when sustainability is a global concern, so legislators and regulators worldwide now finally have it in their sights after years of inaction and it’s become a buzzword. But what exactly is the right to repair, and what do we want it to be?

Is It Designed For Repair?

A Nestle Dolce Gusto machine
For some reason, pod coffee makers are especially resistant to repair. Andy1982, CC BY 3.0

The first question to consider is this: does it matter whether or not you have the right to repair something, if it’s designed specifically with lack of repairability in mind? Consider a typical domestic pod coffeemaker such as a Tassimo or similar: despite being physically quite a simple device, it is designed to be especially complex to dismantle and reassemble. You just can’t get into it when something goes wrong.

Should it be the preserve of regulators to require design for easy repair? We think so. There are other forces working on the designers of home appliances; design-for-manufacture considerations and exterior appearance concerns directly affect the firm’s bottom line, while the end users’ repair experience is often at the bottom of the list, even though the benefit at a national level is obvious. That’s what laws are for.
Continue reading “Should You Be Able To Repair It? We Think So.”

Build A Barebones 68000

The 68000 chip was ubiquitous in the computing world well past its heyday in the 1980s. It was used as the basis for many PCs and video game consoles, and even in embedded microcontrollers. Now, one of its niche applications is learning about the internal functions of computers. 68000 builds are fairly common when building homebrew computers from scratch, but projects like these can be complicated and quickly get out of hand. This 68000 project, on the other hand, gets the job done with the absolute minimum of parts and really dives into the assembly language programming on these chips. (Google Translate from Spanish)

[osbox68] built this computer by first simulating its operation. Once he was satisfied with that, the next step was to actually build the device. Along with the MC68008 it only uses two other TTL chips, a respectable 32 kilobytes of ram, and additionally supports a serial port and an expansion bus. A few 74-series chips round out the build including a 74HC574 used for debugging support. With a custom PCB to tie everything together, it’s one of the most minimal 68000 builds we’ve seen that still includes everything needed to be completely functional.

After all, including the TTL and 74XX chips the entire circuit board only uses 10 integrated circuits and a few other passive elements for a completely functional retro computer. [osbox68] also includes complete schematics for building a PCB based on these chips to make construction that much easier. Of course, emulating an old microcontroller instead of using TTL components can save a lot of real estate on a PCB especially if you’re using something like an FPGA.