Processing For Raspberry Pi

You know Processing? It is the programming language and IDE aimed at the electronic arts, new media art, and visual design communities. [Gottfried Haider] recently got Processing working on the Raspberry Pi and included a hardware input/output library to manipulate the Pi’s I/O pins.

If you want to experiment with Processing, you can download it right on your Pi with the following command:

curl https://processing.org/download/install-arm.sh | sudo sh

You can also download it from the download page. There’s a specific tutorial available or you can watch some general videos on Processing (see below).

Continue reading “Processing For Raspberry Pi”

Laser Cut Your Own Vinyl Records

[Amanda Ghassaei] has created an awesome hack for making your own vinyl records using a laser cutter from an MP3 file. Her excellent hack uses a Processing sketch that converts a digital audio file into a vector graphics file, which is then burned onto vinyl using a laser cutter. We saw a demo of this at the FabLab11 conference, and it’s an impressive hack.

One of the best parts of her write up are the details of how she arrived at the appropriate processing settings to get the record sounding as good as possible, but still be cuttable. It’s an object lesson in how you iterate on a project, trying different approaches and settings until you find the one that works. She also decided to take it a few steps further, cutting records on paper and wood for the ultimate eco-friendly record collection.

Audiophiles should avoid this technique though. Due to limitations in the resolution of the laser cutter, [Amanda] ended up having to reduce the bandwidth of the audio signal to 4.5Khz and use a 5-bit sampling depth. That translates to a rather tinny-sounding record. Vinyl record snobs can breathe easy: this isn’t going to replace their beloved white-hot stampers. For the rest of us, there are always records etched into tortillas.

Continue reading “Laser Cut Your Own Vinyl Records”

Hackaday Links: September 7, 2014

Like Adventure Time? Make your own BMO! It’s a little more expressive than the Adafruit version we saw earlier due to the Nokia LCD. It’s got audio playback too so it can talk to football.

A few years ago, [Matt] made a meat smoker with a PID controller and an SSR. Now the same controller is being used as a sous vide. PID controllers: the most useful kitchen gadget ever.

[Josh] keeps his server in a rack, and lacking a proper cable management solution, this means his rack is a mess. He adapted some Dell wire management arms to his system, using a PCI card bracket to attach the arm to the computer.

[Dr. Dampfpunk] has a lot of glowey things on his Youtube channel

Another [Josh] built a 3D tracking display for an IMU. It takes data off an IMU, sends it over Bluetooth, and displays the orientation of the device on a computer screen. This device also has a microphone and changes the visualization in response to noises.

Remember the pile of failure in a bowl of fraud that is the Scribble pen? Their second crowdfunding campaign was shut down. Don’t worry; they’re still seeking private investment, so there’s still a chance of thousands of people getting swindled. We have to give a shout-out to Tilt, Scribble’s second crowdfunding platform. Tilt has been far more forthcoming with information than Kickstarter ever has with any crowdfunding campaign.

A Webcam Based Posture Sensor

Webcam based posture sensor

Even for hobby projects, iteration is very important. It allows us to improve upon and fine-tune our existing designs making them even better. [Max] wrote in to tell us about his latest posture sensor, this time, built around a webcam.

We covered [Max’s] first posture sensor back in February, which utilized an ultrasonic distance sensor to determine if you had correct posture (or not). Having spent time with this sensor and having received lots of feedback, he decided to scrap the idea of using an ultrasonic distance sensor altogether. It simply had too many issues: issues with mounting the sensor on different chairs, constantly hearing the clicking of the sensor, and more.  After being inspired by a very similar blog post to his original that mounted the sensor on a computer monitor, [Max] was back to work. This time, rather than using an ultrasonic distance sensor, he decided to use a webcam. Armed with Processing and OpenCV, he greatly improved upon the first version of his posture sensor. All of his code is provided on his website, be sure to check it out and give it a whirl!

Iteration leads to many improvements and it is an integral part of both hacking and engineering. What projects have you redesigned or rebuild? Let us know!

Play Peek-A-Boo With Blind Spot

blindspot

You’re at a concert, and a car filled with balloons is in a glass box. As you approach the box, vertical blinds close to block the view directly in front of you. You move left, more blinds close to block your view. The blinds follow your every move, ensuring you can’t get a close up view of the car inside. You’ve just met Blind Spot, an interactive art installation by [Brendan Matkin].

Blind Spot was presented at Breakerhead, an incredible arts and engineering event which takes place every September in Calgary, Canada. Blind Spot consists of a car inside a large wooden box. Windows allow a view into the box, though there are 96 vertical blinds just behind the glass. The vertical blinds are individually controlled by hobby servos. The servos are wired to six serial servo controllers, all of which are controlled by an Arduino.

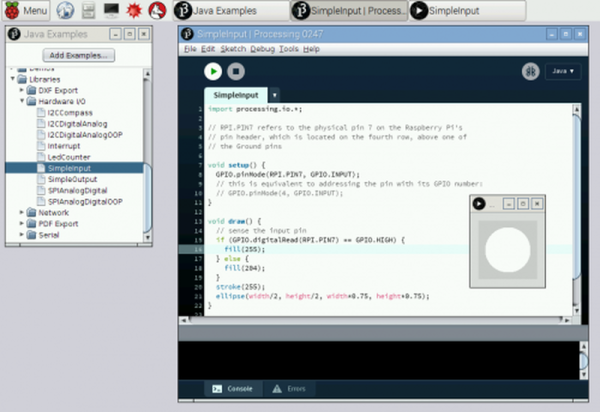
A PC serves as Blind Spot’s brain. For sensors, 6 wide-angle webcams connect to a standard Windows 7 machine. Running 6 webcams is not exactly a standard configuration. To handle this,  [Brendan] switched the webcams to friendly names in the windows registry. The webcam images are read by a Processing sketch. The sketch scans the images and determines which of the 96 blinds to close. The code for Blind Spot is available on github.

Continue reading “Play Peek-A-Boo With Blind Spot”

Computers Playing Flappy Bird. Skynet Imminent. Humans Flapping Arms.

flappy-double

After viral popularity, developer rage quits, and crazy eBay auctions, the world at large is just about done with Flappy Bird. Here at Hackaday, we can’t let it go without showcasing two more hacks. The first is the one that we’ve all been waiting for: a robot that will play the damn game for us. Your eyes don’t deceive you in that title image. The Flappy Bird bot is up to 147 points and going strong. [Shi Xuekun] and [Liu Yang], two hackers from China, have taken full responsibility for this hack. They used OpenCV with a webcam on Ubuntu to determine the position of both the bird and the pipes. Once positions are known, the computer calculates the next move. When it’s time to flap, a signal is sent to an Arduino Mega 2560. The genius of this hack is the actuator. Most servos or motors would have been too slow for this application. [Shi] and [Liu] used the Arduino and a motor driver to activate a hard drive voice coil. The voice coil was fast enough to touch the screen at exactly the right time, but not so powerful as to smash their tablet.

If you would like to make flapping a bit more of a physical affair, [Jérémie] created Flappy Bird with Kinect. He wrote a quick Processing sketch which uses the Microsoft Kinect to look for humans flapping their arms. If flapping is detected, a command is sent to an Android tablet. [Jérémie] initially wanted to use Android Debug Bridge (ADB) to send the touch commands, but found it was too laggy for this sort of hardcore gaming. The workaround is to use a serial connected Arduino as a mouse. The Processing sketch sends a ‘#’ to the Arduino via serial. The Arduino then sends a mouse click to the computer, which is running  hidclient.  Hidclient finally sends Bluetooth mouse clicks to the tablet. Admittedly, this is a bit of a Rube Goldberg approach, but it does add an Arduino to a Flappy Bird hack, which we think is a perfect pairing.

Continue reading “Computers Playing Flappy Bird. Skynet Imminent. Humans Flapping Arms.”

An Android Controlled Arduino Drone

Drone

Who among us has not wanted to create their own drone? [Stefan] wrote in to tell us about a project for high school students, where a Styrofoam glider (translated) is converted into an Android (or PC) controlled drone.

[Stefan] tells us that the inspiration for this project comes from 100 years ago, when “steam-engines were THE thing” and children became introduced to modern technology with toy engines. “Today, mechatronic designs are all around us and this is an attempt to build the equivalent of the toy steam engine.” This project showcases how modern tools make it easy for kids to get involved and excited about hardware hacking, electronics, and software.

At the heart of the glider is an Arduino Pro Mini which communicates with either a computer or an Android phone via Bluetooth. It is especially interesting to note that the student’s used Processing to create the Android app, rather than complicating things by using Eclipse and Android Development Tools (ADT). While the more detailed PDF documentation at the end of the project page is in German, all of the Processingand Arduino code needed to build the project is provided. It would be awesome to see more Bluetooth related projects include a simple Android application; after all, many of us carry computers in our pockets these days, so we might as well put them to good use!

Do you have any well documented projects that introduce young and budding engineers to hardware or software hacking? Let us know in the comment section or send us a tip!