Reverse Engineering A Wireless Protocol

logic

Like all good tinkerers, [Andrew] decided to figure out how his wireless security system worked. Yes, it’s an exercise in reverse engineering, and one of the best we’ve seen to date.

After breaking out the handheld spectrum analyzer and TV tuner SDR, [Andrew] cracked open a few devices and had a gander at the circuit boards. The keypad, PIR sensor, and base station all used a TI radio chip – the CC11xx series – that uses SPI to communicate with a microcontroller.

Attaching a logic analyzer directly to the radio chip and reading the bits directly, [Andrew] started getting some very good, if hard to understand data. From the security system specs, he knew it used a ’20-bit code’, but the packets he was reading off the SPI bus were 48 bits long. The part of this code was probably the system’s address, but how exactly does the system read its sensors?

The easiest way to figure this out was to toggle a few of the sensors and look at the data being transmitted. With a good bit of reasoning, [Andrew] figured out how the alarm system’s code worked. This theory was tested by connecting one of the radios up to an Arduino and having his suspicions confirmed.

While [Andrew]’s adventure in reverse engineering is only a benefit for people with this model of security system, it’s a wonderful insight into how to tear things apart and understand them.

Wireless Microcontroller/PC Interface For $3

uc

Sending data from a microcontroller to a PC usually requires some sort of serial connection, either through fiddly on-chip USB, FTDI chips, or expensive radio ICs. [Scott] didn’t want to deal with this when creating a network of wireless temperature sensors, so he hacked up a few cheap 433 MHz radio transmitters and receivers to transmit data to a PC for about $3.

After sensor data is collected on a microcontroller and sent over radio, there’s still the issue of getting it into a PC. For this, [Scott] piped the data into the microphone port of a cheap USB sound card. We’ve seen this trick before both in the world of microcontrollers and loading programs onto a Commodore 64 via a cassette interface.

Once the data is sent into the sound card, it’s decoded with a a small Python app. Given the range and quality of the RF transmitters and receivers  [Scott] says it’s not an extremely reliable way to send data to a PC. It is cheap, though, and if you need to read sensors wirelessly on a budget, it’s hard to do much better.

Check out [Scott]’s demo of his creation below.

[youtube=http://www.youtube.com/watch?v=GJHFldPwZvM&w=580]

AM Tube Radio Restored And Given MP3 Playback Too

mp3-antique-radio

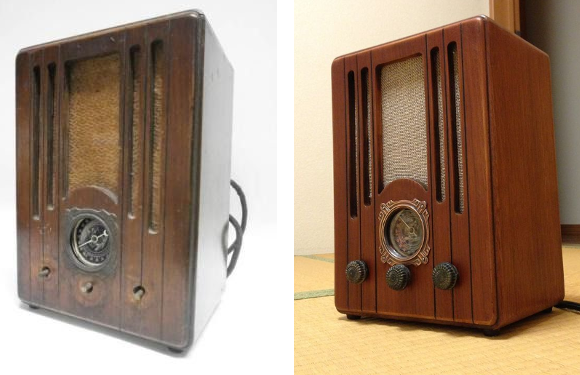
This AM radio looks a bit like it did coming out of the factory. But there are a lot of changes under the hood and that faceplate is a completely new addition. The project really is a restoration with some augmentation and [Michael Ross] did a great job of documenting the project.

The Kenyon radio was built in 1946 and uses vacuum tubes for the amplifier. Considering its age this was in relatively good shape and the first thing that [Michael] set out to do was to get the electronics working again. It involved replacing the messy collection of capacitors inside. He then cleaned up the tubes, checking for any problems, and put the electronics back together to find they work great!

He cleaned up the chassis and gave it a new coat of finish. The original dial plate was missing so he built a wood frame to match a dial scale he ordered. The bell-shaped brass cover hides the light that illuminates the dial.

He could have stopped there but how much do people really listen to AM radio these days? To make sure he would actually use the thing he added an Arduino with an MP3 shield. It patches into the antenna port via a relay, injecting modern tunes into the old amplifier circuit. Catch a glimpse of the final project in the video after the break.

Continue reading “AM Tube Radio Restored And Given MP3 Playback Too”

Console Radio Given New Life With A WiFi Router Retrofit

tube-radio-wifi-router-retrofit

[Craig] did a great job of restoring the case of his antique console radio. But he wanted to bring the guts up to modern standards. The fix ended up being rather easy when it comes to hardware. He based his internet radio retrofit around a wireless router.

We laughed when we heard that he removed about eighty pounds of original electronics from this beast. He then cut a piece of MDF to serve as a mounting platform for the replacement hardware. The WiFi router takes care of audio playback from several sources and offers him the ability to control the stereo from a smart phone or a computer. It has a USB port to which he connected a hub to make room for the USB sound card and a thumb drive which holds his music library. The black box in the upper right is an amp which feeds the NHT stereo speakers housed in the lower half of the cabinet.

It doesn’t make use of the original knobs like the recent tube-amp conversion we looked at. But [Craig] did add some LEDs which illuminate the dial to help keep that stock look.

Tube Radio Husk Gets A Web Radio Transplant

[Dominic Buchstaller] found this German Greatz tube radio at a flea market. It only cost him about €35 and was in a bit more rough condition than the finished product you see above. He also found that a portion of the original circuitry was missing, making it completely non-function. He cleaned up the case to improve the wife-acceptance-factor, and outfitted it with hardware to make it a web radio.

Adding modern speakers was pretty easy as he was already replacing the original cloth bezel which has several holes and tears in it. A set of elements from some Logitech computer speakers served as the organ donors for this step in the process. As he was trying to keep a stock look he came up with a really neat hack to use the original knobs. The station select happens to have a large metal wheel on the inside which is about a centimeter wide. [Dominic] used the optical sensor from a mouse to monitor the turning of the dial by aiming the sensor at this wheel. Internet connectivity was provided by a wireless router he had on hand. This way he can stream music or play from an SD card he also used in the retrofit.

SqueezeBerry: A Raspberri Pi Powered Squeezebox Appliance

squeezeberry

We like the look which [Emmanuel] achieved with his Raspberry Pi based Squeezebox client. It’s got that minimalist slant that makes it seem like a commercial product at first glance. But one more look at the speakers without grates, the character LCD, and the utilitarian buttons, knobs, and switches tips us off that it’s filled with the hardware we know and love.

Since Logitech announced that it was terminating the Squeezebox line we’ve seen several projects which take up the torch. We’ve seen the RPi used as a Squeezebox server and several embedded Linux systems used as clients. This follows in the footsteps of the latter. The RPi is running Raspbian with the squeezelite package handling the bits necessary to talk to his server. The controls on the front include a power switch, rotary encoder and button for navigating the menus, and a potentiometer to adjust the HD44780 LCD screen’s contrast. The speakers are a set of amplified PC speakers that were liberated from their cases and mounted inside of the wooden box that makes up the enclosure. The in-progress shots of that case look pretty rough, but some sanding and painting really pulled everything together. As you would expect, we’ve embedded the demo video after the jump.

Continue reading “SqueezeBerry: A Raspberri Pi Powered Squeezebox Appliance”

Writing New Firmware For A Handheld Radio

HAM

When playing around with a cheap, handheld, dual-band radio, [Lior], a.k.a. [KK6BWA], found a schematic for a similar and even cheaper radio. He realized the programming pads were very accessible and the dev tools for the radio’s microcontroller were available from the manufacturer. After these discoveries, there really was only one thing to do: write new firmware for a $40 radio, and making a great tool for playing around in the 2 meter and 70 cm bands.

The instructions for reflashing the firmware on this radio only require an Arduino and a handful of miscellaneous components. [Lior]’s new firmware for the uv3r radio isn’t quite finished yet, but he plans on adding some really impressive features. Things like a better UI for a four-button radio, a mode for tracking satellites, a digital mode, and a computer-controlled mode are all possible and on [Lior]’s project wishlist.

Getting a $40 radio to do your bidding with an Arduino is cool enough, but [Lior] says this mod for the uv3r can be taken even further: if you’ve got an amateur radio license, it’s possible to use the uv3r to control an Arduino or other microcontroller from miles away. It’s a great hack, right up there with the USB TV tuner/software defined radio thing we saw almost exactly one year ago.

You can check out a demo of some custom software running on the uv3r after the break. The radio listens for a DTMF tone (supplied by the uv3r’s big brother, the uv5r), and plays back a three-digit DTMF tone. There’s also a more through walk through of what [Lior]’s new radio can do as well.

Continue reading “Writing New Firmware For A Handheld Radio”