The Pi 2 Means Faster GPIO

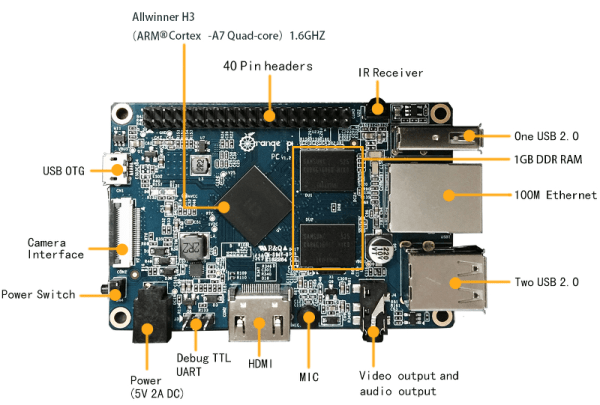
The Raspberry Pi is a great machine to learn the ins and outs of blinking pins, but for doing anything that requires blinking pins fast, you’re better off going with a BeagleBone. This has been the conventional wisdom for years now, and now that the updated Raspberry Pi 2 is out, there’s the expectation that you’ll be able to blink a pin faster. The data are here, and yes, you can.

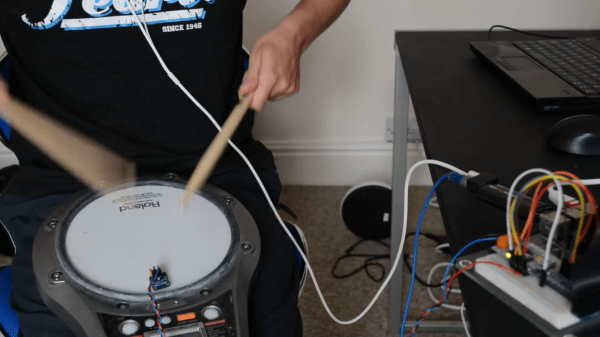
The method of testing was connecting a PicoScope 5444B to a pin on the GPIO pin and toggling between zero and one as fast as possible. The original test wasn’t very encouraging; Python maxed out at around 70 kHz, Ruby was terrible, and only C with the native library was useful for interesting stuff – 22MHz.

Using the same experimental setup, the Raspberry Pi 2 is about 2 to three times faster. The fastest is still the C native library, topping out at just under 42 MHz. Other languages and libraries are much slower, but the RPi.GPIO Python library stukk sees a 2.5x increase.

Hackaday Retro Edition: Remaking The PDP 8/I With A Raspberry Pi

[Oscar] really likes the PDP-8s, with the extremely old school PDP-8/I being his favorite. If you haven’t checked the price on these recently, getting a real PDP-8/I is nigh impossible. However, after assembling a KIM-1 clone kit, an idea struck: what about building a modern PDP-8/I replica that looks like the real thing, but is powered by modern hardware. This would be fairly cheap to build, and has the added bonus of not weighing several hundred pounds.

The PiDP-8 is [Oscar]’s project to replicate the hardware of the 8/I in a modern format. Instead of hundreds of Flip Chips, this PDP-8 is powered by a Raspberry Pi running the SIMH emulator. The 40-pin GPIO connector on the Pi is broken out to 92 LEDs and 26 toggle switches on a large PCB. This setup gets [Oscar] a reasonable facsimile of the PDP-8/I, but he’s also going for looks too. He created an acrylic panel with artwork copied from an original 8/I  that mounts to the PCB and gives the entire project that beautiful late 60s / early 70s brown with harvest gold accent color scheme.

Since this emulated PDP-8/I is running on entirely new hardware, it doesn’t make much sense to haul out disk drives as big as a small child, tape drives, and paper tape readers. Instead, [Oscar] is putting everything on USB sticks. It’s a great solution to the problem of moving around files that are a few kilowords in size.

vt100normal[Oscar] says he’ll be bringing his PiDP to the Vintage Computer Festival East X in Wall, NJ, April 17-19. We’ll be there, and I’ve already offered [Oscar] the use of a VT-100 terminal. If you’re in the area, you should come to this event. It’s guaranteed to be an awesome event and you’re sure to have a great time. Since this is the 50th anniversary of the introduction of the PDP-8, there will be a half-dozen original PDP-8s set up, including a newly refurbished Straight-8 that came out of the RESISTORS.

Oh, if anyone knows how to connect a Pi to a VT100 (technically a 103), leave a note in the comments. Does it need the RTS/CTS?

Resource Monitoring Solution

Electricity, Gas and Water – three resources that are vital in our daily lives. Monitoring them using modern technology helps with conservation, but the real impact comes when we use the available data to reduce wasteful usage over time. [Sébastien] was rather embarrassed when a problem was detected in his boiler only during its annual inspection. Investigations showed that the problem occurred 4 months earlier, resulting in a net loss of more than 450 cubic meters, equivalent to 3750 liters per day (about 25 baths every day!). Being a self professed geek, living in a modern “connected” home, it rankled him to the core. What resulted was S-Energy – an energy resource monitoring solution (translated) that checks on electricity, gas and water consumption using a Raspberry Pi, an Arduino, some other bits of hardware and some smart software.

[Sébastien] wanted a system that would warn of abnormal consumption and encourage his household folks to consume less. His first hurdle was the meters themselves. All three utilities used pretty old technology, and the meters did not have pulse data output that is commonplace in modern metering. He could have replaced the old meters, but that was going to cost him a lot of money. reflective-power-meter-sensorSo he figured out a way to extract data from the existing meters. For the Electricity meter, he thought of using current clamps, but punted that idea considering them to be suited more for instantaneous readings and prone for significant drift when measuring cumulative consumption. Eventually, he hit upon a pretty neat hack. He took a slot type opto coupler, cut it in half, and used it as a retro-reflective sensor that detected the black band on the spinning disk of the old electro-mechanical meter. Each turn of the disk corresponds to 4 Watt-hours. A little computation, and he’s able to deduce Watt-hours and Amps used. The sensor is hooked up to an Arduino Pro-mini which then sends the data via a nRF24L01+ module to the main circuit located inside his house. The electronics are housed in a small enclosure, and the opto-sensor looks just taped to the meter. He has a nice tip on aligning the infra-red opto-sensor – use a camera to check it (a phone camera can work well).

Continue reading “Resource Monitoring Solution”

RaspPi2 Keyboard

RaspPi/Keyboard Project Called Kiiboard, Still Pronounced ‘keyboard’

[b10nik] wrote in to tell us about a pretty sweet project that he just finished up. It’s a mechanical keyboard with an integrated Raspberry Pi 2 Model B inside.

[b10nik] purchased a new Filco Ninja Majestouch-2 keyboard just for this project. Although it may make some people cringe, the keyboard was immediately taken apart in order to find an open cavity for the Raspberry Pi. Luckily there was space available towards the left rear of the keyboard case.

RaspPi2 Keyboard insideIf you are familiar with the Raspberry Pi 2 Model B, you know that all of the connections are not on the same side of the board. The USB, audio, HDMI and Ethernet jacks were removed from the PCB. The Ethernet port is not needed since this hack uses WiFi, but those those other ports were extended and terminated in a custom 3D printed I/O panel . The stock keyboard case had to be cut to fit the new panel which results in a very clean finished look.

There’s one more trick up this keyboard’s sleeve, it can be used with the internal Raspberry Pi or be used as a standard keyboard. This is done by way of a FSUSB30MUX USB switch IC that completely disconnects the Raspberry Pi from the keyboard’s USB output.

For another RaspPi/Keyboard solution, check out this concept from a few years ago using a Cherry G80-3000 mechanical keyboard.


Hacklet 39: The Kerbal Way Of Doing Things

Kerbal Space Program is a space flight simulator based on an extremely stupid race of green space frogs that have decided to dedicate all their resources towards the exploration of space. It is a great game, a better space simulator than just about anything except for Orbiter, and the game is extremely moddable. For this edition of the Hacklet, we’re going to be taking a look at some of the mods for KSP you can find over on hackaday.io.

1271491420181365398Like most hardware builds for Kerbal Space Program, [lawnmowerlatte] is using a few user-made plugins for KAPCOM, a hardware controller and display for KSP. The Telemachus plugin is used to pull data from the game and display that data on a few screens [lawnmower] had sitting around.

There are a few very cool features planned for this build including seven-segment displays, a throttle handle, and neat enclosure.


IMG_20140419_013717[Gabriel] is working on a similar build for KSP. Like the KAPCOM, this one uses the Telemachus plugin, but this one adds three eight-digit, SPI-controlled, seven-segment displays, relegendable buttons, and a Kerbal-insipired frame made out of Meccano.


[Lukas]’ KSP Control Panel is another complicated control system that breaks immersion slightly less than a keyboard. He’s using a Raspberry Pi to talk to the Telemachus server to control every aspect of the craft. From staging to opening up the solar panels, it’s all right there in [Lukas]’ control panel.


You may have noticed a theme with these builds; all of them use the Telemachus plugin for KSP. Even though it’s fairly simple to create plugins for Unity, there really aren’t that many KSP plugins build for these immersive control panels and space flight simulators. Or rather, Telemachus is ‘good enough’. We’d like to see a fully controllable KSP command pod model, just like those guys with 737 flight simulators in their garage. If you have any idea how that could happen, leave a note in the comments.

DIY Oscilloscope With A Scanning Laser

If you’ve ever used an old-school analog oscilloscope (an experience everyone should have!) you probably noticed that the trace is simply drawn by a beam that scans across the CRT at a constant rate, creating a straight line when there’s no signal. The input signal simply affects the y-component of the beam, deflecting it into the shape of your waveform. [Steve] wrote in to let us know about his home-built “oscilloscope” that works a lot like a simple analog oscilloscope, albeit with a laser instead of  a CRT.

[Steve]’s scope is built out of a hodgepodge of parts including Lego, an Erector set, LittleBits, and a Kano Computer (based on a Raspberry Pi). The Pi generates a PWM signal that controls the speed of a LittleBits motor. The motor is hooked up to a spinning mirror that sweeps the laser across some graph paper, creating a straight laser line.

After he got his sweep working, [Steve] took a small speaker and mounted a mirror to its cone. Next he mounted the speaker so the laser’s beam hits the mirror on the speaker, the spinning sweep mirror, and finally the graph paper display. The scope’s input signal (in this case, audio from a phone) is fed into the speaker which deflects the laser beam up and down as it is swept across the paper, forming a nice oscilloscope-like trace.

While [Steve]’s scope might not be incredibly usable in most cases, it’s still a great proof of concept and a good way to learn how old oscilloscopes work. Check out the video after the break to see the laser scope in action.

Continue reading “DIY Oscilloscope With A Scanning Laser”

Convert A Rotary Phone To VOIP Using Raspberry Pi

There’s something so nostalgic about the rotary phone that makes it a fun thing to hack and modernize. [Voidon] put his skills to the test and converted one to VoIP using a Raspberry Pi. He used the RasPi’s GPIO pins to read pulses from the rotary dial – a functional dial is always a welcome feature in rotary phone hacks. An old USB sound card was perfect for the microphone and handset audio.

As with any build, there were unexpected size issues that needed to be worked around. While the RasPi fit inside the case well, there was no room for the USB power jack or an ethernet cable, let alone a USB power bank for portability. The power bank idea was scrapped. [voidon] soldered the power cord to the RasPi before the polyfuse to preserve the surge protection, used a mini-USB wifi dongle, and soldered a new USB connector to the sound card. [Voidon] also couldn’t get the phone’s original ringer to work, so he used the Raspberry Pi’s internal sound card to play ringtones.

The VoIP (SIP) was managed by some Python scripting, available at GitHub. [voidon] has some experience in using Asterisk at his day job, so it will be interesting to see if he incorporates it in the future.

[via Reddit]