Bike Stand

Dirt Cheap Plywood Bike Holder

Commuting to work on a bicycle saves tons of dough, but sometimes storing your bike isn’t that easy. [Lewis] has been playing around with a few prototype bike stands and seems to have found the ticket, and it’s way cheaper –maybe even free, if you have the supplies. All you need is a single strip of plywood, and some wood screws, or wood glue! Well, that and a woodworking clamp.

The stand is designed to clamp onto 4×4 posts, or even a 2×4 stud. It’s great for storing bikes along your fence! It’s built purposefully snug, which allows you to add a small clamping force to make for a very rigid stand, suitable for even old steel-framed clunkers. Hooray for friction! Oh and if you’re happy with the location you could always get rid of the clamp and screw it in place instead.

Simple? Yup. Effective? Totally.

Oh and if it’s still crummy old winter where you live, why not beat the cold weather blues with an indoor bicycle roller?

DIY Turntable In A Beautiful Wooden Case

Old timers who have been around for the last 40 years or so have been fortunate enough to have lived through several audio reproduction technologies – Vinyl Records, Cassette Tapes, Laser Disks and CD-ROM’s. Most will also swear that analog, especially vinyl records, sounded the best. And when it comes to amplifiers, nothing comes close to the richness of vacuum tubes.

[MCumic10] had a long time desire to build his own HiFi turntable encased in a nice wooden housing, with the electronics embedded inside. When he chanced upon an old and battered turntable whose mechanism barely worked, he decided to plunge right in to his pet project. The result, at the end of many long months of painstaking work, is a stunning, beautiful, wooden turntable. Especially since in his own words, “I didn’t have any experience in electronics or woodworking before I started this project so it took me many long months in learning analyzing and frustration. I burned some electronic parts few times and made them from the beginning.”

The build is a mix of some off the shelf modules that he bought off eBay and other sources, and some other modules that he built himself. He’s divided the build in to several bite sized chunks to make it easy to follow. The interesting parts are the 6N3 Valve Preamplifier (the main amplifier is solid-state), the motorized Remote Volume Control Input kit, and the Nixie tube channel indicator. And of course the layered, plywood casing. By his own reckoning, this was the toughest and longest part of his build, requiring a fairly large amount of elbow grease to get it finished. He hasn’t yet measured how much it tips the scales, but it sure looks very heavy. The end result is quite nice, especially for someone who didn’t have much experience building such stuff.

Thanks [irish] for sending in this tip.

3D Printer Plays Music

3D Printer Plays Classic MIDIs

For whatever reason we all seem to have this obsession with making things other than speakers into speakers. Hard drives, floppy drives, CD drives, fax machines, inanimate objects, dot-matrix printers, and now — well let’s stay with times — a 3D printer!

[Andrew Sink] wanted to give stepper music a try (is that seriously a genre now? (Yes, we’re calling it Stepstep – Ed.)), so he found HomeConstructor.de, which happens to have an awesome MIDI to G-CODE converter specifically designed for making those steppers hum. His instrument of choice is an original Printrbot but unfortunately it did require a few hours of tweaking the G-Code to get it to work just right.

Feast your ears on this beautiful rendition of the Jurassic Park Theme song below.

Continue reading “3D Printer Plays Classic MIDIs”

Execution Tracing On Cortex-M3 Microcontrollers

The higher-power ARM micros have a bunch of debugging tools for program and data tracing, as you would expect. This feature – CoreSight Trace Macrocells – is also found in the lowly ARM Cortex M3 microcontroller. The Cortex M3 is finding its way into a lot of projects, and [Petteri] wondered why these debugging tools weren’t seen often enough. Was it a question of a lack of tools, or a lack of documentation? It doesn’t really matter now, as he figured out how to do it with a cheap logic analyzer and some decoders for the trace signals.

There are two trace blocks in most of the Cortex M3 chips: the ITM and ETM. The Instrumentation Trace Macrocell is the higher level of the two, tracing watchpoints, and interrupts. The Embedded Trace Macrocell shows every single instruction executed in the CPU.  Both of these can be read with a cheap FX2-based logic analyzer that can be found through the usual outlets for about $10. The problem then becomes software, for which [Petteri] wrote a few decoders.

To demonstrate the debugging capability, [Petteri] tracked down a bug in his CNC controller of choice, the Smoothieboard. Every once in a great while, the machine would miss a step. With the help of the trace tool and by underclocking the micro, [Petteri] found the bug in the form of a rounding error of the extruder. Now that he knows what the bug is, he can figure out a way to fix it. He hasn’t figured that out yet. Still, knowing what to fix is invaluable and something that couldn’t be found with the normal set of tools.

Logic Noise: Sawing Away With Analog Waveforms

Today we’ll take a journey into less noisy noise, and leave behind the comfortable digital world that we’ve been living in. The payoff? Smoother sounds, because today we start our trip into analog.

If you remember back to our first session when I was explaining how the basic oscillator loads and unloads a capacitor, triggering the output high or low when it crosses two different thresholds. At the time, we pointed out that there was a triangle waveform being generated, but that you’d have a hard time amplifying it without buffering. Today we buffer, and get that triangle wave out to our amplifiers.

triangle_square

But as long as we’re amplifying, we might as well overdrive the amps and head off to the land of distortion. We’ll do just that and build up a triangle-wave oscillator that can morph into a square wave, passing through a rounded-over kinda square wave along the way. The triangle sounds nice and mellow, and the square wave sounds bright and noisy. (You should be used to them by now…) And we get everything in between.

And while we’re at it, we might as well turn the triangle wave into a sawtooth for that nice buzzy-bass sound. Then we can turn the fat sawtooth into a much brighter sounding pulse wave, a near cousin of the square wave above.

What’s making all this work for us? Some dead-boring amplification with negative feedback, and the (mis-)use of a logic chip to get it. After the break I’ll introduce our Chip of the Day: the 4069UB.

If you somehow missed them, here are the first three installments of Logic Noise:

Continue reading “Logic Noise: Sawing Away With Analog Waveforms”

microwave reactor

Ask Hackaday: The Many Uses Of Microwaves

When most think of a microwave, they think of that little magic box that you can heat food in really fast. An entire industry of frozen foods has sprung up from the invention of the household microwave oven, and it would be difficult to find a household without one. You might be surprised that microwave ovens, or reactors to be more accurate, can also be found in chemistry labs and industrial complexes throughout the world. They are used in organic synthesis – many equipped with devices to monitor the pressure and temperature while heating. Most people probably don’t know that most food production facilities use microwave-based moisture solids analyzers. And there’s even an industry that uses microwaves with acids to dissolve or digest samples quickly. In this article, we’re going to look beyond the typical magnetron / HV power supply / electronics and instead focus on some other peculiarities of microwave reactors than you might not know.

Single vs Multimode

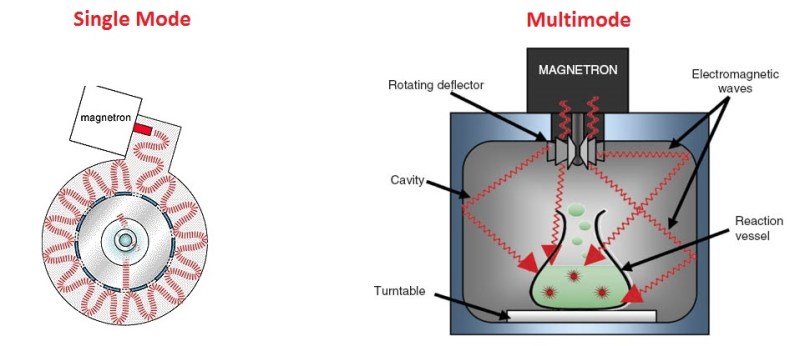
The typical microwave oven in the millions of households across the world is known as multimode type. In these, the microwaves will take on typical wavelike behavior like we learned about in physics 101. They will develop constructive and destructive interference patterns, causing ‘hot spots’ in the cavity. A reader tipped us off to this example, where [Lenore] uses a popular Indian snack food to observe radiation distribution in a multimode microwave cavity. Because of this, you need some type of turntable to move the food around the cavity to help even out the cooking. You can avoid the use of a turn table with what is known as a mode stirrer. This is basically a metal ‘fan’ that helps to spread the microwaves throughout the cavity. They can often be found in industrial microwaves. Next time you’re in the 7-11, take a look in the top of the cavity, and you will likely see one.

Multimode microwaves also require an isolator to protect the magnetron from reflected energy. These work like a diode, and do not let any microwaves bounce back and hit the magnetron. It absorbs the reflected energy and turns it into heat. It’s important to note that all microwave energy must be absorbed in a multimode cavity. What is not absorbed by the food will be absorbed by the isolator. Eventually, all isolators will fail from the heat stress. Think about that next time you’re nuking a small amount of food with a thousand watts!

Single Mode microwaves are what you will find in chemistry and research labs. In these, the cavity is tuned to the frequency of the magnetron – 2.45GHz. This allows for a uniform microwave field. There is no interference, and therefore no hot or cold spots. The microwave field is completely homogenous. Because of this, there is no reflected energy, and no need for an isolator. These traits allow single mode microwaves to be much smaller than multimode, and usually of a much lower power as there is a 100% transfer of energy into the sample.  While most multimode microwaves are 1000+ watts, the typical single mode will be around 300 watts.

single vs multimode cavity

Power Measurement

Most microwave ovens only produce one power level. Power is measured and delivered by the amount of time the magnetron stays on. So if you were running something at 50% power for 1 minute, the magnetron would be on for a total of 30 seconds. You can measure the output power of any microwave by heating 1 liter of water at 100% power for 2 minutes. Multiply the difference in temperature by 35, and that is your power in watts.

There are other types of microwaves that control power by adjusting the current through the magnetron. This type of control is often utilized by moisture solids analyzers, where are more precise control is needed to keep samples from burning.

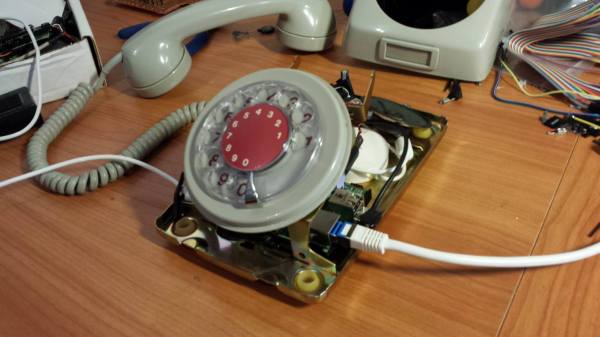
Have you used a microwave and an arduino for something other than cooking food? Let us know in the comments!

Thanks to [konnigito] for the tip!

Convert A Rotary Phone To VOIP Using Raspberry Pi

There’s something so nostalgic about the rotary phone that makes it a fun thing to hack and modernize. [Voidon] put his skills to the test and converted one to VoIP using a Raspberry Pi. He used the RasPi’s GPIO pins to read pulses from the rotary dial – a functional dial is always a welcome feature in rotary phone hacks. An old USB sound card was perfect for the microphone and handset audio.

As with any build, there were unexpected size issues that needed to be worked around. While the RasPi fit inside the case well, there was no room for the USB power jack or an ethernet cable, let alone a USB power bank for portability. The power bank idea was scrapped. [voidon] soldered the power cord to the RasPi before the polyfuse to preserve the surge protection, used a mini-USB wifi dongle, and soldered a new USB connector to the sound card. [Voidon] also couldn’t get the phone’s original ringer to work, so he used the Raspberry Pi’s internal sound card to play ringtones.

The VoIP (SIP) was managed by some Python scripting, available at GitHub. [voidon] has some experience in using Asterisk at his day job, so it will be interesting to see if he incorporates it in the future.

[via Reddit]