The Nintendo 64 is certainly a classic video game system, with amazing titles like Mario Kart 64 and Super Smash Bros that are still being played across the world today. But, like finding new parts for a classic car, finding an original controller that doesn’t have a sad, wobbly, worn-out joystick is getting to be quite the task. A common solution to this problem is to replace the joystick with one from a Gamecube controller, but the kits to do this are about $20USD, and if that’s too expensive then [Frenetic Rapport] has instructions for doing this hack for about $2.
The first iteration of using a Gamecube stick on an N64 controller was a little haphazard. The sensitivity was off and the timing wasn’t exactly right (very important for Smash Bros.) but the first kit solved these problems. This was the $20 kit that basically had a newer PCB/microcontroller that handled the Gamecube hardware better. The improvement which drove the costs down to $2 involves modifying the original PCB directly rather than replacing it.
While this solution does decrease the cost, it sacrifices the new potentiometer and some of the easier-to-work-with jumpers, but what was also driving this project (in addition to cost) was the fact that the new PCBs were becoming harder to get. It essentially became more feasible to simply modify the existing hardware than to try to source one of the new parts.
Either way you want to go, it’s now very easy to pwn your friends in Smash with a superior controller, rather than using a borked N64 controller you’ve had for 15 years. It’s also great to see hacks like this that come together through necessity and really get into the meat of the hardware. Perhaps we’ll see this controller ported to work with other versions of Super Smash Bros, too!
[robin] has a Red Camera (lucky!), an absurdly expensive digital video camera. As you would expect the batteries are also absurdly expensive. What’s the solution? Battery packs from cordless drills.
Cordless drills are interesting pieces of tech that can be easily repurposed; there are huge battery packs in them, big, beefy motors, and enough hardware to build an Automatic Cat Feeder or a motorized bicycle.
What if those old Makita batteries don’t charge? That usually means only one or two cells are dead, not the whole pack. Free LiIon cells, but you need to charge them. Here’s a single cell charger/boost converter that will do the trick.
A problem faced by amateur radio operators around the world is the lack of commercial power. Plugging a portable shack into a wall will work, but for uninterrupted power car batteries are everywhere. How do you combine wall power and car batteries for the best of both worlds? With an In-line battery backup module.
All of the projects above rely on charging a battery through wall power, and sometimes even that is impossible. Solar is where we’re headed, with solar LiPo chargers, and solar LiFe chargers. That’s more than enough to keep a smartphone charged, but if you want to go completely off the grid, you’re going to need something bigger.
[Michel] has been off the power grid 80% of the time since he installed his home PV system a few years ago. How’s he doing it? A literal ton of batteries, huge chargers, and a 5kW inverter.
The Midwest RepRap Festival is over – forever. This was the last one. Apparently enough people complained that Goshen, Indiana wasn’t in the midwest. The number of Dairy Queens I passed contradicts this, but whatever. Next year, there’s going to be a different con in Goshen. Same content, different name. If you have a suggestion, you know where to put it.
The Groot fail
What the infill looks like on the PartDaddy
Contaminated with masterbatch
The world’s largest 3D printed trash can. People were taking pictures of them standing next to it.
I promised the world’s largest 3D printed trash can, and I gave you the world’s largest 3D printed trash can. This gigantic orange vase was printed on the PartDaddy, SeeMeCNC’s 18-foot tall delta printer a few months ago at the NYC Maker Faire. I have been using this as a trash can in my basement since then, making me one of the only people who have their trash can on Wikipedia.
A failed print on Saturday morning
Speaking of the PartDaddy, this is what a fail looks like. The first PartDaddy print was a Groot, a 13-hour long print job. It was left running overnight, but it ran out of PLA pellets sometime around 4 in the morning. If you’re wondering what the black band is around the Groot’s face is, here’s the breakdown:
The PartDaddy sucks PLA pellets up from a trash can (that’s not 3D printed), and dispenses it into a hopper above the print head. This hopper was 3D printed on the PartDaddy, and there is still a little bit of colarant dust in there. When the PLA pellets run out, that dust is embedded in the extrusion. When you realize that masterbatch is only about 5% of the finished plastic, it doesn’t take much black dust to discolor a print.
Yes, this is a print fail that could have been fixed by having an all-night bash. A few other people left their printers running overnight including [The Great Fredini] and his Scan-A-Rama. This was a Rostock Max that had something wonky happen with the Bowden. There was filament everywhere.
How about some Star Wars droids? An R2 from the Droid Builder’s Club was there, but there was also the beginnings of a completely 3D printed Roger. While we’re on the subject of plastic robots that will fall apart at a moment’s notice, there was a K’NEX 3D printer. Yes, it’s made almost entirely out of K’NEX, and it did work at one time. Those orange parts sitting next to it? Those came out of the K’NEX printer. If you’re looking for the definitive RepStrap, there ‘ya go.
Roger Roger, or a B1 Battle Droid
K’NEX Printer
Lincoln death mask in bronzefill. Patinaed with vinegar.
NEW FILAMENTS
For the last few months, metal filaments – PLA with tiny particles of copper, brass, bronze, iron, or aluminum have been available. MRRF was the first place where you could see them all together. A few things of note: these filaments are heavy – the printed objects actually feel like they’re made out of metal. They’re actually metal, too: the iron-based filaments had a tiny bit of red corrosion, and the Lincoln death mask above was treated with acetic acid. These filaments are also expensive, around $100 for 1kg. Still, if you want to print something that will be around in 100 years, this is what you should get.
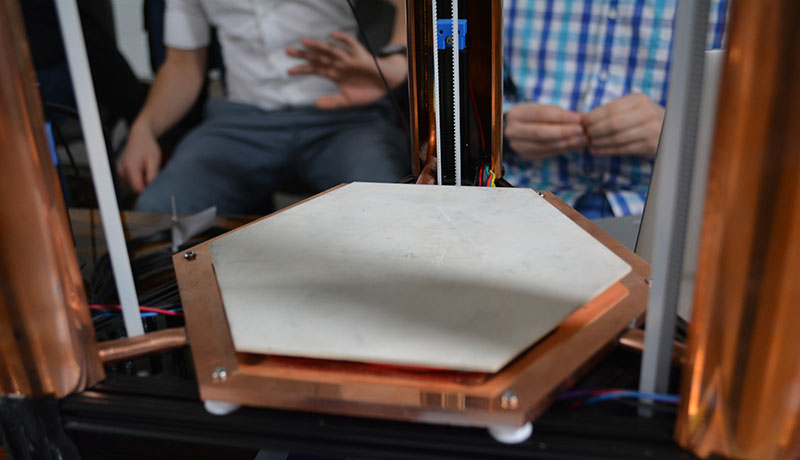
The most beautiful printer ever
MRRF should have had a contest for the best looking 3D printer at the show. A beautiful delta from Detroit Rock City would have won:
That white hexagon in the center is a ceramic PCB that I’m told cost an ungodly amount of money. Underneath the ceramic build plate, there’s a few Peltiers between the bed and the large copper heat sink. The heat sink is connected to the three risers by heat pipes, making the entire printer one gigantic heat sink. Why would anyone make such an amazing art deco printer? For this.
Because you can use Peltiers to heat and cool a bed, a little bit of GCode at the end of a print will cool the bed to below room temperature. If you do your design right, this means the print will just fall over when it’s done. When the print bed is cooling, you can actually hear the bond between the bed and print cracking. It’s beautiful, it’s cool, and I’m told this printer will make its way to hackaday.io soon.
There you go, the best and coolest from the last Midwest RepRap Festival ever. There will never be another one. It only needs a better name, and [John] at SeeMeCNC is great at coming up with names. Just ask what VIP is a backronym of.
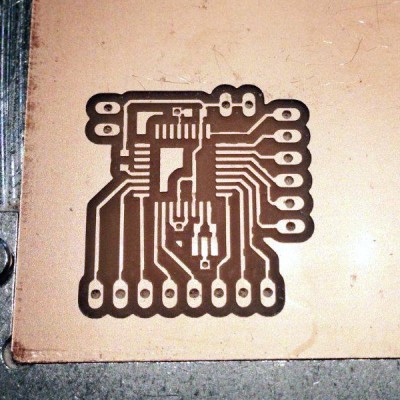
We’ve been on the lookout for alternatives to chemically etching circuit boards for years. The problem has been that we don’t particularly want to devote months of or lives learning how to build precision CNC mills. Off in the distance there may be an answer for that quandary if you don’t mind parting with twenty-two Benjamins. Sure, it’s a heck of a lot more expensive than toner transfer and cupric chloride, but the Othermill can be purchased right now (in your hands a few months later) and after reading this in-depth review we are a bit less hesitant about opening our wallets for it.
It’s a tome of a review, but that means there’s something for everybody. We especially enjoyed seeing the 10 mil board shown here which took about 1-hour to mill. Considering it has also been through-hole drilled we’d put that on part with the time it takes to etch a board. There are obvious places where the traces are not perfectly smooth (not sure if that’s burring or over-milling) but they are not broken and the board’s ready to be populated.
Alignment is something of an issue, but the Othermill isn’t limited to PCBs so we’d recommend designing and milling your own alignment bracket system as an early project.
Who isn’t envious of custom-builds that can get down to 10-mils, like this beauty from 2013. Our hopes had been sparked when Carbide 3D came onto the scene. We’re still optimistic that they will make a big splash when they start shipping preorders in a few months.
As this review proves, Othermill is already out in the wild with a 6-8 week wait before shipping. We saw it in action milling multiple materials at the Hackaday Omnibus Lauch Party and were duly impressed. Price or waiting-period aside we’re going to hold off until the software options expand beyond Mac-only (UPDATE: Othermill software support for Windows was added in early 2016); either Othermill will add support or someone will come up with a hack to use traditional CNC software. But if you count yourself as a subscriber to the cult of Apple the software, called Otherplan, does get a favorable prognosis along with the hardware.
Already have an Othermill sitting on your bench? Let us know your what you think about it in the comments below.
Bonus content: [Mike Estee], CTO of Othermill just gave a talk last night about how he got into making mills and the challenges of building something with super-high-precision. Sound isn’t good but the talk is solid. Hackaday’s [Joshua Vasquez] also gives a talk on the video about building an SPI core for FPGA. These talks are one of the Hardware Developer’s Didactic Galactic series which you really should check out if you’re ever in the San Francisco area.
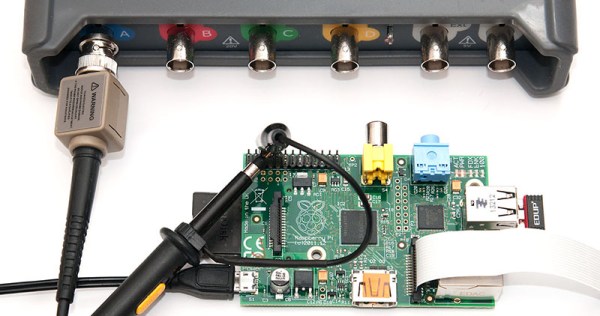
The Raspberry Pi is a great machine to learn the ins and outs of blinking pins, but for doing anything that requires blinking pins fast, you’re better off going with a BeagleBone. This has been the conventional wisdom for years now, and now that the updated Raspberry Pi 2 is out, there’s the expectation that you’ll be able to blink a pin faster. The data are here, and yes, you can.
The method of testing was connecting a PicoScope 5444B to a pin on the GPIO pin and toggling between zero and one as fast as possible. The original test wasn’t very encouraging; Python maxed out at around 70 kHz, Ruby was terrible, and only C with the native library was useful for interesting stuff – 22MHz.
Using the same experimental setup, the Raspberry Pi 2 is about 2 to three times faster. The fastest is still the C native library, topping out at just under 42 MHz. Other languages and libraries are much slower, but the RPi.GPIO Python library stukk sees a 2.5x increase.
Few things have managed to capture the imagination of hackers and engineers around the world the way Synthetic Biology did over the last couple of years. The promise of “applying engineering principles to designing new biological devices and systems” just seemed way too sci-fi to missed out on, and everyone jumped on the bandwagon. All of a sudden, the field which used to be restricted to traditional research organizations and startups found itself crowded with all sorts of enthusiasts, biohackers, and weirdos alike. Competitions such as the International Genetically Engineered Machine (iGEM) paved the way, and the emergence of community spaces like GenSpace and BioCurious finally made DNA experimentation accessible to anyone who dares to try. As it often happens, the Sci-Fi itself did not go untouched, and a whole new genre called “Biopunk” emerged, further fueling people’s imagination and extrapolating worlds to come.
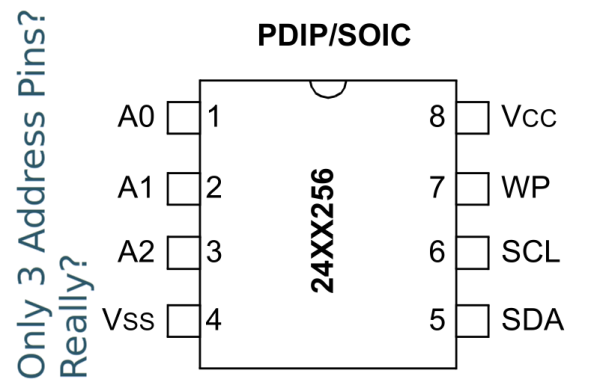
I2C has a seven-bit address space, and you’re thinking “when do I ever need more than 127 devices on a pair of wires?” So you order up some parts only to find that they have one, two, or three user-configurable address pins for any given device type. And you need a bunch more than four or eight capacitive sensor buttons on your project. What do you do?
If you’re reader [Marv G], you think outside the box and realize that you can change the addresses on the fly by toggling address pins high and low with your microcontroller. That is, you can use a single I2C address pin for each device as a chip select signal just like you would have with SPI.
That’s it, really. [Marv G] goes through all of the other possible options in his writeup, and they’re all unsavory: multiple I2C busses, a multiplexer, buying different sensors, or changing micros. None of these are as straightforward as just running some more wires and toggling these with your micro.
We’d even go so far as to suggest that you could fan these chip select lines out with a shift register or one of those 1-of-N decoder chips, depending on how many I2C devices you need to chip-selectify. (We’re thinking 74HC595 or 74HC154.)
At the end of his post, [Marv G] asks if anyone else has thought of this chip select trick before. We hadn’t. Here’s your chance to play the smart-ass in the comments.

 [robin] has a Red Camera (lucky!), an absurdly expensive digital video camera. As you would expect the batteries are also absurdly expensive. What’s the solution?
 All of the projects above rely on charging a battery through wall power, and sometimes even that is impossible. Solar is where we’re headed,


 That white hexagon in the center is a ceramic PCB that I’m told cost an ungodly amount of money. Underneath the ceramic build plate, there’s a few Peltiers between the bed and the large copper heat sink. The heat sink is connected to the three risers by heat pipes, making the entire printer one gigantic heat sink. Why would anyone make such an amazing art deco printer?
 It’s a tome of a review, but that means there’s something for everybody. We especially enjoyed seeing the 10 mil board shown here which took about 1-hour to mill. Considering it has also been through-hole drilled we’d put that on part with the time it takes to etch a board. There are obvious places where the traces are not perfectly smooth (not sure if that’s burring or over-milling) but they are not broken and the board’s ready to be populated.