Once again my inbox runneth over with press releases, Kickstarter announcements, unsolicited emails, and a bunch of product announcements. Most of these, of course, are never to be seen again. Once in a great while – statistically insignificant, really – there’s a product announcement that’s just interesting enough to take a closer look at. This time, it’s a really, really wide screen.
LCDs are curious beasts when it comes to display interfaces. Back in the bad old days of gigantic tube TVs, the aspect ratio of these displays was fairly limited. You could get a 4:3 display, and with the rare exception of o-scopes, vector displays, and other weird devices, that was it. Since then we’ve moved to LCDs, a promising technology if you want a display in the shape of a car dashboard, or as a thin strip to put on some rackmount modules. It took this long for a sliver of an LCD to appear.
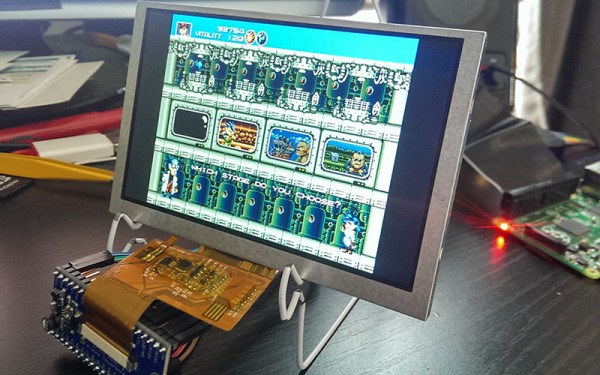
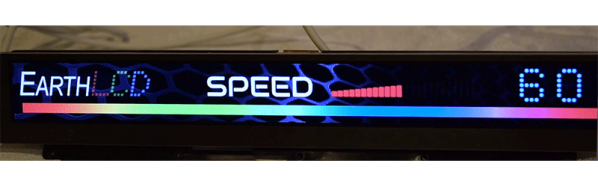
This display produced by EarthLCD is a 10.4 inch display, about ten inches wide and one inch tall. The resolution is 1024 by 100. It is, by far, the skinniest LCD ever produced. The closest you’re going to get to a display with this kind of aspect ratio are old character LCDs, and even then you’re not going to address individual pixels.
If you’re struggling to figure out what this would be used for, this product makes it somewhat obvious. It’s a 1U rack with a beautiful 1024×100 display embedded in the front. You’ve never seen a server that cool.
Interestingly, the 1U display is driven by a single Raspberry Pi, and looking at the datasheet for the display (PDF) tells you pretty much everything. The display is driven by a regular old parallel interface, with six bits of color for R, G, and B. That means it can be driven with a Raspberry Pi without an adapter board, a BeagleBone, or even smaller ARM micros with the obvious reduction in color depth.
While the display isn’t a game changer or something that will knock your socks off, it is, interesting and something that could find its way into some interesting projects. If you have any idea what those projects would be, drop a note in the comments.
Continue reading “New Part Day: Really, Really Wide Screens”