Using Arduino Shields With The Raspi

With hundreds of Arduino shields available for any imaginable application, it’s a shame they can’t be used with the Raspberry Pi. Breaking out the Raspi GPIO pins to Arduino-compatible headers would allow makers and tinkerers to reuse their shields with a far more capable computing platform.

The folks over at Cooking Hacks realized a Raspi to Arduino shield bridge would be an awesome device, so they made their own, complete with a software library that allows you to port your Arduino code directly to the Raspberry Pi.

There are a few limitations with the Raspberry Pi’s GPIO headers; the Raspi doesn’t have analog inputs, so the Cooking Hacks team added an 8-channel ADC. Along with analog inputs and the headers required to pop a shield on the board, there’s also a socket for an XBee module.

The software library contains most of the general Arduino functions such as digitalWrite() and digitalRead(). There Serial, Wire, and SPI libraries are also implemented, allowing any device that communicates through UART, I2C, or SPI to talk directly to the Raspberry Pi.

While the Raspi Arduino bridge doesn’t allow for PWM in the same capacity as an Arduino, you’re always welcome to whip up a servo or LED shield for this neat little adapter.

Web IDE For The Raspi

For this month’s release of Adafruit’s Raspberry Pi Linux distribution, [Limor], et al. decided to build a web-based IDE for the Raspberry Pi.

The Raspberry Pi WebIDE is a web server that runs on the Raspi. By connecting to your raspi in a web browser, you’re able to create your own Python programs that are able to interact with the GPIO pins. All the code is stored in the cloud with the help of bitbucket.

The WebIDE is in its early Alpha stage right now; there are a few bugs and minor issues, but in the video after the break, [Limor] shows us it’s possible to push code to a Raspi through the Internet and view the result in a web-based serial terminal.

For fear of editorializing, we have to point out that Adafruit’s web IDE – along with other Arduino web IDEs such as Codebender and the Wifino – work on the cloud. If you’re planning a long-term project that relies on a web-based IDE, you might be in for a world of hurt if only because you can’t host a cloud on a personal server. We’d love to see a package that allows us to have the same functionality as bitbucket on a personal server. If you can find a project that does something similar, or have written your own, send it in and we’ll spread the word.

Continue reading “Web IDE For The Raspi”

Wearable Raspberry Pi Turns You Into The Borg

The Hoboken hackerspace, MakerBar, recently hosted a very special guest – [Rob Bishop] from the Raspberry Pi Foundation. Wanting to impress [Rob], [Zach] and a few others from MakerBar put together a wearable computer based on the Raspberry Pi in just a few hours.

Putting a Raspi, small Bluetooth keyboard and mouse combo, and a USB charger equipped with lithium-ion battery wasn’t that hard. The tricky part was finding a wearable display. Luckily, [Zach] had a pair of MyVu Crystal video glasses lying around and after a tricky bit of dissassembly, the folks at MakerBar had a completely wearable computer.

Apart from the RCA cable connecting the Raspi to the glasses, the project is completely wireless; with a small webcam also mounted to the display, the Pi in the Face could easily be a platform for figuring out what to do with Google Glass.

[Zach] said the entire setup could be reconstructed for about $100, a fair price for being turned in to [Locutus] of Borg

Hackaday Links: September 21, 2012

And then Obi-wan said, “you were supposed to be the chosen one!”

Yesterday, a little bird told us Makerbot will be moving to a closed source model for their newest printer. This was confirmed, and now [Zach Smith] a.k.a. [Hoeken] – creator of the RepRap Research Foundation and co-founder of Makerboth Industries is weighing in with his take on the situation.

Hey! Free stuff!

Remember that DIP28 ARM chip with BASIC? Remember how I told you Coridium will be giving a few hundred away as samples? Yeah, that’s happening now.

Replacing a scroll wheel with titanium

[Rhett] has been using a Logitech mouse for a few years now. Recently the scroll wheel became corroded, so [Rhett] replaced it with a titanium version. The perfect match for the trusty battle axe, theIBM Model M keyboard.

Web-based IDE for the Raspi

[Phil Torrone] sent in a video of something he and [ladyada] are working on. It’s a web-based IDE for the Raspberry Pi. We’ll do a full review of this when it’s released.

Intro to software defined radio

So you have one of those TV tuner dongles and want to get in to software defined radio. Where do you start? [Al Williams] over at Dr. Dobbs has a great introduction to SDR, and gives a few pointers that should help you get that cool looking waterfall plot very quickly. Thanks for sending this in, [Chris].

A Truly Professional Raspi Analog Input

Much to the chagrin of hardware tinkerers, the Raspberry Pi doesn’t have analog inputs on its GPIO pins. Sure, you can blink a LED with just a few console commands, but reading sensors with a bone-stock Raspi requires a little additional hardware. [Brian Dorey] just released a board that allows for 8 analog inputs on the Raspberry Pi with a 16-bit resolution that is much higher than any Arduino-based build.

[Brian]’s build is based on an earlier, similar iteration of a Raspi analog board we saw last July. Like the previous version, the new professionally made PCBs use a pair of Microchip MCP3428 analog to digital converter. These ADCs are able to sample four channels at a resolution of 16 bits; a vast improvement over the 8-bit ADCs included on every Arduino.

The boards communicate with the Raspberry Pi over an I2C serial bus using a neat stackable header. In theory, it should be possible to use several of these boards and measure dozens of analog channels, but we’ll leave a demonstration of that up to [Brian].

Raspy Juice Gives You Serial Ports And Servo Control

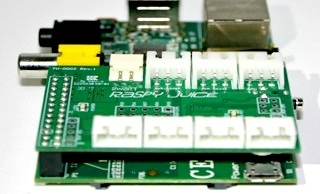
Up next on the continual march of expansion boards for the Raspberry Pi is the Raspy Juice, a board designed to break out the GPIO pins on the Raspberry Pi into servo, serial, and other miscellaneous connections.

The Raspy Juice features an ATMega168A microcontroller connected to the Raspberry Pi as an I2C slave device. Not only does the addition of a microcontroller add analog inputs to the Raspberry Pi, but also RS232 and RS485 serial connections, a real-time clock, and four JST plugs for hobby servos.

Because the Raspberry Pi can be powered from the GPIO header, the creator, [NTT] added a buck regulator so batteries or solar cells can be used to power the Raspberry Pi.

The Raspberry Pi is a terribly awesome robotics platform, but sadly limited by its capability to drive motors and servos natively. The Raspy Juice adds some much-needed capability to the Raspberry Pi, and we can’t wait to see a robot take its first steps with this expansion board.

Getting Around The Raspi’s USB Host Current Limit

For being such a revolutionary device, there are still a few problems with the Raspberry Pi. For one, the USB host ports are only able to source 140 mA per port, while the USB ports on your desktop, laptop, and even tablet are able to send a full 500 mA per port.

The official ‘fix’ for this problem is to use a powered USB port for any device that requires more than 140 mA,  something that didn’t sit well with [Manis]. He came up with an easy fix , though, that only requires a few bits of wire and a soldering iron.

The USB ports on the Raspi are current limited to 140 mA by a pair of polyfuses. [Manis] bridged these fuses, effectively taking them out of the circuit with a short length of wire. This allowed him to use a USB hard drive (powered by USB, of course) with the Raspi.

There’s one small problem with sending that much current through the Raspi’s USB port. Sometimes, when the high-power USB device is powered on, the voltage will sag, resetting the SoC and rebooting the system. [Manis] did his homework and discovered USB 2.0-spec ports should use a 120 μF, low-ESR capacitor to prevent this. The Raspi comes stock with a 47 μF cap used for this purpose. Replacing this cap (C32) might be a good idea if you’re planning on using high-power devices with your Raspi.