Learn To Translate IR Codes And Retransmit Using Arduino

[Dave Jones] from EEVBlog.com takes “Arduino fan boys” off the garden path getting down and dirty with different methods to capture, evaluate and retransmit IR remote control codes. Capturing and reproducing IR remote control codes is nothing new, however, [Dave] carves his own roads and steers us around some “traps for young players” along the way.

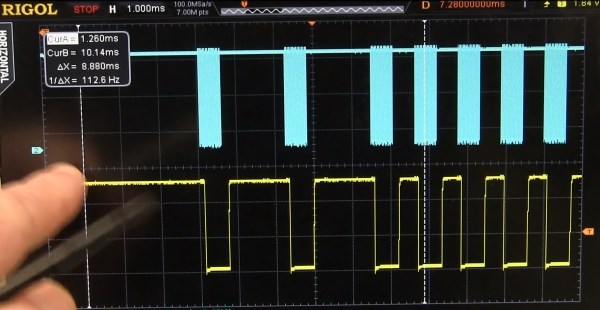
[Dave] needed a countdown timer that could remotely start and stop recording on his Cannon video camera, which he did with simplicity in a previous EEVBlog post using a commercial learning remote control unit. The fans demanded better so he delivered with this excellent tutorial capturing IR codes on his oscilloscope from an IR decoder (yellow trace) as well as using an IR photo transistor (blue trace) which showed the code inclusive of 38 KHz carrier frequency. Either capture method could easily be used to examine the transmitted code. The second lesson learned from the captured waveforms was the type of code modulation being used. [Dave’s] remote transmitted NEC (Japanese) pulse length encoding — which can be assertaind by referencing the Infrared Remote Control Techniques (PDF). Knowing the encoding methodology it was trivial to manually translate the bits for later use in an Arduino transmitter sketch. We find it amazing how simple [Dave] makes the process seem, even choosing to write his own sketch to reproduce and transmit the IR codes and carrier instead of taking the easy road looking for existing libraries.

A real gem of knowledge in the video was when it didn’t work! We get to follow along as [Dave] stumbles before using a Saleae Logic analyzer to see that his transmitter was off frequency even though the math in his sketch seemed correct. Realizing the digital write routine was causing a slowdown he fudged his math to make the needed frequency correction. Sure, he could have removed the performance glitch by writing some custom port control but logic dictates using the fastest and simplest solution when hacking a one-off solution.

[Dave’s] video and links to source code after the break.

Continue reading “Learn To Translate IR Codes And Retransmit Using Arduino”

Cloning An Infrared Disarming Remote Of A $8 Home Security System

5

[Sylvio] decided to buy one of the cheap alarm systems you can find on the internet to have a look at its insides. The kit he bought was composed of one main motion sensor and two remote controls to arm/disarm it.

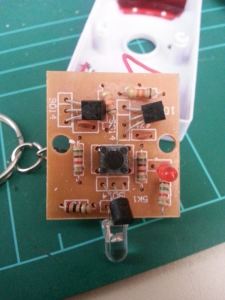
Communication between the remotes and the sensor is done by using infrared, requiring a direct line of sight for a signal to be received. Modern alarm systems typically use RF remotes with a typical frequency of 434MHz or 868MHz.  In his write-up, [Sylvio] first tries to replicate the IR signal with one of his ‘learning remote controls’ without success and then proceed to reverse engineering the remote circuit shown in the above picture. Hackaday readers may figure out just by looking at it that it is a simple astable multivibrator (read ‘oscillator’). Its main frequency is 38.5kHz, which is typical for IR applications. Therefore, if one of your neighbours had this ‘security system’ one could just disarm it with any of the same remotes…

[Sylvio] then explains different ways to replicate the simple IR signal, first with an Arduino then with a frequency generator and finally using the USB Infrared Toy from Dangerous Prototypes. We agree with his conclusion: “you get what you pay for”.

Screaming Fast RC Hovercraft

Of all the homemade RC Hovercraft floating around out there, this build is not only one of the better looking: it’s also unexpectedly quick. [ScratchBuiltAircraft] sourced foam board from the local dollar store to construct the hovercraft’s body and a heavy-duty garbage bag with a hole cut in the center for the skirt. Air reaches the skirt area from the hovercraft’s EDF (Electric Duct Fan — the big one on the back) which pumps the air through a rectangular hole in the base.

A servo mounted behind the fan controls the rudders, while the rest of the electronics and the battery are cleanly tucked away beneath foam body pieces. We’re not sure what kind of top speed the Turnigy motor provides, but it’s probably impressive assuming it can keep from flipping over. Watch it blast off with a bit too much lift in the video below.

For something a bit slower, there’s always the solar powered hovercraft from earlier this summer.

Continue reading “Screaming Fast RC Hovercraft”

A Real Car Remote Controlled With An Arduino… What Could Go Wrong?

[Gilad] tipped us about his latest project, where he adds plenty of pneumatics and electronics into his wife’s car to remote control it.

The brake/throttle pedals are actuated by pistons controlled by electronic valves, and a standard DC motor is in charge of turning the wheel. The Arduino code tells us that the valves will be opened as long as the remote up/down channel is above/under given values. The frame is based on Festo aluminium profiles and we’re not sure where the mains used for the DC/DC converters is coming from.  As the valves use 24V and the motor 12V, standard N-Mosfets and power relays are used for voltage conversion. The remote controller [Gilard] used is actually 20 years old, so the output signal of the receiver isn’t actually really clean.

We do hope to never see this car on the road….

Robot Theater Isn’t So Much For The Actors As The Stagehands

robot-theater

[Chris Rybitski] developed this low-profile robot to help move scenery on stage. The test footage shows it to be spry and able to move hundreds of pounds of cargo. The demo shows the addition of a wooden platform about twice the length of the metal chassis with casters at each end to support the extra weight. It seems to have no problem moving around with the weight of a couple of human passengers on board.

Crafty systems for changing huge sets has long made the theater a natural breeding ground for hacks. Balanced turn tables, rails systems, and the like are common place. But we think this has a ton of potential. Right now the electronics seem convoluted, as there is an Arduino running the motors which connects to the LAN using an Ethernet shield and that Linksys wireless router.

We think he should patch directly into the serial port of the router. If he loads DD-WRT or OpenWRT he can easily make the remote control a web interface. We also wonder about the possibility of making it a line-follower that can precisely position itself automatically using patterns on the floor.

Continue reading “Robot Theater Isn’t So Much For The Actors As The Stagehands”

Giving An RC Tank A Fire Control Computer

tank

[Vincent] plays around with remote control tanks, and even though his current model is a WWII-era armor piece, he’d still like modern accoutrements such as a fire control computer and laser sighting for his main gun. His latest project did just that (French, Google translation) with the help of an Arduino, a few modifications to the receiver, and an IR rangefinder.

The stock RC tank includes servos to move the turret and the requisite electronics to fire an Airsoft gun. The precision of the mechanical movements inside the turret weren’t very precise, though, so [Vincent] had to gear down the servos to turn large movements into slight adjustments. After that, he installed an IR rangefinder and laser diode onto the barrel that allowed the gun to sight a target and read its distance.

After some experimentation with the rangefinder and laser, [Vincent] plotted data from firing a few BBs at a whole bunch of distances and targets. The graph came out fairly linear, and after plugging this into a graphing calculator, he was able to find an equation that took into account the distance and angle so the Arduino-powered fire control computer would hit its mark.

The accuracy of the gun is very impressive, all things considered. [Vincent] is able to accurately fire BBs downrange and hit an 8×12 cm target at five meters. You can check out that action below.

Continue reading “Giving An RC Tank A Fire Control Computer”

Chromebook Hack Controls Your Television

chromebook_remote_control1

[Michael Kohn] only accomplished about half of what he set out to, but we still think his TV channel switcher from a Chromebook turned out nicely. When starting the project he wanted to include a grid of listing so that he could choose a specific program, but decided that scraping the data was too much work for this go-round.

The Chromebook doesn’t include an IR transmitter so he built one using an MSP430 chip. He had previously built a little transmitter around an AVR chip and was surprised to find that the internal oscillator on that was quite a bit more accurate than on the MSP430. Timing is everything with the Manchester encoded signals used for IR remote controls so he used his oscilloscope to tune the DCO as accurately as possible.

The app shown on the screen was written in Javascript. Google published some example code on using RS232 with the computer; [Michael] used this resource to provide communications between the computer and the microcontroller.

Continue reading “Chromebook Hack Controls Your Television”