Adding A Router And Wireless Camera To A Remote Controlled Helicopter

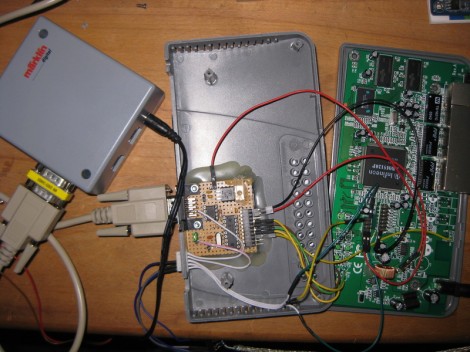
Last Christmas, [bonafide] received a WiFi enabled remote control helicopter from his employer. The heli is an interesting bit of kit, able to be controlled with an Android or iDevice. Being the good tinkerer he is, [bonafide] took a screwdriver to his Wi-Fli Bladerunner Helicopter and reengineered the toy to use an off-the-shelf wireless router.

The protocol used by the Wi-Fli helicopter is closed source, but a few people have had their hand at reverse engineering this cool toy. Instead of simply controlling the helicopter over WiFi, [bonafide] wanted to add a few unsupported features like sending images from a webcam. This isn’t supported in the toy’s firmware, so after a valiant attempt at flashing new firmware, [bonafide] decided to replace the electronics with a WiFi router.

In the stock configuration, the helicopter receives commands from an RT5350F-based WiFi module. This module communicates to the servos and motors with a serial connection. [bonafide] replaced the WiFi module with a very small router capable of running OpenWRT. The new router was easily configured to send commands to the motors, and allowed [bonafide] to add a small keychain webcam to stream video back to his desktop.

Interestingly, the makers of the WiFli helicopter, Interactive Toy Concepts, are putting out a streaming-video version of this toy next fall. The current version of the WiFli helicopter may hit the Toys ‘r Us clearance bin before that, so if you’d like your own unmanned aerial drone [bonafide]’s may be worth looking over.

Special thanks to [MS3FGX] for sending this one in. Also, the non-coral cache version of [bonafide]’s site is here, but try not to turn his server into a pile of molten slag.

Using A Router As A Wireless Embedded Platform

If you’re going to make your next project wireless, you don’t need an XBee, WiFi shield, or even a Bluetooth module. Turning old hardware into a dev board is extremely easy, as [Taikson] shows us by adding an I2C bus to a Fonera router. (Spanish, here’s the Google translation)

To add an I2C bus, [Taikson] took two pins that originally went to a router status pin and soldered on a pair of wires. [Taikson]’s router is running OpenWrt, so adding support for I2C devices is just a matter of changing a few kernel settings.

As for what you can do with a router development platform, the sky’s the limit. Last year, [Taikson] controlled a quadcopter from within a web browser with a similarly modified I2C-enabled router. It’s a clever hack, and with a little bit of work it should be possible to add a few sensors or even a camera to his quadcopter.

Copying Complex Objects In Wood

[Matthias], eminent woodworker he is, designed and built an awesome machine to make copies of just about any object imaginable. With a few scrap 2x4s, and a few bolts, screws, and skateboard bearings, you too can copy anything into a solid block of wood.

The theory of operations for [Matthias]’ copy carver is mounting a router and ‘follower’ to the same piece of wood. Put that on an XY table with a rotation axis, and just about any object can be copied in wood or plastic. It’s not too dissimilar to a Dulplicarver, a routing machine meant to copy everything from gun stocks to guitar and violin bodies.

So far, [Matthias] has copied a rotary phone and a sadly non-functional wrench.  It’s the perfect follow-up for [Matthias]’ 3 axis pantograph router that can copy and enlarge any random flat object you can throw at it.

via Make

A Personal Manufacturing Stack Exchange

Over on Stack Exchange, there’s a proposal for a new CNC/3D printer site. It’s a personal manufacturing stack exchange, and hopefully we’ll see some awesome discussion when it’s eventually created.

Stack Exchange is already well-known for hosting the most useful programming site as well as awesome sites/forums covering everything from LaTeX to grammar. The proposed Personal Manufacturing site is sure to provide a ton of advice and discussion covering the hardware, software, electronics, and toolchains of CNC routers, RepRaps and mills.

The personal manufacturing stack exchange hasn’t been created yet – a few more people still need to commit to use it. Once that’s done, though, we’re sure to see a lot of very helpful advice and discussion from the Stack Exchange community.

Kudos to [Michael] for sending this in.

Cheap And Easy Linear Supported Rail

Some of the very largest – and coolest – CNC machines use supported linear rail for their movement axes. For any home tinkerer trying to reproduce these supported rails, the problem of cost comes up very quick; these rails can run over $100 for just a few feet. [Michael] came up with a great way to build his own supported rail so he can build his very large CNC router.

There aren’t many tools needed to build [Michael]’s rail. He put a 90° notch in a 2×4 to support his 25mm rail, and clamped it down with a piece of plywood. After drilling a 5/16″ hole every 12 cm, he tapped these holes out to receive 3/8″ threaded rod. Yes, we also hate the mix of metric and imperial units in that description, but the results speak for themselves.

The now-supported rail was mounted to a piece of MDF with a few bolts and washers. MDF isn’t the most dimensionally stable material, so [Michael] will be covering the whole thing in a coat of epoxy very soon. Now, he’s one step closer to his gigantic CNC gantry router.

You can check out [Michael]’s demo video after the break.

Continue reading “Cheap And Easy Linear Supported Rail”

Never Miss Your Transport With This Bus Arrival Notifier

[John Graham-Cumming] was all set to start a new project based on the Raspberry Pi. Well, that was until shipment was delayed due to manufacturing issues. Not to fret, he transitioned over to a router board which displays the arrival countdown for mass transit bus service.

He based the build on a web page the Transport for London provided. You can load it up and see if your bus is running on time or not. There’s no published API, but by studying the source code from the site [John] was able to figure out how the JSON commands were formatted.

The next step is building a standalone device to pull the data and display it. The board seen above is from a Linksys WRT54GL router. This longtime favorite has a serial port header which can be driven from the Linux kernel. He wired up a jack on the router’s case, and uses an extension cable to get from it to the 7-segment displays mounted in a model of the bus. Since there’s four digits the display can tell you minutes until the arrival of two different buses.

[Thanks Pseudo Lobster]

Using Routers As Displays

Have you ever seen an LED display made out of routers? [Sean] took eight Netgear routers and made an 8×4 display out of them. Because that wasn’t cool enough, a very small version of Conway’s Game of Life was added to the build.

Each router is running a copy of OpenWrt, a Linux distro meant for limited hardware. Instead of an 802.11 protocol, each router runs the B.A.T.M.A.N. advanced mesh protocol. This protocol allows each router to communicate with all the other routers.

Instead of each router receiving data from a master, the routers calculate each step in the Game of Life independently.  Once the routers communicate their initial states, each router is responsible for displaying its four LEDs for each new generation. In the video after the break, you can see [Sean]’s routers calculating random Game of Life boards. Sadly, we didn’t notice a GoL oscillator being randomly generated, but with a 4×8 play field even a Glider wouldn’t last very long.

Continue reading “Using Routers As Displays”