Building A Vehicle Parking Camera

rpi-backup-camera

We’re never really sure what to call these things. When we say “back up camera” it sounds distinctly like a redundancy system for when the primary camera fails to work. But it is used for when you move in reverse in an automobile. [Jeremy Blythe] built the distance sensing video system using a Raspberry Pi board as the brain.

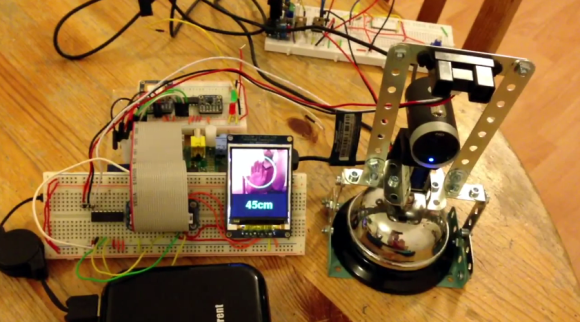
The flexibility of Linux and the power of the RPi board ended up making it pretty easy to get everything working together. He’s using a Microsoft Lifecam Cinema HD camera, which connects to one of the USB ports on the board. Just above that you can see the infrared distance sensor which is connected to the RPi’s GPIO header using one of Adafruit’s Pi Cobbler breakout boards. This also facilitates the connection to the 176×220 color LCD screen.

In the video after the break you can see [Jeremy] testing out the system by moving his hand in front of the sensor. Python is used to grab the image from the camera, draw a circle on it, and overlay the distance in centimeters at the bottom. Once his hand is within 30cm the overlay turns red and the work STOP is displayed. Pretty neat!

Continue reading “Building A Vehicle Parking Camera”

Analog Input Expansion Boards For Raspberry Pi

analog-input-rpi-add-on

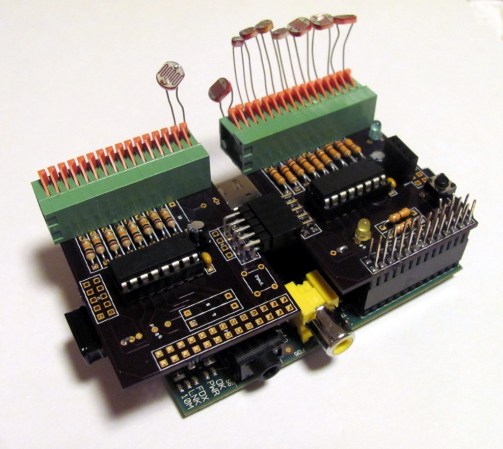
[Ken Olsen] needed a bunch of analog inputs for his model railroad project. He wanted to use the Raspberry Pi board, but alas there are no analog inputs available on the GPIO header. But there is SPI. So he used an online service to design his on Analog input expansion boards.

He mentions that Eagle can be a bit of a pain to work with. For this project he decided to give circuits.io a try. This is an in-browser PCB layout tool which we looked at in a links post some time ago. The service lets you order directly from your in-browser design without the need to run gerber files or the like (boards are made using the OSH Park service). He’s very happy with the boards he got back. They feature a footprint for a connector to interface with the RPi.

The design uses MCP3008 Analog to SPI chips. Each has eight channels but [Ken] needed more than that. Since the service provides three copies of the board he made them modular by adding end connectors which chain the SPI and power rails from one board to the next. Don’t miss his full demo in the video after the break.

Continue reading “Analog Input Expansion Boards For Raspberry Pi”

WSPR Transmitter Shows True Value Of Raspberry Pi For Hacking

wspr

Don’t get us wrong, we love our Raspberry Pi. But if you’re merely running a Linux image without adding a hardware hack into the mix you’re missing out on part of the power for which the platform was developed. This project is a great example of how to embrace the Raspberry Pi’s ability to deliver both low-level hardware access, and solid embedded Linux performance. [Dan Ankers] and [Threeme3] have developed a program which turns the RPi in to a WSPR transmitter. The GitHub readme shares many of the details on how it was done. But you’ll also want to dig through the .c file to see how they’re making use of the GPIO header pins.

[William Meara] sent in the tip for this. He’s been featured on Hackaday previously for his work with WSPR (Weak Signal Propagation Report). It’s an amateur radio protocol which lets you communicate over very long distances using relatively weak transmitters. The trick is to use computing power to find the signal hidden in all the noise. Be warned that you do need a HAM license to try this out, but otherwise all you need to connect to the board is a low-pass filter and an antennae.

[via SolderSmoke]

[Photo credit: WSPR hompage]

Enabling An Unused Touchscreen Overlay On A Consumer LCD

uncovering-an-unused-touchscreen-on-a-consumer-lcd

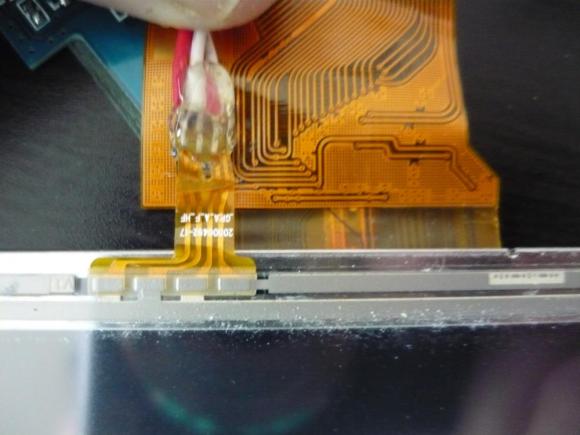
When [Andrei] first got his Raspberry Pi he wanted to make it a standalone computer right away. This means the normal input devices like a mouse and keyboard, but also some type of display. To avoid waiting for shipping he ended up using a cheap vehicle backup camera screen from the local big box store. It worked great, and recently he decided he would try to convert it to run off of 5V power to simplify his setup. While snooping around inside the device he discovered an unused resistive touch overlay and figured out how to get it to work.

What tipped him off is the small four-conductor connector which wasn’t hooked up to anything. He carefully soldered wires onto the flexible circuit traces, then generously covered them in hot glue to help prevent movement from breaking the rigid connection. To get this working you need to measure the resistance between the conductors. Most of the time we figure the RPi GPIO header can be used directly, but for this task an intermediary is necessary. [Andrei] went with a small Arduino clone board. A bit of trial and error was all it took to get the connections right and to iron out the code which translates the values into coordinates.

Minimalist User Interface For Headless Raspberry Pi Applications

minimial-ui-for-headless-rpi

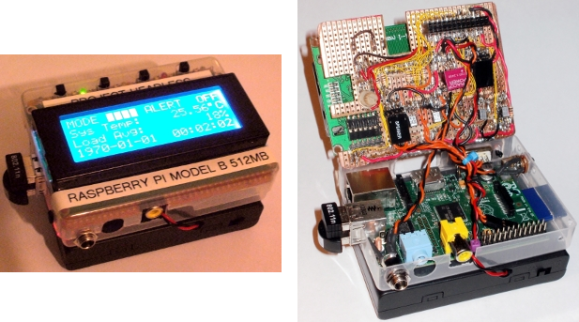
[Jason Birch] just finished building a beautifully simple user interface for the Raspberry Pi. The goal was to keep it small and intuitive while still providing a range of functionality. His add-on hardware gives feedback using several LEDs and a four-line character LCD screen. It provides control using just four momentary press switches.

The base for the add-on hardware is a chunk of protoboard the same size as the Pi itself. This is just slightly wider than the LCD screen, leaving room along the top for the row of buttons with different colors of LEDs in between them. Look closely in that nest of point-to-point wiring and you’ll find the dual pin-socket which mates with the RPi GPIO header. One important note from [Jason] mentions that the LCD screen R/W pin must be tied to ground. This keeps it from going into read mode, which would push 5V over the I/O pins, potentially damaging the 3.3V tolerant header on the RPi.

Throw in a battery and that pretty much covers the hardware. To see how he’s using it you’ll want to view the video clip after the break.

Continue reading “Minimalist User Interface For Headless Raspberry Pi Applications”

Wiimote Controlled RPi Robot

Wiimote RPi Robot

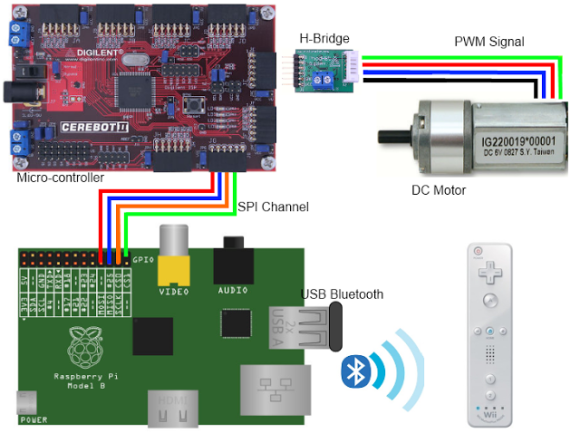
[Brian] has brought together a powerful collection of hardware to build a robot. The end goal is to have a robot that’s controlled by a Wiimote.

The Wiimote communicates over Bluetooth with a Raspberry Pi, which is running a Python script. This script uses the CWiid Python module to communicate with the controller, and [Brian] has detailed instructions on getting the Wiimote working with a RPi. The RPi controls an ATmega based development board over SPI, which drives an h-bridge to control the two DC motors that move the robot.

[Brian]’s code for this could be helpful for anyone looking to control their RPi with a Wiimote. Since Wiimotes and Bluetooth dongles are fairly cheap nowadays, this is a great way to drop in wireless control to any RPi project, or even to control your media center from the couch.

After the break, check out a video of the build in action

Continue reading “Wiimote Controlled RPi Robot”

Dynamic Bicycle Headlight Uses The Open Road As A Display

This thing is so cool it almost looks fake. But [Matt Richardson] isn’t a hoaxster. He actually built what might be called a heads-down display for your bicycle. He refers to it as a headlight because it borrows a similar function. It mounts on the handlebars and shoots light off the front of the bike. But it’s more than just a battery and a bulb, this uses a pico-projector to give that light some meaning. In the video after the break he shows it off on the streets of NYC.

So far he’s only displaying information that has to do with the speed of travel, but the proof is there just waiting for a brilliant new use. Feeding the projector is a Raspberry Pi board. For this prototype [Matt] mounted it, along with the portable cellphone charger which plays the role of the power source, on a hunk of hardboard strapped inside the bike frame.

If you’re thinking of doing this one yourself beware of the BOM price tag. That projector he’s using runs upwards of $400. We wonder if you could hack together a rudimentary replacement with an old cellphone screen and this diy film projector?

Continue reading “Dynamic Bicycle Headlight Uses The Open Road As A Display”