Split-Flap Clock Makes A Nice Side Quest In Larger Project

Sometimes projects spawn related projects that take on a life of their own. That’s OK, especially when the main project is large and complex, In that case, side-quest projects provide a deliverable that can help keep the momentum of the whole project going. The mojo must flow, after all.

That seems to be what’s going on with this beautiful split-flap clock build by [Erich Styger]. It’s part of a much larger effort which will eventually see 64 separate split-flap units chained together. This project has been going on for a while; we first featured it back in 2022 when it was more of a prototype. Each unit is scratch-built, using laser-cut fiberboard for parts like the spool and frame, thin PVC stock for the flip cards, and CNC-cut vinyl for the letters and numbers. Each unit is powered by its own stepper motor.

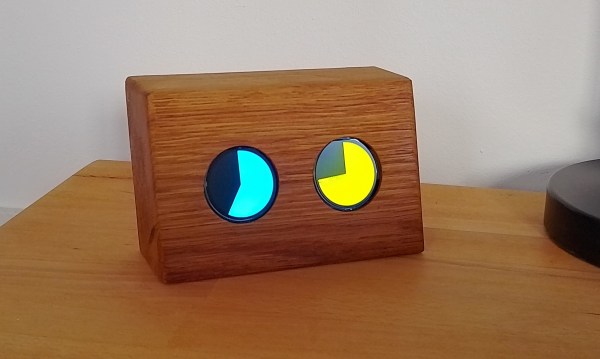
To turn four of these displays into a clock, [Erich] milled up a very nice enclosure from beech. From the outside it’s very clean and simple, almost like something from Ikea, but the inside face of the enclosure is quite complex. [Erich] had to mill a lot of nooks and crannies into the wood to provide mounting space and clearance for the split-flap mechanism, plus a thinned-down area at the top of each window to serve as a stop for the flaps. The four displays are controlled by a single controller board, which houses an NXP K22FN512 microcontroller along with four stepper drivers and interfaces for the Hall-effect sensors needed to home each display. There’s also an RS-485 interface that lets the controllers daisy-chain together, which is how the big 64-character display will be controlled.

We’re looking forward to that, but in the meantime, enjoy the soft but pleasant flappy goodness of the clock in the brief video below.

Continue reading “Split-Flap Clock Makes A Nice Side Quest In Larger Project”

A glowing pocket watch with Roman numerals.

What Is The Hour? It’s XVII O’ Clock

When live-action role playing, or LARPing, one must keep fully in tune with the intended era. That means no digital watches, and certainly no pulling out your fantastic rectangle from the future to find out if you’re late picking up the kid.

The guts of a pocket watch with glowing Roman numerals.So what do you do when you’re LARPing at 2 PM, but you gotta be back at the soccer practice field by 5 PM? Well, you fashion a period-appropriate timepiece like [mclien]’s 17 o’ Clock. Visually, it’s about as close to a pocket sundial as you can get. It’s deliberately non-connected, and its only function is to tell the time.

But how? If you visually divide the watch across the top and bottom, you get two sets of Roman numerals. The top half handles the hour, and the bottom half the minute. [mclien] started designing this in 2018 and picked it back up in the second half of 2024.

Back to the non-connected part. The only permanently-powered part of the project is a high-precision real-time clock (RTC). The rest uses a power latching circuit, which turns on the Adafruit Trinket M0 to show the time using a NeoPixel ring. Be sure to check out the awesome project logs with fantastic pictures throughout.

Looking for a smarter pocket watch? It’s time you built one yourself. And speaking of pocket sundials…

Recreating A Popular Faux-Nixie Clock

There’s a good chance you’ve seen “Nixie clocks” on the Internet that replace the classic cold cathode tubes with similarly sized LCD panels. The hook is that the LCDs can show pictures and animations of Nixie tubes — or pretty much anything else for that matter — to recreate the look of the real thing, while being far cheaper and easier to produce. It’s a hack for sure, and that’s the way we like it.

[Trung Tran] liked the idea, but didn’t just want to buy a turn-key clock. So he’s decided to build his own version based on the ESP32-S3. The WiFi-enabled microcontroller syncs up to the latest time via NTP, then uses a PCF8563 real-time clock (RTC) module to keep from drifting too far off the mark. The six displays, which plug into the custom PCB backplane, can then show the appropriate digits for the time. Since they’re showing image files, you can use any sort of font or style you wish. Or you could show something else entirely — the demo video below shows off each panel running the Matrix “digital rain” effect.

Continue reading “Recreating A Popular Faux-Nixie Clock”

Customizable Bird Clock Sings The Hours By

For those looking to build their own clocks, one of the easiest ways to get started is with a pre-built module that uses a simple quartz oscillator and drives a set of hands. This generally doesn’t allow for much design of the clock besides the face, and since [core weaver] was building a clock that plays bird songs, a much more hackable clock driver was needed to interface with the rest of the electronics needed to build this project.

The clock hands for this build are driven by a double stepper motor which controls an hour and minute hand coaxially but independently. Originally an H-bridge circuit was designed for driving each of the hands but they draw so little current in this configuration that they could be driven by the microcontroller directly. A DS3231 clock is used for timekeeping connected to an ATMega128a which controls everything else. At the start of each hour the clock plays a corresponding bird song by communicating with an mp3 module, and a remote control can also be used to play the songs on demand.

Bird clocks are not an uncommon thing to find off the shelf, but this one adds a number of customizations that let it fly above those offerings, including customizing the sounds that play on the hour and adding remote control capabilities, a lithium battery charging circuit, and a number of other creature comforts. If you’re looking for even more unique bird clock designs this binary bird clock might fit the bill.

Continue reading “Customizable Bird Clock Sings The Hours By”

Synesthetic Clock Doesn’t Require Synesthesia

We often think of synesthetes as those people who associate say, colors with numbers. But the phenomenon can occur with any of the senses. Simply put, when one sense is activated, synesthesia causes one to experience an unrelated, activated sense. Sounds trippy, no?

Thankfully, [Markus Opitz]’s synesthetic clock doesn’t require one to have synesthesia. It’s actually quite easy to read, we think. Can you tell what time it is in the image above? The only real requirement seems to be knowing the AM color from the PM color. The minute display cycles through blue, green, yellow, and red as the hour progresses.

Behind that pair of GC9a01 round displays lies an ESP32 and a real-time clock module. [Markus] couldn’t find a fillArc function, so instead he is drawing triangles whose ends lie outside the visible area. To calculate the size of the triangle, [Markus] is using the angle function tangent, so each minute has an angle of 6°.

[Markus] created a simple but attractive oak housing for the clock, but suggests anything from cardboard and plastic to a book. What’s the most interesting thing you’ve ever used for an enclosure? Let us know in the comments.

Do you appreciate a good analog clock when you see one? Here’s a clock that uses analog meters for its display.

A DIY E-Ink Tank Watch

[Augusto Marinucci] liked the classic Cartier Tank series of dress watches aesthetic, but wanted something a bit more techy, with a decent runtime on a single battery. E-Ink displays are often used in such applications, but finding one to fit a custom case design, is a tall order. When ordering one off the shelf is not easy, the solution is to make one from scratch.

Building a programming jig is a great idea for small-scale production

The article doesn’t have much information on the E-Ink side of things, which is a bit of a shame. But from what we can glean, the segment shapes — in this case, based on the famous Apollo DSKY — are formed in the top copper of a four-layer PCB, using filled and capped vias to connect invisibly from below.

A donor E-Ink display is cut to size with scissors (we don’t know much more than this!) and glued in place around the edge to make the common electrode connection. The display PCB attaches to the control PCB, at the rear using low-profile board-to-board connectors. This board hosts a PIC16 micro, as well as an RV-3028-C7 RTC which keeps time whilst consuming a paltry 45 nA.

Five volts are provided via a MAX1722 low-power boost converter which is fed power from the CR1616 cell via a couple of logic-controllable load switches. With a low-power design such as this, it’s critical to get this correct. Any mistakes here can easily result in a very low runtime. It is easy to over-stress small button cells and kill them prematurely.

The case looks like it’s printed in a translucent resin, with the PCB stack sealed inside with a UV-cured resin pour. It’s not immediately obvious if the rear panel can be removed to access the battery and programming port. There are what appear to be screw holes, so maybe that’s possible, or maybe they’re the rear side of the PCB mounting posts. Who can tell?

If DIY hardware is but too much effort for you, then there’s the option of hacking new firmware onto an existing watch, or perhaps meeting in the middle and making something out of all those junk E-ink tags you can get from time to time?

Thanks to [JohnU] for the tip!

Low-Power Challenge: Making An Analog Clock Into A Calendar With A 50-Year Life

You have to be pretty ambitious to modify a clock to run for 50 years on a single battery. You also should probably be pretty young if you think you’re going to verify your power estimates, at least in person. According to [Josh EJ], this modified quartz analog clock, which ticks off the date rather than the time, is one of those “The March of Time” projects that’s intended to terrify incentivize you by showing how much of the year is left.

Making a regular clock movement slow down so that what normally takes an hour takes a month without making any mechanical changes requires some clever hacks. [Josh] decided to use an Arduino to send digital pulses to the quartz movement to advance the minute hand, rather than let it run free. Two pulses a day would be perfect for making a 30-day month fit into a 60-minute hour, but that only works for four months out of the year. [Josh]’s solution was to mark the first 28 even-numbered minutes, cram 29, 30, and 31 into the last four minutes of the hour, and sort the details out in code.

As for the low-power mods, there’s some cool wizardry involved with that, like flashing the Arduino Pro Mini with a new bootloader that reduces the clock speed to 1 MHz. This allows the microcontroller and RTC module to run from the clock movement’s 1.5 V AA battery. [Josh] estimates a current draw of about 6 μA per day, which works out to about 50 years from a single cell. That’s to be taken with a huge grain of salt, of course, but we expect the battery will last a long, long time.

[Josh] built this clock as part of the Low-Power Challenge contest, which wrapped up this week. We’re looking forward to the results of the contest — good luck to all the entrants!