Last week, the news was filled with stories of Jack Sweeney and his Twitter-bot that tracks the comings and goings of various billionaires in their private jets. This caught the attention of the billionaire-iest of them all, one Elon Musk, who took exception to the 19-year-old’s feat of data integration, which draws from a number of public databases to infer the location of Elon’s plane. After Jack wisely laughed off Elon’s measly offer of $5,000 to take the bot down, Elon ghosted him — pretty childish behavior for the richest man on the planet, we have to say. But Jack might just have the last laugh, as an Orlando-based private jet chartering company has now offered him a job. Seems like his Twitter-bot and the resulting kerfuffle is a real resume builder, so job-seekers should take note.
Here’s hoping that you have a better retirement plan than NASA. The space agency announced its end-of-life plans for the International Space Station this week, the details of which will just be a run-up to the 2031 de-orbit and crash landing of any remaining debris into the lonely waters of Point Nemo. The agency apparently sees the increasingly political handwriting on the ISS’s aging and sometimes perforated walls, and acknowledges that the next phase of LEO space research will be carried out by a fleet of commercial space stations, none of which is close to existing yet. Politics aside, we’d love to dig into the technical details of the plan, and see exactly what will be salvaged from the station before its fiery demise, if anything. The exact method of de-orbiting too would be interesting — seems like the station would need quite a bit of thrust to put on the brakes, and might need the help of a sacrificial spacecraft.
“You break it, you fix it,” is a philosophy that we Hackaday types are probably more comfortable with than the general public, who tend to leave repairs of broken gear to professionals. But that philosophy seems to be at the core of Google’s new Chromebook repair program for schools, which encourages students to fix the Chromebooks they’re breaking in record numbers these days. Google is providing guidance for schools on setting up complete Chromebook repair facilities, including physical layout of the shop, organization of workflows, and complete repair information for at least a couple of popular brands of the stripped-down laptops. Although the repairs are limited to module-level stuff, like swapping power supplies, we still love the sound of this. Here’s hoping that something like this can trigger an interest in electronics for students that would otherwise never think to open up something as complicated as a laptop.
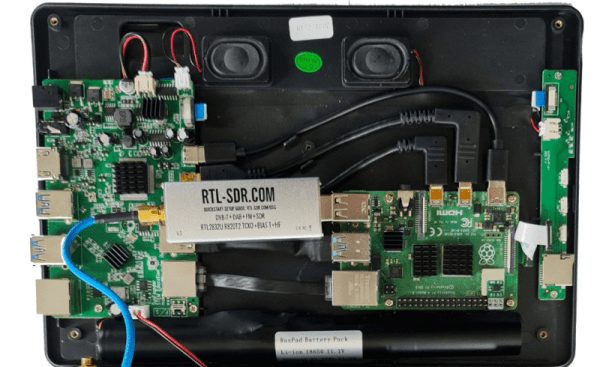
Back in July, we took note of a disturbing report of an RTL-SDR enthusiast in Crimea who was arrested for treason, apparently based on his interest in tracking flights and otherwise monitoring the radio spectrum. Now, as things appear to be heating up in Ukraine again, our friends at RTL-SDR.com are renewing their warning to radio enthusiasts in the area that there may still be risks. Then as now, we have little interest in the politics of all this, but in light of the previous arrest, we’d say it pays to be careful with how some hobbies are perceived.
And finally, aside from the aforementioned flight-tracking dustup, it’s been a tough week for Elon and Tesla. Not only have 817,000 of the expensive electric vehicles been recalled over something as simple as a wonky seatbelt chime, but another 54,000 cars are also being recalled for a software bug that causes them to ignore stop signs in “Full Self-Driving” mode. We’re not sure if this video of this Tesla hell-ride has anything to do with that bug, but it sure illustrates the point that FSD isn’t really ready for prime time. Then again, as a former Boston resident, we can pretty safely say that what that Tesla was doing isn’t really that much different than the meat-based drivers there.