Making Teeny Clamps With Hand Tools

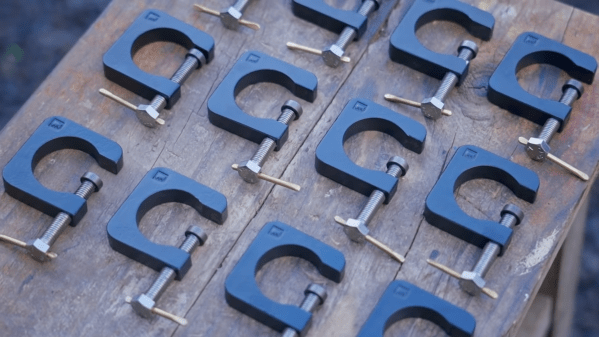
Sometimes you need a small clamp, and sometimes it’s nice to use tools you’ve made yourself. [Neil] from [Pask Makes] delivers on both counts, with incredibly cute little clamps that he whipped up in his own home shop. You can even make them with hand tools!

The first step is to cut out a section of flat steel bar, and then drill a hole in the middle. The flats that form the key clamping surfaces can then be cut using a hacksaw. From there, it’s a matter of cleaning up the resulting blank with a file to take off sharp edges and neaten up the flats.

Drilling and tapping the main hole through the bottom of the clamp is the next job, and getting the hole straight and true is key to making a good usable clamp. The video shares tips on how to do this with even a simple cordless drill, by using a vice and a wood guide to keep things on track. The swiveling nut is then made out of a piece of round bar, and installed on the end of a bolt to create a nice clamping surface. A cute little brass handle is used to tighten it up.

It’s a useful tool, and the video goes on to show how the clamp can be made more quickly using higher-end facilities. While small clamps can be had cheaply, the video notes that making tools is fun and we think that’s as good a reason as any to make your own.

We’ve seen [Neil]’s work before, particularly in the case of this stunning “bladeless fan” build. Video after the break.

Continue reading “Making Teeny Clamps With Hand Tools”

CAN Bus Wireless Hacking / Dev Board

[Voltlog] has been hacking away at the CAN bus console of his VW Golf for quite some time now. Presumably, for his projects, the available CAN bus interface boards are lacking in some ways, either technically and/or price. So [Voltlog] designed his own wireless CAN bus hacking and development module called the ESP32 CanLite (see the video below the break). The board was tailored to meet the needs of his project and he claims it is not a universal tool. Nevertheless we think many folks will find the features he selected for this module will be a good fit for their projects as well.

In his introduction of the design, he walks through the various design decisions he faced. As the project name suggests, he’s using the ESP32 as the main controller due to it’s wireless radios and built-in CAN controller. The board is powered from the car’s +12V power, so it uses a wide input range ( 4 to 40 V ) switching regulator. One feature he added was the ability to switch automotive accessories using the ST VN750PC, a nifty high-side driver in an SO-8 package with integrated safety provisions.

The project is published as open source and the files can be pulled from his GitHub repository. We noticed the debug connector labeled VOLTLINK on the schematic, and found his description of this custom interface interesting. Basically, he was not satisfied with the quality and performance of the various USB-to-serial adapters on the market and decided to make his own. Could this be a common theme among [Voltlog]’s projects?

A word of warning if you want to build the ESP32 CanLite yourself. While [Voltlog] had intentionally selected parts that were common and easy to purchase when the project began, several key chips have since become nearly impossible to obtain these days due to the global parts shortage issue (it’s even out of stock on his Tindie page).

If you want to dig deeper into CAN bus hacking, check out this talk that we wrote about back in 2016. Do you have any favorite CAN bus development boards and/or tools? Let us know in the comments below.

Continue reading “CAN Bus Wireless Hacking / Dev Board”

Hackaday Links Column Banner

Hackaday Links: July 11, 2021

Well, at least the acronym will stay the same. It looks like black is the new blue for Windows 11, as the BSOD screen gets its first makeover in years. It’s an admittedly minor change, since the on-screen text is virtually identical to the BSOD from recent versions of Windows 10, and the new death-knell even sports the same frowny-face emoji and QR code. Really, the white-on-black color scheme is the only major difference we can see — even the acronym will stay the same. It’s not really that newsworthy, we suppose, although it does make us miss the extremely busy BSODs from back in the Windows NT days.

As the semiconductor shortage continues, manufacturers are getting desperate to procure the parts they need to make their products. And if there’s one thing as certain as death and taxes, it’s that desperation provides opportunity to criminals. A thread over on EEVBlog details an encounter one company had with an alleged scammer, who sent an unsolicited offer to them for a large number of ordinarily hard-to-find microprocessors at a good price. Wisely, the company explored the offer in some depth and found that “Brian” (the representative who contacted them) is actually named Nick Martin and, according to an article on the Electronic Resellers Association International (ERAI) website, is apparently associated with a number of fraudulent operations. Their list of allegedly fraudulent deals made by Mr. Martin stretches back to 2018 and totals over $300,000 of ill-gotten gain.

Last year, friend-of-Hackaday and laser artist Seb Lee-Delisle spent a lot of time and effort getting together an amazing interactive laser light show for the night skies of cities in the UK. Laser Light City, with powerful lasers mounted on the tops of tall buildings, was a smashing success that brought a little cheer into what was an otherwise dreadful time. But we have to admit that the videos and other materials covering Laser Light City left us wanting more — something like that, with a far-flung installation on rooftops and the ability for audience members to control it all from their phone, really needs a deeper “how it works” treatment. Thankfully, Seb has released a video that dives into the nuts and bolts of the show, including a look at ludicrously powerful lasers with beams that can still be seen in broad daylight.

Continue reading “Hackaday Links: July 11, 2021”

Digital Audio For Microcontrollers Doesn’t Come Much Simpler Than A WART

Adding an audio channel to your microcontroller project can mean a pile of extra components and a ton of processing power, as a compressed stream must be retrieved and sent to a dedicated DAC. Or if you are [rdpoor], it can mean hooking up a low-pass filter to the UART that’s present on even the simplest of devices, and constructing a serial data stream that mimics PWM audio.

Sound on your microcontroller, it’s this simple!

WART is a Python script that converts a WAV file into a C formatted byte array that can be baked into your microcontroller code, and for which playback is as simple as streaming it to the UART. The example uses a Teensy and a transistor to drive a small speaker, we’re guessing that better quality might come with using a dedicated low-pass filter rather than relying on the speaker itself, but at least audio doesn’t come any simpler.

The code can be found in a GitHub repository and there’s a few recordings of the output in the files section Hackaday.io page, one is embedded below. It’s better than we might have expected given that the quality won’t be the best at the PWM data rate of even the fastest UART. But even if you won’t be incorporating it into your music system any time soon we can see it being a useful addition for such things as small warning sounds. Meanwhile if persuading serially driven speakers to talk is of interest, there’s always the venerable PC speaker.

Continue reading “Digital Audio For Microcontrollers Doesn’t Come Much Simpler Than A WART”

Motorized Camera Slider Gives Your Shots Style

We’ve all seen those smooth panning shots, which combined with some public domain beats, are a hallmark of the modern YouTube tech video. Recreating that style in your own productions is as easy as pointing your browser to Amazon and picking up a motorized camera slider, so long as you don’t mind parting with a few hundred bucks, anyway. But [Paweł Spychalski] had a better idea. He decided to build his own camera slider and make it an open source project so others could spin up their own versions.

His design uses many components that have become popular and affordable thanks to the desktop 3D printer explosion, such as 2020 aluminum extrusion, LM8UU linear bearings, an 8 mm lead screw, and a NEMA 17 stepper motor. In fact, if you’ve got a broken 3D printer that you don’t know what to do with, stripping it for parts would get you a long way towards completing the BOM for this project.

To control the slider, [Paweł] is using an ESP32 and TMC2209 “StepStick” driver connected to an OLED display and a few buttons. As designed, a smartphone connected to a simple web page hosted by the ESP32 is the primary method of controlling the camera, but the buttons and display on the slider itself gives you a physical backup should you need it.

If you need something a bit more advanced than a linear slider, we’ve seen some impressive DIY motion rigs that can spin the camera around the target and produce some very professional looking shots.

Continue reading “Motorized Camera Slider Gives Your Shots Style”

Tuning Into Medical Implants With The RTL-SDR

With a bit of luck, you’ll live your whole life without needing an implanted medical device. But if you do end up getting the news that your doctor will be installing an active transmitter inside your body, you might as well crack out the software defined radio (SDR) and see if you can’t decode its transmission like [James Wu] recently did.

Before the Medtronic Bravo Reflux Capsule was attached to his lower esophagus, [James] got a good look at a demo unit of the pencil-width gadget. Despite the medical technician telling him the device used a “Bluetooth-like” communications protocol to transmit his esophageal pH to a wearable receiver, the big 433 emblazoned on the hardware made him think it was worth taking a closer look at the documentation. Sure enough, its entry in the FCC database not only confirmed the radio transmitted a 433.92 MHz OOK-PWM encoded signal, but it even broke down the contents of each packet. If only it was always that easy, right?

The 433 ended up being a coincidence, but it got him on the right track.

Of course he still had to put this information into practice, so the next step was to craft a configuration file for the popular rtl_433 program which split each packet into its principle parts. This part of the write-up is particularly interesting for those who might be looking to pull data in from their own 433 MHz sensors, medical or otherwise

Unfortunately, there was still one piece of the puzzle missing. [James] knew which field was the pH value from the FCC database, but the 16-bit integer he was receiving didn’t make any sense. After some more research into the hardware, which uncovered another attempt at decoding the transmissions from the early days of the RTL-SDR project, he realized what he was actually seeing was the combination of two 8-bit pH measurements that are sent out simultaneously.

We were pleasantly surprised to see how much public information [James] was able to find about the Medtronic Bravo Reflux Capsule, but in a perfect world, this would be the norm. You deserve to know everything there is to know about a piece of electronics that’s going to be placed inside your body, but so far, the movement towards open hardware medical devices has struggled to gain much traction.

Discount Microfluidics From A $9 Spree At The Dollar Store

Microfluidics — working with tiny volumes of fluids in tiny channels — isn’t something you’d think would be inexpensive. Unless you read [Alexander Bissells’] post on how he created microfluidic devices using stuff from the dollar store. The channels in these devices can be much smaller than a millimeter and the fluid volumes are sometimes measured in femtoliters. At those scales, fluids don’t work like we intuitively think they will.

The parts list included gel tape, baby droppers, and some assorted containers and tools. Total price at the dollar store $9. One of the key finds in the dollar store was some small spray bottles. They weren’t important themselves, but they contain small lengths of silicone tubing and that was useful. Plastic fresnel lenses along with the tubing and gel tape worked to make “chips.” The gel tape also gets cut to make the channels. An eyedropper with some modifications makes a reasonable syringe.

We aren’t sure what you can practically do with any of these, but the T-junction looked pretty interesting. If you want some ideas on how these devices work in biology, including COVID-19 testing, check out this article. And just last week [Krishna Sanka] hosted a Hack Chat on microfluidics in biohacking, you can find the transcript on the project page. If you need a pump, this one uses 3D printer firmware to control it.