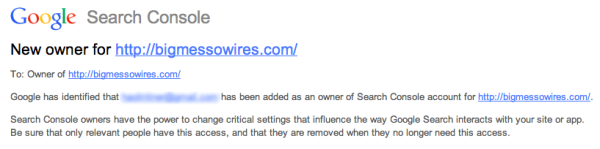
Screensaver Hack

Bypassing The Windows Lock Screen

Most of us know that we should lock our computers when we step away from them. This will prevent any unauthorized users from gaining access to our files. Most companies have some sort of policy in regards to this, and many even automatically lock the screen after a set amount of time with no activity. In some cases, the computers are configured to lock and display a screen saver. In these cases, it may be possible for a local attacker to bypass the lock screen.

[Adrian] explains that the screen saver is configured via a registry key. The key contains the path to a .scr file, which will be played by the Adobe Flash Player when the screen saver is activated. When the victim locks their screen and steps away from the computer, an attacker can swoop in and defeat the lock screen with a few mouse clicks.

First the attacker will right-click anywhere on the screen. This opens a small menu. The attacker can then choose the “Global settings” menu option. From there, the attacker will click on “Advanced – Trusted Location Settings – Add – Add File”. This opens up the standard windows “Open” dialog that allows you to choose a file. All that is required at this point is to right-click on any folder and choose “Open in a new window”. This causes the folder to be opened in a normal Windows Explorer window, and from there it’s game over. This window can be used to open files and execute programs, all while the screen is still locked.

[Adrian] explains that the only remediation method he knows of is to modify the code in the .swf file to disable the right-click menu. The only other option is to completely disable the flash screen saver. This may be the safest option since the screen saver is most likely unnecessary.

Update: Thanks [Ryan] for pointing out some mistakes in our post. This exploit specifically targets screensavers that are flash-based, compiled into a .exe file, and then renamed with the .scr extension. The OP mentions these are most often used in corporate environments. The exploit doesn’t exist in the stock screensaver.

Uber Hack

Stumbling Upon An Uber Vulnerability

[Nathan] is a mobile application developer. He was recently debugging one of his new applications when he stumbled into an interesting security vulnerability while running a program called Charles. Charles is a web proxy that allows you to monitor and analyze the web traffic between your computer and the Internet. The program essentially acts as a man in the middle, allowing you to view all of the request and response data and usually giving you the ability to manipulate it.

While debugging his app, [Nathan] realized he was going to need a ride soon. After opening up the Uber app, he it occurred to him that he was still inspecting this traffic. He decided to poke around and see if he could find anything interesting. Communication from the Uber app to the Uber data center is done via HTTPS. This means that it’s encrypted to protect your information. However, if you are trying to inspect your own traffic you can use Charles to sign your own SSL certificate and decrypt all the information. That’s exactly what [Nathan] did. He doesn’t mention it in his blog post, but we have to wonder if the Uber app warned him of the invalid SSL certificate. If not, this could pose a privacy issue for other users if someone were to perform a man in the middle attack on an unsuspecting victim.

[Nathan] poked around the various requests until he saw something intriguing. There was one repeated request that is used by Uber to “receive and communicate rider location, driver availability, application configurations settings and more”. He noticed that within this request, there is a variable called “isAdmin” and it was set to false. [Nathan] used Charles to intercept this request and change the value to true. He wasn’t sure that it would do anything, but sure enough this unlocked some new features normally only accessible to Uber employees. We’re not exactly sure what these features are good for, but obviously they aren’t meant to be used by just anybody.

Hacking Oklahoma State University’s Student ID Cards

[Sam] took an information security class at Oklahoma State University back in 2013. For his final project, he and a team of other students had to find a security vulnerability and then devise a theoretical plan to exploit it. [Sam’s] team decided to focus on the school’s ID cards. OSU’s ID cards are very similar to credit cards. They are the same size and shape, they have data encoded on a magnetic strip, and they have a 16 digit identification number. These cards were used for several different purposes. Examples include photo ID, physical access to some areas on campus, charges to an online account, and more.

[Sam] and his team analyzed over 100 different cards in order to get a good sample. They found that all cards started with same eight digits. This is similar to the issuer identification number found in the first six digits of a credit card number. Th analysis also showed that there were only three combinations used for the next two digits. Those were either 05, 06, or 11. With that in mind, the total possible number of combinations for card numbers was mathematically calculated to be three million.

OSU also had a URL printed on the back of each card. This website had a simple form with a single field. The user can enter in a 16 digit card number and the system would tell the user if that card was valid. The page would also tell you if the card holder was an employee, a student, or if there were any other special flags on the card. We’re not sure why every student would need access to this website, but the fact is that the URL was printed right on the back of the card. The website also had no limit to how many times a query could be made. The only hint that the university was aware of possible security implications was the disclaimer on the site. The disclaimer mentioned that usage of the tool was “logged and tracked”.

The next step was to purchase a magnetic card reader and writer. The team decoded all of the cards and analyzed the data. They found that each card held an expiration date, but the expiration date was identical for every single card.  The team used the reader/writer to copy the data from [Sam’s] card and modify the name. They then wrote the data back onto a new, blank magnetic card. This card had no printing or markings on it. [Sam] took the card and was able to use it to purchase items from a store on campus. He noticed that the register reached back to a server somewhere to verify his real name. It didn’t do any checks against the name written onto the magstripe. Even still, the cashier still accepted a card with no official markings.

The final step was to write a node.js script to scrape the number verification website. With just 15 lines of code, the script will run through all possible combinations of numbers in a random sequence and log the result. The website can handle between three and five requests per second, which means that brute forcing all possible combinations can be completed in roughly two days. These harvested numbers can then be written onto blank cards and potentially used to purchase goods on another student’s account.

[Sam’s] team offers several recommendations to improve the security of this system. One idea is to include a second form of authorization, such as a PIN. The PIN wouldn’t be stored on the card, and therefore can’t be copied in this manner. The primary recommendation was to take down the verification website. So far OSU has responded by taking the website offline, but no other changes have been made.

Another Garage Door Opener, This Time With Security

We’ve been seeing a lot of garage door opener hacks, whether it’s because one person inspired everyone else to build their own Internet-connected GDO or because there’s something in the water that’s caused the simultaneous building of one specific type of project, we’re not sure. However, the latest one we’ve seen adds a little something extra: motion-based security.

[DeckerEgo] really went all out with this one, too. The core of the project is a Raspberry Pi hardwired to a universal garage door remote. The Pi also handles a small webcam and runs a program called motion, which is a Linux program that allows for all kinds of webcam fun including motion detection. While the other builds we see usually use a button or limit switch to tell whether the door is open or closed, this one just watches the door with the webcam so [DeckerEgo] can actually see what’s going on in the garage. As a bonus, the motion software can be configured to alert him if anything suspicious is going on in the garage.

The build is full-featured as well, with an interesting user interface overlaid on the live picture of the garage door. According to [DeckerEgo] the camera is a necessity because he wouldn’t trust a simple status indicator, but if you wanted to try one of those before breaking out the Raspberry Pi, we’ve featured one recently that you can check out.

RasPi Doorbell

Raspberry Pi Doorbell Is Fully Featured

When you think of a doorbell, you typically don’t think of anything very complicated. It’s a button that rings a bell inside your home. That’s about it. [Ahmad] decided he wanted to turn his doorbell up to eleven (Google Doc) with this build. Using a Raspberry Pi, he was able to cram in loads of features.

When the doorbell button is pressed, many different events can be triggered. In the demo video, [Ahmad] shows how his phone receives a text message, and email, and a tweet. The system can even be configured to place a voice call via Google Hangouts using a USB microphone. [Ahmad] demonstrates this and shows how the voice call is placed almost instantly when the button is pressed. This may be a bit overkill, but it does demonstrate many different options depending on your own needs.

For the hardware side of things, [Ahmad] purchased a wireless doorbell. He opened up the ringer unit and hooked up the speaker wires to a couple of pins on the Raspberry Pi through a resistor. The doorbell unit itself is powered off of the 3.3V supply from the Pi. The Pi also has a small LCD screen which shows helpful information such as if the Internet connection is working. The screen will also display the last time and date the doorbell was pressed, in case you weren’t home to answer the door.

On top of all of that, the system also includes a Raspberry Pi camera module. This allows [Ahmad] to take a photo of the person ringing the doorbell as a security measure. He can even view a live video feed from the front door by streaming directly to YouTube live. [Ahmad] has provided a link to his Pi image in the Google Doc so others can use it and modify it as they see fit. Continue reading “Raspberry Pi Doorbell Is Fully Featured”

Facebook Bounty

Deleting Facebook Albums Without Permission

[Laxman] was poking around Facebook looking for security vulnerabilities. Facebook runs a bug bounty program which means if you can find a vulnerability that’s serious enough, it can earn you cold hard cash. It didn’t take much for [Laxman] to find one worthy of a bounty.

The graph API is the primary way for Facebook apps to read and write to the Facebook social graph. Many apps use this API, but there are limitations to what it can do. For example, the API is unable to delete users’ photo albums. At least, it’s not supposed to be able too. [Laxman] decided to test this claim himself.

He started by sending a command to delete one of his own albums using a graph explorer access token. His request was denied. The application didn’t have the correct permissions to be able to perform that action. It seemed that Facebook was correct and the API was unable to delete photos. [Laxman] had another trick up his sleeve, though. He noticed that the wording of the response suggested that other apps would have the ability to delete the albums, so he decided to check the Facebook mobile application.

He decided to send the same request with a different token. This time he used a token from the Facebook for Mobile application. This actually worked, and resulted in his photo album being deleted. To take things a step further, [Laxman] sent the same requests, but changed the user’s ID to a victim account he had set up. The request was accepted and processed without a problem. This meant that [Laxman] could effectively delete photo albums from any other user without that user’s consent. The vulnerability did require that [Laxman] had permission to view the album in the first place.

Since [Laxman] is one of the good guys, he sent this bug in to the Facebook team. It took them less than a day to fix the issue and they rewarded [Laxman] $12,500 for his trouble. It’s always nice to be appreciated. The video below shows [Laxman] walking through how he pulled off this hack using Burp Suite. Continue reading “Deleting Facebook Albums Without Permission”

Resurrecting Capcom’s Kabuki

About a dozen old Capcom arcade titles were designed to run on a custom CPU. It was called the Kabuki, and although most of the core was a standard Z80, a significant portion of the die was dedicated to security. The problem back then was arcade board clones, and when the power was removed from a Kabuki CPU, the memory contents of this security setup were lost, the game wouldn’t play, and 20 years later, people writing emulators were tearing their hair out.

Now that these games are decades old, the on-chip security for the Kabuki CPU is a problem for those who have taken up the task of preserving these old games. However, now these CPUs can be decuicided, programming the chip and placing them in an arcade board without losing their memory contents.

Earlier we saw [ArcadeHacker] a.k.a. [Eduardo]’s efforts to resurrect these old CPUs. He was able to run new code on the Kabuki, but to run the original, unmodified ROMs that came in these arcade games required hardware. Now [ArcadeHacker] has it.

The setup consists of a chip clip that clamps over the Kabuki CPU. With a little bit of Arduino code, the security keys for original, unmodified ROMs can be flashed, put into the arcade board (where the contents of the memory are backed up by a battery), and the clip released. [ArcadeHacker] figures this is how each arcade board was programmed in the factory.

If you’re looking for an in-depth technical description of how to program a Kabuki, [ArcadeHacker] has an incredibly detailed PDF right here.

Continue reading “Resurrecting Capcom’s Kabuki”