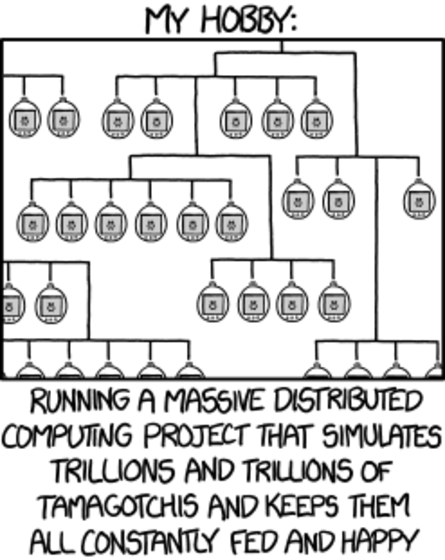
Hackaday Munich Speaker: Sprite_TM

Plans for Hackaday Munich are coming along quite nicely. Today we’re happy to announce that [Sprite_TM] will be speaking at the event. Click that link above and make sure you get your tickets for November 13th. You can do some hands-on hacking at the Embedded Hardware Workshop, hear the talks, find out which of the five finalists will be the grand prize winner, and enjoy The Hackaday Prize Party along with the Hackaday crew.

You may also know [Sprite_TM] as [Jeroen Domburg], one of the judges for The Hackaday Prize. That’s him on the left in the image above (we love a good avatar!). If you follow Hackaday, you should already be thrilled about meeting him and hearing his talk. The last talk we remember reading about was an epic hard drive controller hack. Just last month we saw a well-executed clock radio overhaul from him. While we’re on the topic, his micro-bots were a spectacular project.

[Sprite_TM] has also offered to help out with the reverse engineering workshop. We’re hard at work making sure everything is in place for those afternoon hacking events. As we solidify details we’ll be adding workshop pages (and emailing those already registered for Hackaday Munich) to let everyone know what to expect. We can report that we have shipped [Sprite_TM] a Bus Pirate so that he can be familiar with it. This will be the primary tool provided for this particular workshop.

The entire Hackaday crew is looking forward to it. See you there!

[Sprite_TM] OHM2013 Talk: Hacking Hard Drive Controller Chips

Even if he hadn’t done any firmware hacking on this hard drive [Sprite_TM’s] digital exploration of the controller is fascinating. He gave a talk at this year’s Observe, Hack, Make (OHM2013) — a non-commercial community run event in the Netherlands and we can’t wait for the video. But all the information on how he hacked into the three-core controller chip is included in his write up.

[Sprite_TM] mentions that you’re not going to find datasheets for the controllers on these drives. He got his foot in the door after finding a JTAG pinout mentioned on a forum post. The image above shows his JTAG hardware which he’s controlling with OpenOCD. This led him to discover that there are three cores inside the controller, each used for a different purpose. The difference between [Sprite_TM’s] work and that of mere mortals is that he has a knack for drawing surprisingly accurate conclusions from meager clues. To see what we mean check out the memory map for the second core which he posted on page 3 of his article.

Using JTAG he was able to inject a jump into the code (along with a filler word to keep the checksum valid) and run his own code. To begin the firmware hacking portion of the project he pulled the flash ROM off of the board and installed it on that little board sticking out on the left. This made it easy for him to backup and reflash the chip. Eventually this let him pull off the same proof of concept as a firmware-only hack (no JTAG necessary). He goes onto detail how an attacker who has root access could flash hacked firmware which compromises data without any indication to they system admin or user. But we also like his suggestion that you should try this out on your broken hard drives to see if you can reuse the controllers for embedded projects. That idea is a ton a fun!

When we were poking around the OHM2013 website (linked above) we noticed that the tickets are sold out; good for them! But if you were still able to buy them they take Bitcoin as one payment option. Are there any other conferences that allow Bitcoin for registration?

[Sprite_tm]’s Three-component FM Transmitter

When the Regency TR-1 transistor radio came out onto the market in the 1950s, it was hailed as a modern marvel of microelectronics. With only four transistors and a handful of other components, the TR-1 was a wonder of modern engineering. [Sprite_tm] may have those old-timers beat, though. He built an FM transmitter with the lowest parts count of any transmitter ever.

Like most of [Sprite_tm]’s builds, it’s an unimaginably clever piece of work. [Sprite] overclocked the internal RC oscillator of an ATtiny45 to 24 MHz. After realizing the PLL running at four times the frequency of the oscillator was right in the middle of the FM band, he set about designing a tiny FM transmitter.

[Sprite_tm] remembered his work on MONOTONE and made a short song for hit ATtiny. The firmware for the build takes the notes from his song and varies the 96 MHz PLL frequency a tiny bit, thereby serving as a tiny FM transmitter.

Does it work? Well, if you want to compare it to a Mister Microphone, the range is incredibly limited. That being said it works. It’s an FM transmitter built out of a microcontroller and a battery, and that’s very impressive. Check out [Sprite_tm]’s demo after the break.

Continue reading “[Sprite_tm]’s Three-component FM Transmitter”

Rebuilding A Mac SE As A Server Again

Around this time last year, [Sprite_TM] took a 1980’s-era Macintosh SE and rebuilt it as a home file server. He used a Seagate Dockstar as the new motherboard, but over the past year he’s been annoyed with the fact that the Dockstar doesn’t have real SATA ports. Using USB to SATA converters on a server is a slow way of doing things, so [Sprite_TM] rebuilt his SE using an HP thin client. To do this, he had to break out the onboard SATA and PCIE; not an easy task, but that’s why [Sprite_TM] is around.

The first order of business was installing a pair of SATA ports. The stock thin client had two NAND-flash chips serving as the drive, both connected to a SATA controller. All [Sprite_tm] had to do was desolder the flash chips and wire up the new SATA connections. Easy enough.

Because the HP thin client only had 100Mbps Ethernet, [Sprite_tm] wasn’t looking forward to the order of magnitude difference between his expected rsync speeds and what he would get with a 1Gbps connection. The only problem is the thin client didn’t have a spare PCIE connection for an Ethernet card. That’s really no problem for [Sprite_tm], though: just desolder the GPU and run a few wires.

Just like last year’s work on his SE, [Sprite_tm] ended up with a functional and very cool home server. The old-school System 7 is still there, and of course he can still play Beyond Dark Castle. Awesome work, in our humble opinion.

Adding A MIDI Input To A Game Boy

[Sprite_tm] is back again, and his work never fails to impress. His latest project is a Game Boy Advance MIDI synth that takes MIDI data from a keyboard or sequencer and maps that to Game Boy sound channels.

Because he seems to never do anything the normal way, [Sprite_tm] decided to run the Game Boy without a cartridge. We’ve seen this before; the GBA boots into the synth software over the link cable with multibooting.

Continue reading “Adding A MIDI Input To A Game Boy”

Unlocking The Crippled Potential Of An Unmanaged Switch

[Sprite_TM] outgrew the features of the cheap unmanaged TL-SG1005D switch he was using on his home network. Instead of buying a new and much more costly switch he cracked the cheap one open and found that the RTL8366SB chip inside possessed the ability to work harder but was crippled for sale as a low-end model. It wasn’t as easy as that oscilloscope firmware upgrade we saw a while back. He had to add an AVR ATmega88 to send I2C commands to the switch. Turns out that the I2C protocol wasn’t standard and after much head scratching he found some Linux drivers for the chipset that gave him enough info to send the configuration commands he needed. Now he’s go the managed switch he needed for his VLAN for the cost of a microcontroller and some wire.

Wireless RGB Light Bulb

img_3953

Want to make the above yourself? [Sprite_tm] did a thorough job documenting the build step by step (complete with pics, schematics, graphs, and links to the parts used). In summary, [Sprite_tm] busted open an Ikea CFL bulb to reuse the housing. Inside, he installed a scavenged power supply, ATtiny44, RGB LED module, and a radio receiver. A remote control allows [Sprite_tm] to change the lighting of his room to nearly any color. The cost of the project is a little under $30. The price tag isn’t so steep when one considers the insanely long lifetime of LEDs.