Sun Ray Thin Client Becomes Raspberry Pi Workstation

One of the great predictions of desktop computing from the mid 1990s was that we would all move to so-called thin clients, stripped-out desktop computers containing only processor, display driver, and peripheral interfaces, that would call up their applications not from a local hard disk but from a remote server. It was one that was never fulfilled in quite the way its proponents envisaged, but a business thin client hardware market did emerge for the likes of Citrix sharing of Windows applications. In a sense we have reached the same point through cloud-based in-browser applications such as Google Apps or Office 365, though even with newer thin client hardware such as the Chromebook these are still largely used on more traditional machines.

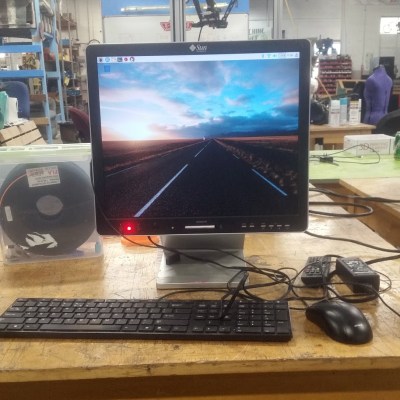
Even though thin clients never took the world by storm, it is still not unusual to encounter the hardware once it has outlived its usefulness. A surplus Sun Ray 270 all-in-one thin client came [Evan Allen]’s way, and to make something useful from it he converted it into a Raspberry Pi workstation.
The Sun Ray 270 has a MIPS processor board integrated into a 17 inch monitor. [Evan] was fortunate enough to find a generic HDMI controller board for its LCD panel, so was able to dispense with the MIPS board entirely and couple the controller with an automatic HDMI switch. This allows him to use the device both as a Raspberry Pi and as a monitor.

This may not rank among the most epic hacks ever, but it has delivered [Evan] a useful computer and it’s reminding the rest of us that these thin clients can be repurposed. So if one lands on your bench, look at it with fresh eyes.

Of course, if you have a Pi in a thin client, you could always take it full circle and use it to run a thin client.

Two-Axis Solar Tracker

Solar panels are an amazing piece of engineering, but without exactly the right conditions they can be pretty fickle. One of the most important conditions is that the panel be pointed at the sun, and precise aiming of the panel can be done with a solar tracker. Solar trackers can improve the energy harvesting ability of a solar panel by a substantial margin, and now [Jay] has a two-axis tracker that is also portable.

The core of the project is a Raspberry Pi, chosen after [Jay] found that an Arduino didn’t have enough memory for all of the functionality that he wanted. The Pi and the motor control electronics were stuffed into a Pelican case for weatherproofing. The actual solar tracking is done entirely in software, only requiring a latitude and longitude in order to know where the sun is. This is much easier (and cheaper) than relying on GPS or an optical system for information about the location of the sun.

Be sure to check out the video below of the solar tracker in action. Even without the panel (or the sun, for that matter) the tracker is able to precisely locate the panel for maximum energy efficiency. And, if you’d like to get even MORE power from your solar panel, you should check out a maximum power point tracking system as well.

Continue reading “Two-Axis Solar Tracker”

Solar Oven Built To Last

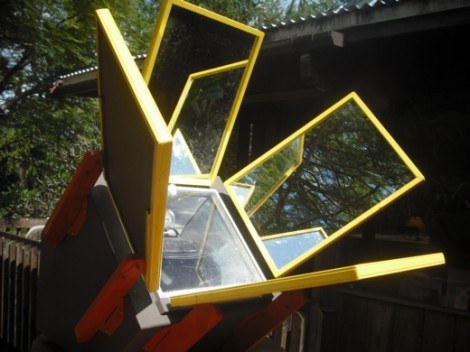
The problem with most solar ovens is that they’re flimsy builds that will stand up to only a handful of uses. But this one stands apart from that stereotype. It’s big, sturdy, and used a lot of math to efficiently gather the sun’s energy when cooking food.

This is the third version of the build and each has included many improvements. The obvious change here is a move from aluminum reflectors to actual mirror reflectors. These attach at a carefully calculated angle to get the most power from the rays they are redirecting. The orange mounting brackets for the mirrors also serve as a storage area for transport. The rectangular reflectors fit perfectly between them (stacked on top of the tempered glass that makes up the transparent side of the cooking chamber).

The body of the oven doesn’t track the sun and one of the future improvements mentions adding tilt functionality to the base. We’d suggest taking a look at some of the solar tracking setups used for PV arrays.

[Thanks John]

Sun-powered Stirling Engine With Automatic Tracking

Check out this solar-powered Stirling engine (translated). The build is part of a high school class and they packed in some really nice features. The first is the parabolic mirror which focuses the sun’s rays on the chamber of the engine. The heat is what makes it go, and the video after the breaks shows it doing just that.

But the concept behind the mirror makes for an interesting challenge. The light energy is focused at a narrow point. When the sun moves in the sky that point will no longer be at an efficient position to power the engine. This issue is solved by a pair of stepper motors which can reposition the dish. It’s done automatically by an Arduino Uno which makes readings from four LDR (photoresistors) in that cardboard tube mounted at the top of the dish. If the light intensity is the same for all four, then the tube is pointed at the sun. If not, the motors are tweaked to get the best angle possible.

Continue reading “Sun-powered Stirling Engine With Automatic Tracking”

Soda Bottle Skylights

Here’s a way to brighten up enclosed spaces in an environmentally friendly way. The power of the sun is harnessed using a bottle full of water. Quite simply they’re used 2-liter soda bottles. They’ve been filled with water along with two caps worth of bleach to keep microorganisms out. The cap is then covered with a film canister to protect it from the sun. They are installed through holes in the roof, and in full sun they put out the equivalent of a 50 watt incandescent light bulb.

Our first thought is keeping the weather out but that is addressed in the video after the break. With proper weather sealing they do not leak. We might not be installing them in the house just yet, but what a great addition to that dark shed that has no electricity and seems to gobble up yard implements. Perhaps we’ll finally be able to find all of those hand trowels that have gone missing.

Continue reading “Soda Bottle Skylights”

Beer Can Pinhole Camera

When [Justin Quinnell] sent in his beer can pinhole camera, we were just floored. The parts are easy to obtain, and the process for building and ‘shooting’ with the camera are near effortless.

The really impressive part of this hack is letting your camera sit for 6 months facing the sun. Yes, you read that correct, a 6 month exposure. Check out after the break for one of his astonishing shots, and trust us, its well worth the click. Continue reading “Beer Can Pinhole Camera”