This SMD Reflow Hot Air Gun Hangs Around Your Workbench

smd_reflow_hot_air_gun_nc_80

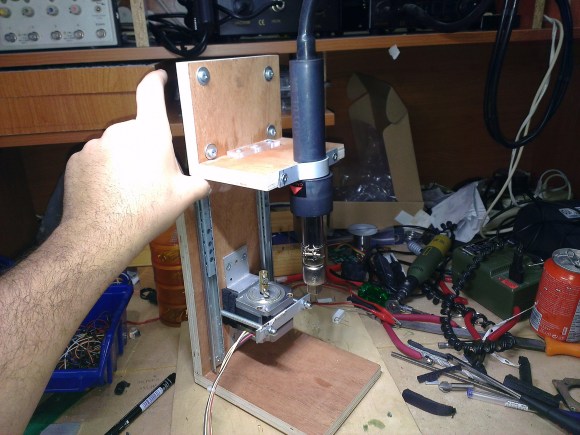
Has reflowing surface mount components got you down? [Giorgos] is currently working on a project that will lift your spirits…. well at least your hot air gun. Tired of manually holding his heat gun in one hand and IR thermometer in the other, [Giorgos] set out to create a device to alleviate just that. Although not completed yet, it appears the machine’s intent is to hold the heat gun at an appropriate height above the work piece in order to achieve the correct reflow temperature. He doesn’t say how the height of the hot air gun will be controlled. We’d like to see a microcontroller adjust the height of the hot air gun depending on the temperature of the component to be reflowed. [Giorgos] gives an extremely detailed account of his build process. Make sure to check out all four pages of the project post!

We’ve seen a lot of interesting work from [Giorgos] over the years like this capacitive touch-pad entry system.

[via Dangerous Prototypes]

Electric Skillet Reflow Soldering Guide

skillet-reflow-tutorial

It’s no secret that we’re bizarrely drawn to macro videos showing solder paste during the reflow process. This electric skillet reflow guide provides the fix we’ve been jonesin’ for while including some helpful tips for first-timers and veterans alike. Not sure what we’re talking about? Look at the grey paste at the top of this image. As it heats up it’s drawn under each component as seen in the lower half of the image.

This particular guide is aimed at one-off assembly so a solder paste stencil is not used (we learned a lot about those earlier in the month). It instead uses the painstaking toothpick application technique. It takes time but the upside is that once you get the hang of it you’ll apply the perfect amount of solder each time. After placing all of the components [Count Spicy] carefully transfers the board to an electric skillet, covers it with the glass lid (so he can see what’s going on), and sets the temperature just above the solder’s specified melting point.

Since the skillet is cheap and easy to find you really just have to order the solder paste to get into this type of assembly. Our only gripe is that you can’t really follow a temperature profile with this rig. For that you need to move up to some PID controlled hardware.

Continue reading “Electric Skillet Reflow Soldering Guide”

Quick Fixes For SMD Population Problems

Here’s a collection of tricks to get over some surface mount prototyping issues the next time you find yourself in a bind. But first we have to address the soldering atrocity seen on most of the components above. [Rxdtxd] admits he’s using a firestick for soldering his SMD parts. The non-brand 40W iron is just about the worst thing he could be using (well, we guess a candle would be worse). Try to overlook those joints and enjoy his solutions to a couple of other problems.

First up is what to do when you lift a fine-pitch trace like would be found on a TQFP footprint. The fix for this is to grab a junked transformer and use a bit of the enameled wire from the wrappings as a jumper. The wire is quite fine, and the insulation will burn off when soldered which means you don’t need to strip it first.

The second and third tricks both deal with resistors. As you can see above he placed two 1K resistors on a single resistor footprint to make his 2k resistor. The 0603 packages were both soldered standing on end, then connected with a lead from a through-hole component. The other resistor hack piles five components on top of each other to build resistance in parallel. This is not a great idea as it will fail over the long-term, but it will get you though the prototyping stage as long it doesn’t require precise tolerance.

Populate SMD Boads Using A Toothpick And Tweezers

Here’s a demonstration which proves you don’t really need special tools to populate a surface mount PCB. We’ve seen this board before, it’s the glass PCB server which [Cnlohr] developed and demonstrated by connecting the real world to Minecraft. It’s a tiny board and we were happy to have the chance to see his method for populating the parts before reflow soldering.

In the video after the break [Cnlohr] starts by dispensing a glob of solder pasted from its storage container. He mentions that as long as you store the stuff in the refrigerator it’s rather easy to work with. Because most of his projects are single boards it’s not worth it to have a solder stencil produced. Instead he picks up a bit of the solder glob on the end of a toothpick and applies it to each pad.

This isn’t really as bad as it sounds. The fine pitch TQFP footprints can just be dragged with a bit of the paste. After this application — which took around seven minutes — he grabs some tweezers (not the vacuum type) and begins placing each component. If he missed some paste he’ll discover it in this step and add where necessary. The last step is a trip through his toaster oven.

Continue reading “Populate SMD Boads Using A Toothpick And Tweezers”

$20 Vacuum Pen Build On Of The Best We’ve Seen

20-dollar-vacuum-pen-build

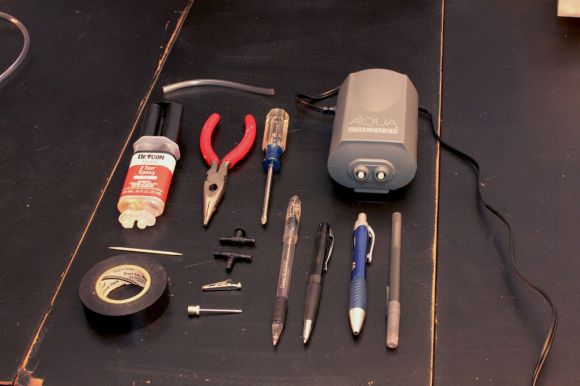
Everything you need to build a vacuum tweezers is laid out in this image. The parts should run you about $20 and when you’re done you’ll have the perfect tool for placing very small surface mount parts for reflow soldering.

This project uses the same concept as other fish pump tweezers projects but builds upon them with some interesting additions. The first step in the conversion process is to tear down the aquarium pump to reverse its flow. There are several steps but all-in-all it’s not very difficult. With the source of vacuum established [Technically Artistic] begins work on the business end of the tool. This is where the array of different pens see some action. The large blue one is the outer assembly, with the others combining to help connect it to the plastic tubing. The business end is made from a needle adapter for an air compressor, with an alligator clip cleverly modified to serve as a valve to release the parts from the tip.

An Inexpensive Manual Pick-and-Place Machine

pick-and-place

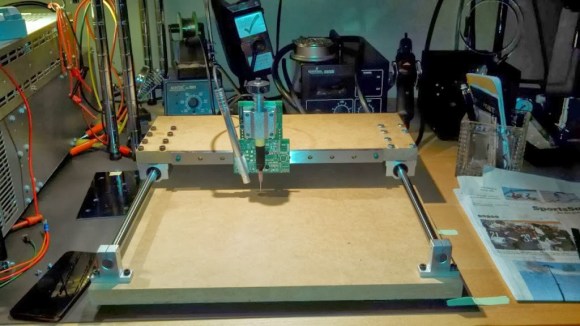
When dealing with surface mount components, a manual pick-and-place machine is certainly a helpful device to have. Unfortunately, they can be quite expensive, so [Vassilis] came up with his own solution.

While commercial setups can cost upwards of a thousand dollars, this setup was made for less than a tenth of this cost. This one uses a simple setup of sliders and bearings available from a local hardware store. A cheap vacuum pen is used to lift the components, using an aquarium pump in reverse to generate suction. Finally, a USB microscope is used to make sure everything is placed in the correct position.

Plans are available on the site in DXF format, so you can build your own. The setup is reminiscent of a DIY CNC router, like this one that we featured a while ago. We could even see something like this serving a dual role with interchangeable heads for whatever you happen to be making that day!

Update: [Vassilis] published an video demonstration. See it after the break.

Continue reading “An Inexpensive Manual Pick-and-Place Machine”

Semi-professional Board Assembly For Your Workshop

[Zach Hoeken] has the answer to assembling multiple surface mount PCBs in the home workshop. It’s certainly not for everyone. But if you’ve ever thought of marketing your own small runs he has the equipment and methodology you need.

He had tried using hacked together equipment, but after encountering a range of issues he finds the investment in a few key items saves time and money in the long run. The first is a precision tooling fixture block; that metal plate with a grid of holes that makes up the background of the image above. It comes with machined pegs which fit the holes perfectly, and as you can see, his panel of 16 boards include tooling holes that line up with the fixture. Once in place, a steel solder stencil is aligned with the board using its own tooling holes. The alignment of the stencil and its uniformed thickness ensure that the perfect amount of solder paste is easy to apply with a squeegee. [Zach] hand places his components but he did invest in a proper reflow oven to make the soldering a set and forget process.