The band Kraftwerk hit the music scene with its unique electronic sound in the 70s in Germany, opening the door for the electronic music revolution of the following decade. If you’re not familiar with the band, they often had songs with a technology theme as well, and thanks to modern microcontroller technology it’s possible to replicate the Kraftwerk sound with microcontrollers as [Steven] aka [Marquis de Geek] demonstrates in his melodic build.
While the music is played on a Stylophone and a Korg synthesizer, it is fed through five separate Arduinos, four of which have various synths and looping samplers installed on them (and presumably represent each of the four members of Kraftwerk). Samplers like this allow pieces of music to be repeated continuously once recorded, which means that [Steven] can play entire songs on his own. The fifth Arduino functions as a controller, handling MIDI and pattern sequencing over I2C, and everything is finally channeled through a homemade mixer.
[Marquis] also dressed in Kraftwerk-appropriate attire for the video demonstration below, which really sells the tribute to the famous and groundbreaking band. While it’s a great build in its own right and is a great recreation of the Kraftwerk sound, we can think of one more way to really put this project over the top — a Kraftwerk-inspired LED tie.
Have you ever wanted to experiment with MIDI, but didn’t know where to start? Or perhaps you didn’t think you could afford to properly outfit your digital beat laboratory, especially given the average hacker’s penchant for blinkenlights? Well worry no more, as [Johan von Konow] has unveiled a collection of DIY MIDI devices that anyone with a 3D printer can build on the cheap.
The LEET modular synthesizer is made up of a keyboard, drum pad, chord keyboard, arpeggiator and a step sequencer that plug into your computer and interface with industry standard digital audio workstation (DAW) programs. The down side is that they don’t do anything on their own, but this simplification allowed [Johan] to really streamline the design and bring the cost of the build down to the bare minimum.
Integrated wire channels mean no PCB is required.
You don’t need to build all the components either, especially if you’re just testing the waters. The keyboard is a great starting point, and even if you have to buy all the components new from eBay, [Johan] says it shouldn’t cost you more than $10 USD to build. You just need an Arduino Pro Micro, some tact switches, and a section of WS2812 RGB LED strip. There’s an excellent chance you’ve already got some of that in the parts bin, which will make it even cheaper.
There is one missing element though: the PCB. But not because you have to source it yourself. Like his clever Arduboy clone we covered earlier in the year, the 3D printed bodies for all of the LEET devices have integrated wiring channels that serve as a stand-in for a traditional circuit board. Simply place all your components, push some stiff 0.3 mm diameter wire down into the channels, and solder the ends. It’s a very neat approach, and something we could see becoming more popular as desktop 3D printers become an increasingly common sight in the home workshop.
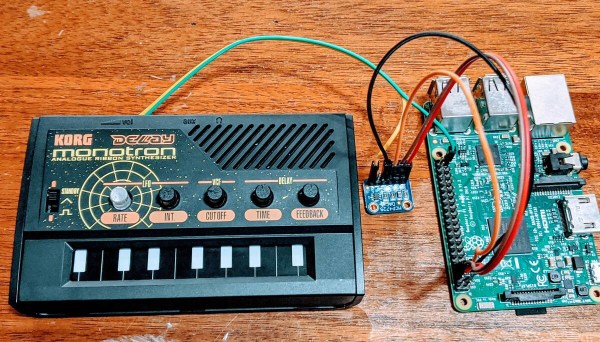
There are a handful of relatively dirt cheap synths out there like the KORG Monotron, but many of them use ribbon controllers that aren’t very precise. Ribbon controllers basically slide pots that you operate with your finger or a stylus. They’re painted to look like piano keys in order to show you approximately where the notes are supposed to be. The Stylophone is another extremely affordable synth that does even less as a synthesizer and uses this type of input. It’s a fun input if you don’t mind imprecision, but can be annoying otherwise.
All it really took was a couple of solder joints in the right places, plus a clever Python script. The script listens for MIDI input from a keyboard, and then controls an MCP4725 DAC, which sends voltages to the Monotron. [schollz] wrote a tuning function that computes the FFT of the MIDI tones to find the fundamental frequencies of each to send along to the Monotron. Check it out after the break.
If imitation is the sincerest form of flattery, what then are we to make of something that shares only a few of the original’s design elements, operates in a completely different way, and has been scaled down to a fifth its size? Still seems like flattery to us.
Despite the changes, it’s clear where [Love Hultén] took inspiration for his miniature Marble Machine XS. Readers will no doubt see in it elements from [Martin Molin]’s original Marble Machine, the fantastic plywood and Lego musical contraption, along with his new Marble Machine X, the construction of which never seems to end. Like the originals, [Love]’s miniature version uses a lot of steel balls, albeit considerably scaled down, and it still uses a programming drum to determine where and when to drop them. But rather than strike real traditional instruments, the falling balls strike synthesizer keys, triggering a range of sounds through its built-in speaker. The whole thing is powered by a small electric motor rather than being hand-cranked and is small enough to sit on a desktop, a decided advantage over the mammoth machines to which it pays homage.
We have to say that as much as we love the hacksmanship of the original Marble Machine and the craftsmanship of its successor, the look and feel of [Love]’s machine just blows us away. We’re not sure what materials he used, but the whole hammertone paint scheme and Meccano look is a feast for nostalgic eyes.
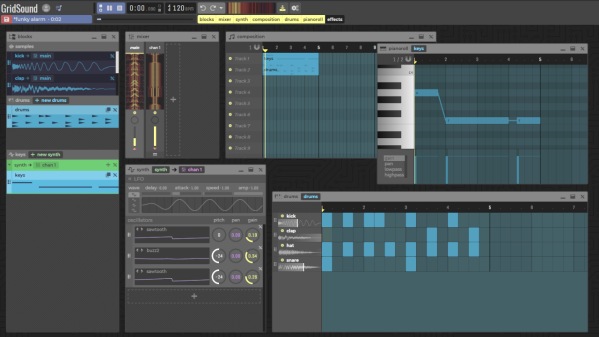
If you’re into creating music, you’ll have a surprisingly large variety of open source options at your disposal, ranging from Audacity as rather simple audio editor to Ardour as a full-blown, studio-worthy DAW — and LMMS, Rosegarden, MusE etc. for anything in between. With [Thomas Tortorini]’s GridSound project, you’ll have one additional choice on your list now, except this one runs in your browser. So if you find yourself in a sudden moment of inspiration, all you’ll need is a browser and off you go.
From the feature set’s point of view, GridSound leans towards LMMS and offers a drum kit, piano roll, and synthesizer. It appears that you won’t be able to record real world instruments at this point, but it’s also a work in progress, so who knows what the future will bring. The code is available on GitHub and you can explore GridSound itself here — no login required, unless you want to save your work. Running in a browser, GridSound is naturally written in JavaScript and uses the Web Audio API to perform the actual audio tasks.
What’s impressive is that [Thomas] opted against any UI framework-of-the-week, but instead implemented everything from scratch in pure vanilla JavaScript. In fact, the entire code base seems to be self-contained without any third party dependencies, and that alone deserves some respect. Sure, JavaScript isn’t everybody’s cup of tea — “real developers use assembly” — so if you prefer something more physical, how about some cardboard music?
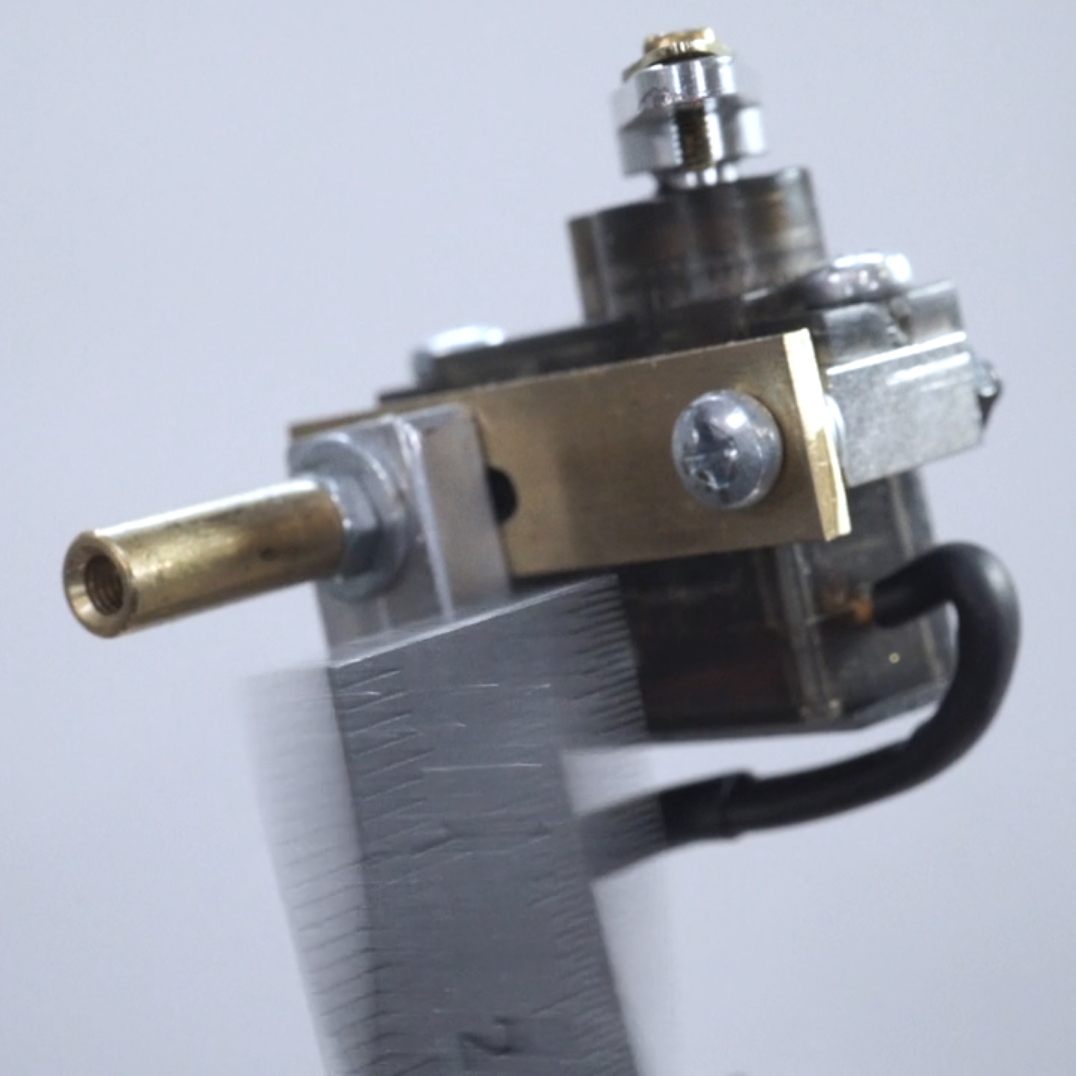
How does one describe the notes that come from a ruler that is anchored on one end and then plucked? The best word we can come up with is “wubulation”. So would that make this ruler-plucking synthesizer a “wubulator”? Or perhaps a “wubatron”?
Whatever we decide to call it, [Dmitry Morozov] dubbed it the RBS-20, or “ruler bass synth, 20-cm”, for the 20-cm stainless steel ruler that forms the heart of the instrument. The ruler is attached to a linear slide which varies the length of the sprung section. A pair of servos can pluck the free section of the ruler in two different places, providing notes in different registers, while another pair of servos control metal fingers that can damp the vibration, change the sustain, and alter the notes. There’s no resonator; the sounds are instead picked up by a piezo mic. Twelve keys on the base of the instrument can be programmed for various lengths, and an OLED display gives the musician feedback. The video below shows the instrument wubulating, and brings us back to those desktop jam sessions in our grade school days — at least until the rulers were confiscated.
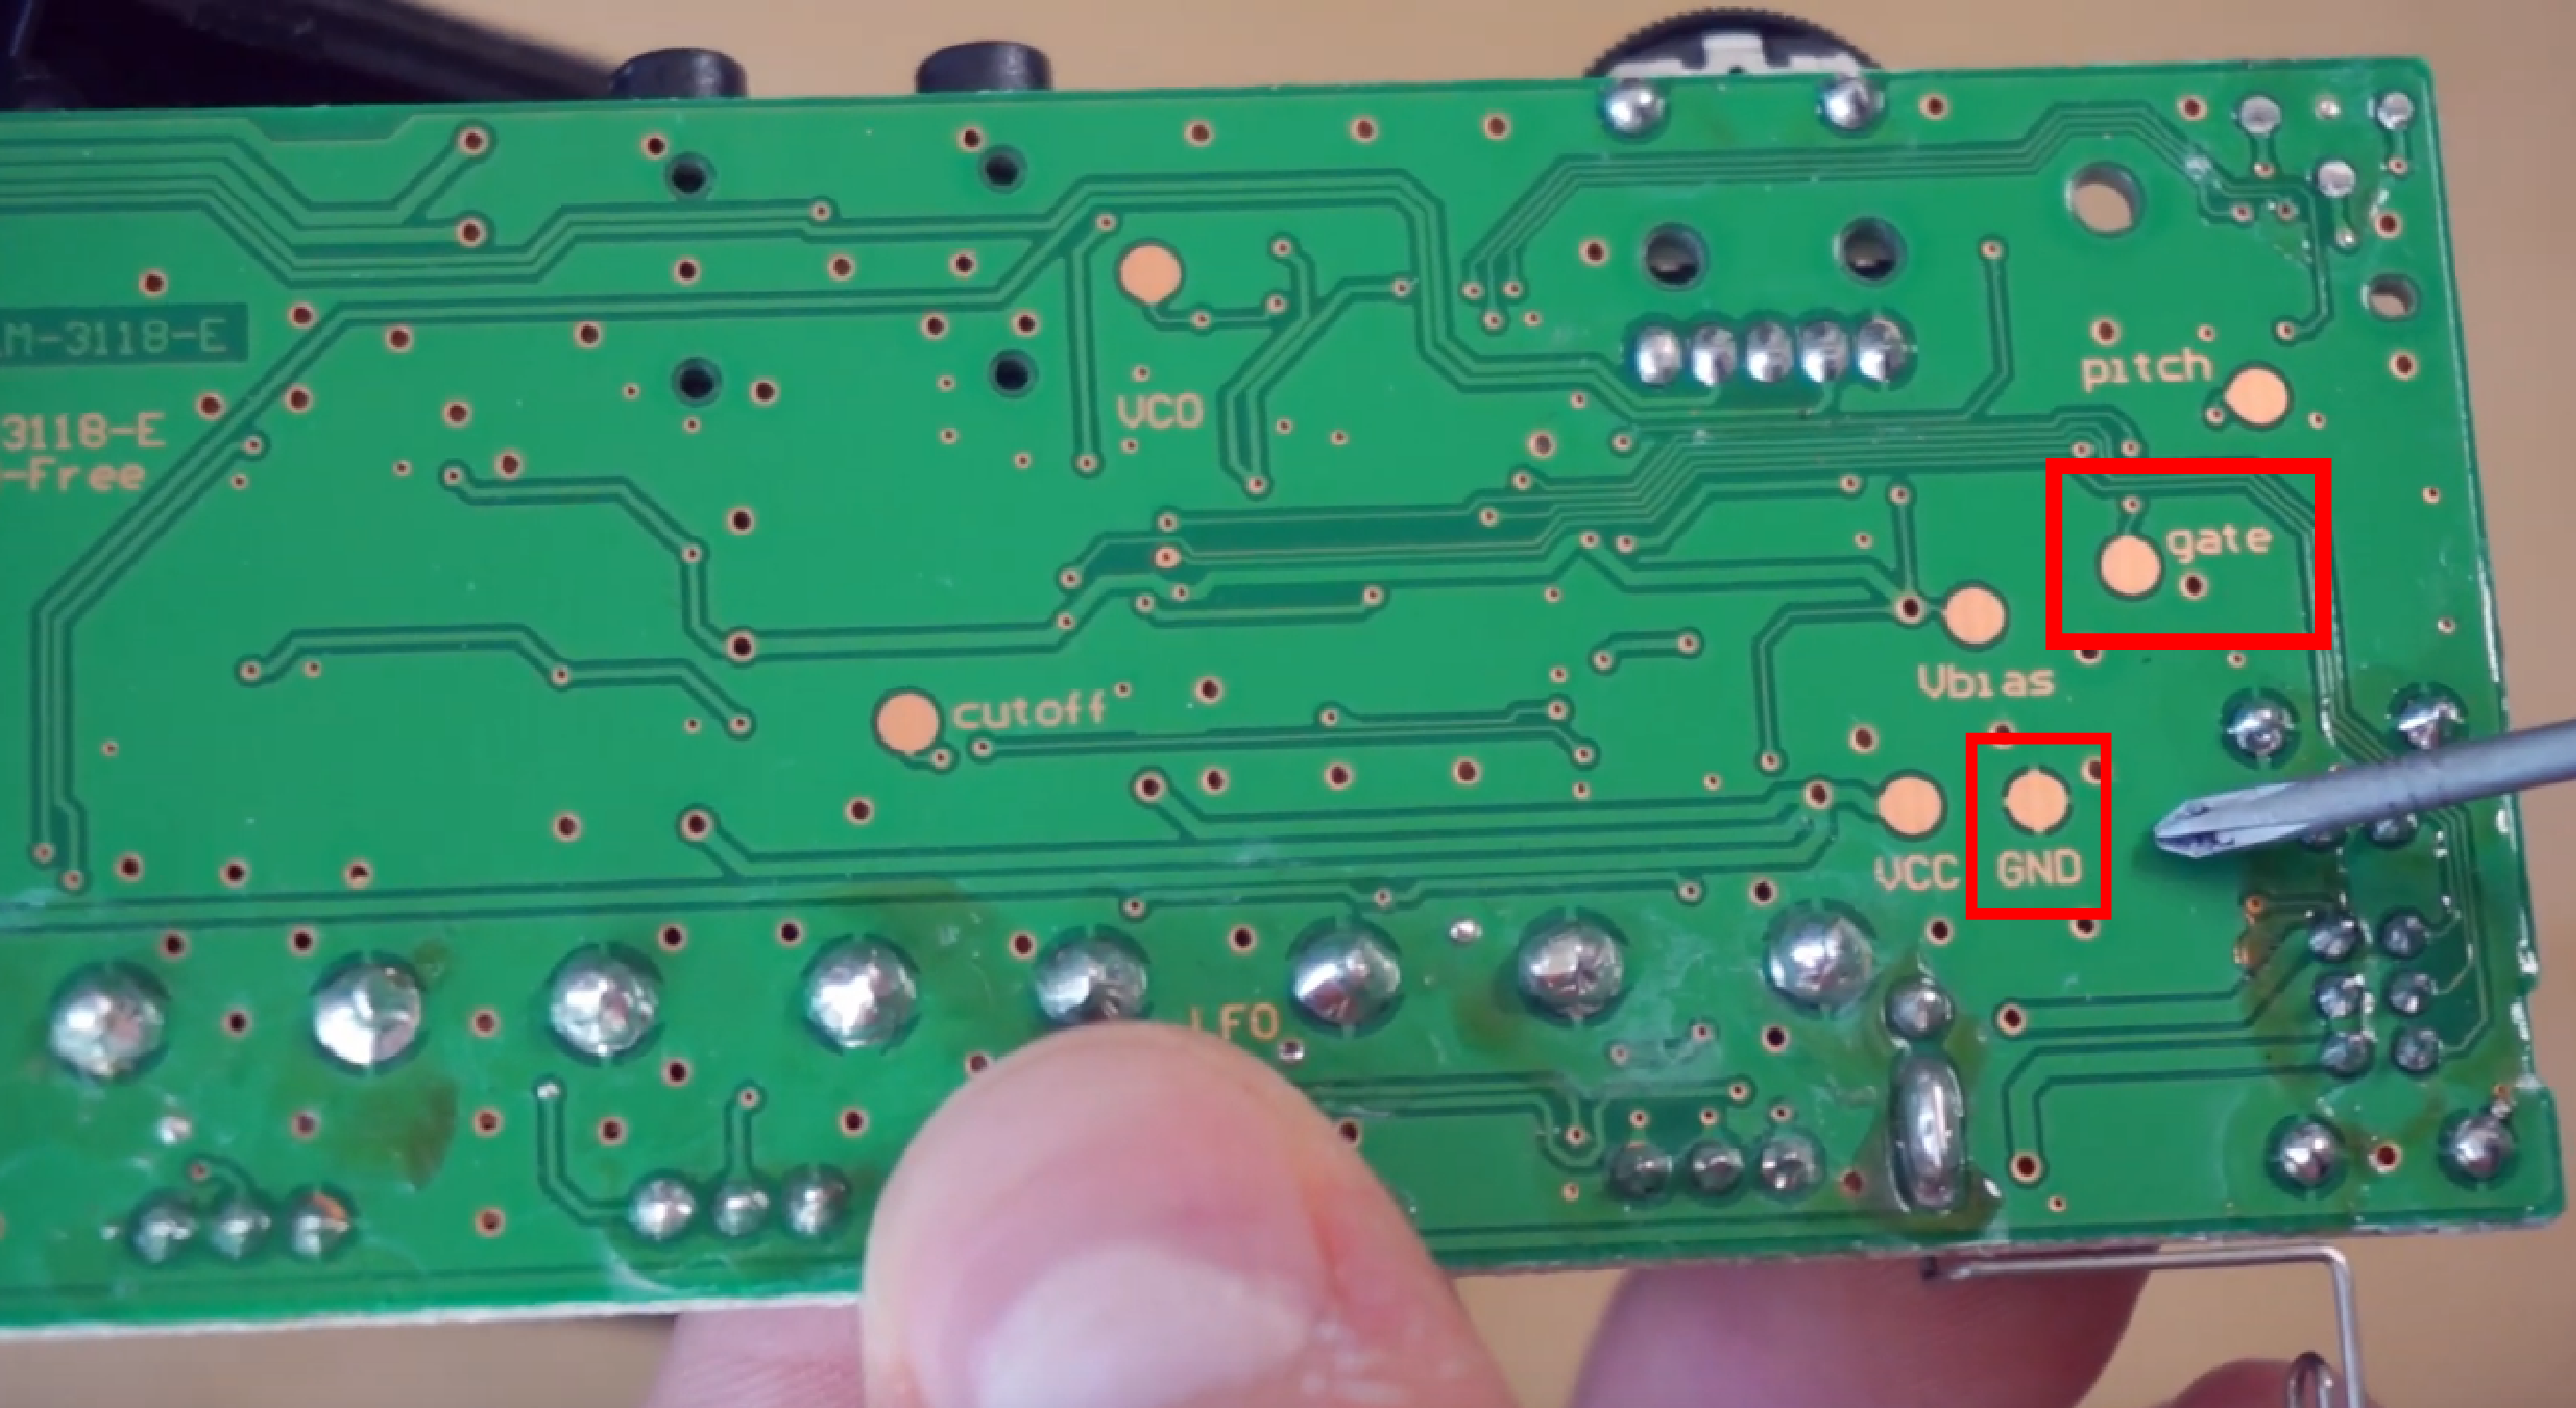
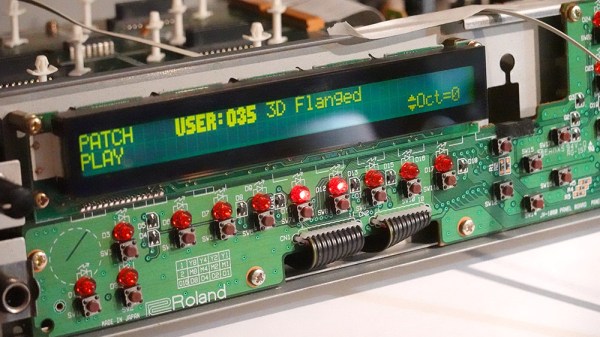
[Mitxela]’s repair of a Roland JV-1080 (a rack-mounted 90s-era synthesizer) sounds simple: replace a broken rotary encoder on the front panel. It turned out to be anything but simple, since the part in question is not today’s idea of a standard rotary encoder at all. The JV-1080 uses some kind of rotary pulse switch, which has three outputs (one for each direction, and one for pushing the knob in like a button.) Turn the knob in one direction, and one of the output wires is briefly shorted to ground with every detent. Turn it the other way, and the same happens on the other output wire. This is the part that needed a replacement.
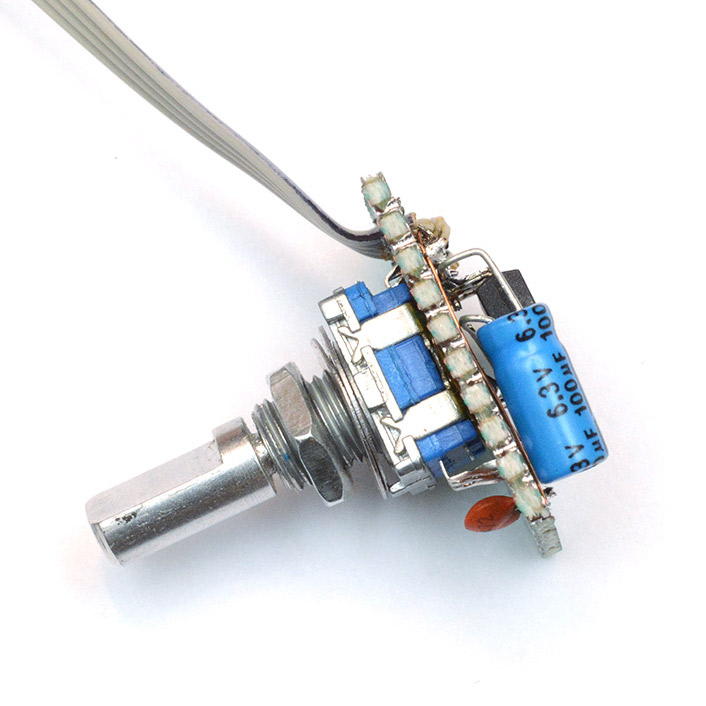
The finished unit uses a modern rotary encoder and microcontroller in place of the original part, and implements a few tricks to power it.
Rather than track down a source for the broken part, [Mitxela] opted to replace it with a modern rotary encoder combined with an ATtiny85 microcontroller to make it act like something the JV-1080 understands and expects. There was an additional wrinkle, however. The original rotary pulse switch is an entirely passive device, and lives at the end of a four-conductor cable with no power provided on it. How could the ATtiny85 be powered without resorting to running a wire to a DC voltage supply somewhere? Success was had, but it did take some finessing.
For the power, it turns out that the signal wires are weakly pulled up to +5 V and [Mitxela] used that for a power supply to the microcontroller. Still, by itself that wasn’t enough, because the ATtiny85 can easily consume more current than the weak pullups can source. We really recommend reading all the details in [Mitxela]’s writeup, but the short version is that the ATtiny85 does two things.
First, it minimizes its power usage by spending most of its time in sleep mode (consuming barely any power at all) and uses an interrupt to wake up just long enough to handle knob activity. Second, the trickle of power from the weak pullups doesn’t feed the ATtiny directly. It charges a 100 uF capacitor through a diode, and that is what keeps the microcontroller from browning out during its brief spurts of activity. Even better, after browsing the datasheet for the ATtiny, [Mitxela] saw it was possible to use the built-in ESD protection diodes for this purpose instead of adding a separate component.
It’s a neat trick and makes for a very compact package. Visit the project’s GitHub repository to dive into the nitty gritty. In the end, a single assembly at the end of a 4-wire connector acts just like the original passive component, no extra wires or hardware modifications needed.
When opening older hardware it’s never quite certain what will be found on the inside. But at least [Mitxela]’s repair duties on this synth didn’t end up with him tripping out on LSD.