Retrotechtacular: Submarine Cable Splicing Is Serious Business

Really. As this wonderfully narrated talkie picture from 1939 will attest, keeping even one drop of water from penetrating undersea cables is of the utmost importance.

How do they do it? Many, many layers of protection, including several of jute wrapping. The video centers on splicing a new cable to an existing one in the San Francisco Bay to bring the wonder of telephony to a man-made island created for the Golden Gate International Expo.

The narrator makes these men out to be heroes, and when you see how much lead they came into contact with, you’ll understand what he means. Each of the 1,056 individually insulated wires must be spliced by hand. After that comes a boiling out process in which petrolatum is poured over the splice to remove all moisture. Then, a lead sleeve is pulled over the connections. Molten lead is poured over the sleeve and smoothed out by hand.

At this point, the splice is tested. The sleeve is punctured and nitrogen gas is pumped in at 20psi.  Then comes the most important step: the entire sleeve is painted with soap suds.  Any gas that escapes will make telltale bubbles.

Once they are satisfied with the integrity of the sheath, they wrap the whole thing in what appears to be lead cables and pound them into submission. Surely that would be enough, don’t you think?  Nope.  They weld the cables all around and then apply two coats of tar-treated jute wrapping, which retards saltwater corrosion considerably.

Continue reading “Retrotechtacular: Submarine Cable Splicing Is Serious Business”

High Voltage ROV Adventures

[Eirik] wrote in to share the build log for the third iteration of his underwater ROV. The first two project were completed and tested (you may remember reading about it back in January), but both had issues that caused general failure. Most notably, the introduction of water where he didn’t want it. But this time around he seems to have gotten everything right, successfully taking this little guy down to twenty meters without a leak.

One of the problems he had on version two was supplying electricity from the surface. He needs 12V at up to 10A, and had to use a tether made of 14 AWG to make it happen. That’s a lot of heavy wire to be hauling around and it made the ROV virtually unable to move itself. He wanted to go back to using Cat5e cable but it won’t handle that kind of current. He ended up using an inverter at the surface to up the voltage to 130V, and a switch mode supply on the ROV to get back to 12V. This caused noise on the data lines which he fixed by adding a full-wave rectifer to the inverter’s output.

The dive video after the break shows off the crystal-clear camera shots this thing can capture.

Continue reading “High Voltage ROV Adventures”

Water Glider Prototype

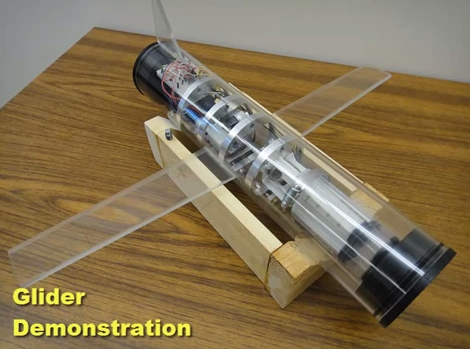
[Byrel Mitchell] wrote in to share some details on this water glider which he has been working on with his classmates at the Nonlinear Autonomous Systems lab of Michigan Technological University. As its name implies, it glides through the water rather than using propulsion systems typically found on underwater ROVs. The wings on either side of the body are fixed in place, converting changes in ballast to forward momentum.

The front of the glider is at the bottom right of the image above. Look closely and you’ll see a trio of syringes pointed toward the nose. These act as the ballast tanks. A gear motor moves a pinion connected to the syringe plungers, allowing the Arduino which drives the device to fill and empty the tanks with water. When full the nose sinks and the glider moves forward, when empty it rises to the surface which also results in forward movement.

After the break you can find two videos The first shows off the functionality and demonstrates the device in a swimming pool. The second covers the details of the control systems.

Continue reading “Water Glider Prototype”

DIY ROV Explores The Watery Depths

This rig looks so good it’s hard to believe this is the first ROV that [DZL] has ever built. It houses an HD camera which feeds the display at the operator’s station. You can see the controller to the left of that screen which uses a joystick and buttons to pilot the underwater vessel.

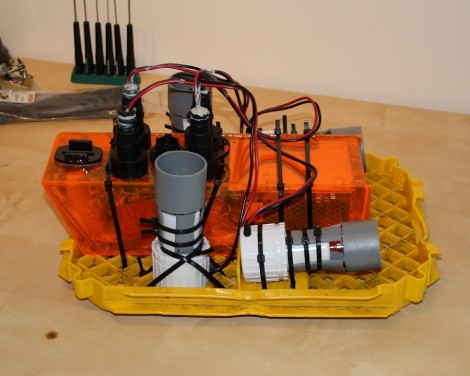
In order to simplify construction, [DZL] decided not to use propellers. The problem with that technique is that you need to have bearings that will allow the propeller shafts to turn without letting water in. Propulsion is instead provided by a group of small water pumps whose intake is on one end and outflow is on the other. These are mounted at various places on the body and each have one power cable that connects to the control circuitry in the main housing. The passage of cables through the enclosure is another possible leak point, but [DZL] found some off the shelf bushings that ended up making it pretty easy.

The link at the top is a round-up of all the different project posts. For us, the most interesting Flickr set is the one showing how the enclosure is put together. There is also a pretty neat dive video after the break that shows the craft being tested underwater.

Continue reading “DIY ROV Explores The Watery Depths”

Two Generations Of Ocean-going ROV

[Eirik] wants to help inspire others to take on big projects to he sent in a link to his ROV project. He started it about one year ago and the image above shows the first generation. After the break you can see the video that the ROV captured during a couple of it’s initial voyages. They’re pretty clear and right off the bat you’ll see the little guy following a jellyfish. Like a lot of homebrew ROV’s [Eirik] is still searching for the right way to pass wires through the housing without leaks. He does okay so far, and has designed a nice cable spool for the topside tether, but some water does get in. He’s almost finished the second generation which re-designs the camera mount to aim downward so that what’s in frame is more interesting.

Continue reading “Two Generations Of Ocean-going ROV”

Would You Entrust Your DSLR To This Diy Underwater Enclosure?

Next time you head off on that underwater adventure take your camera along with you. [Jkcobabe] shows us how to build a waterproof camera enclosure using just a few components. The box is meant to be used to keep your stuff dry while camping, and the lens housing is made using plumbing fittings from the a home building center. There is a rail system that allows you to mount the camera securely inside, with a flexible button on the outside to actuate the shutter. If anything this is well designed and built, but we might still stick to using disposable cameras under water. Then again, the pros build their own enclosures so we’ll keep our fingers crossed for that $2500 camera as you try to capture that perfect shot.

[Thanks Troy]

Remote Operated Underwater Vehicle

PVC hull, SLA batteries, Bilge Pumps, sounds like a good start to [Jimmy’s] ROV project. Paintball gun (as a BCD), dual live cameras paired with an Arduino making it internet controlled, all tethered with a fiber optic cable, sounds like [Jimmy’s] ROV got a whole lot more astounding.

While some very important parts have yet to be implemented, like the leak detectors, the project looks to be going quite smoothly. With updates promised, we can’t wait to watch this continue until the end.

Related: Yellow Subs and double ROVs