A Cyclonic Vacuum Cleaner On A Hacker’s Budget

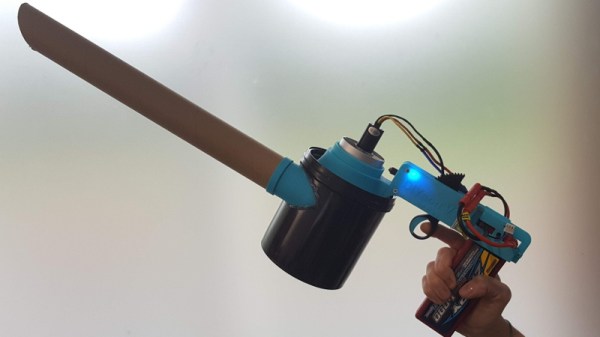
Have you ever seen a product in the store and been shocked at what the manufacturer was trying to charge for it? Since you’re reading Hackaday, we can safely assume the answer to that question; building a homebrew version of some commercial product for a fraction of its retail price is practically a rite of passage around these parts. So it’s fitting that for his entry into the 2019 Hackaday Prize, [Madaeon] submitted the “DIYson”, an open source version of a popular high-end vacuum made by a British company who’s name you can surely guess.

As [Madaeon] explains on the project’s Hackaday.io page, the idea behind “cyclonic” vacuums is not particularly complex. Essentially, with a powerful enough blower and carefully designed chamber, the incoming air will spin around so fast that dust is pulled out by centrifugal force. The trick is getting it working on a small enough scale to be a handheld device. Especially given the energy requirements for the blower motor.

Luckily for the modern hacker, we’re living in the “Golden Age” of DIY. With a 3D printer you can produce plastic components with complex geometry, and thanks to a resurgence in remote controlled aircraft, powerful motors and high capacity lithium-ion batteries are easily obtainable. Powered by what’s essentially the hardware that would go into an electric ducted fan plane, the total cost of all the electronics for the DIYson comes in right around $60 USD. Even with a roll of printer filament added to the mix, you’re still comfortably at half the cost of the “name brand” alternative.

With some refinements, [Madaeon] hopes that this open source dust-buster will be a staple of labs and hackerspaces all over the world. Judging by the performance his early prototype shows in the video after the break, we know we wouldn’t mind having one.

Continue reading “A Cyclonic Vacuum Cleaner On A Hacker’s Budget”

This Air Compressor Sucks

Vacuum is something most people learn about as children, when they’re first tasked with chores around the home. The humble vacuum cleaner is a useful home appliance and a great way to lose an eye as an inquisitive child. When it comes to common workshop tasks though, they can be a bit of a let down. When you need to pull some serious vacuum, you might wanna turn to something a little more serious – like this converted air compressor.

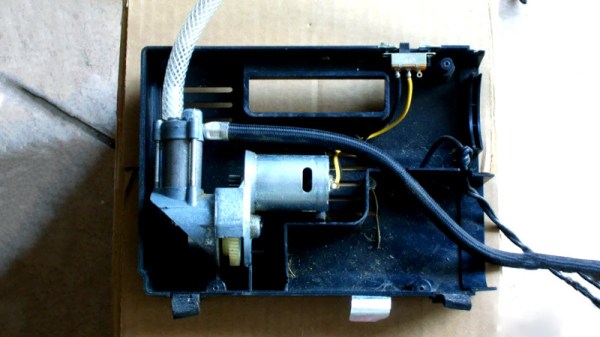
The build starts with a cheap off-the-shelf tyre inflator. These can be had for under $20 from the right places. They’re prone to overheating if used at too high a duty cycle, but with care they can last just long enough to be useful. The hack consists of fitting a hose barb connection over the intake of the pump, to allow air to be sucked out of whatever you’re trying to pull vacuum on. This is achieved with some hardware store parts and a healthy dose of JB-Weld. It’s then a simple matter of removing the valve adapter on the tyre inflator’s outlet so it can flow freely.

You might also consider adding a check valve, but overall this remains a cheap and easy way to get an electric vacuum pump for your workshop up and running. If that’s not quite your jam, you can always go down the handpump route instead.

Build Your Own Vacuum Chamber For Degassing And More

A vacuum chamber can be a useful thing to have around the shop. It can be used for all manner of purposes, from science experiments to degassing paints and epoxies. They’re not something you’d find in every workshop, but never fear – you can always build one from scrap you’ve got lying around! (YouTube video, embedded below.)

[VegOilGuy] begins the build with a simple plywood box, which gets screwed together and then tarted up with bodyfiller and paint. This helps to make the box airtight, as well as improving the aesthetics. A slot is then cut in the lid, and then filled with an excessive amount of silicone sealant. A flat plate covered in aluminium foil is placed on top, and the silicone is left to cure for several days.This is used to create a flat sealing surface for the lid to be placed on later.

Once the seal is complete, it’s a simple plumbing job to finish the chamber. [VegOilGuy] does a great job of demonstrating copper soldering and the proper way to install the necessary taps and check valves. Combined with an electric pump, the vacuum chamber passes its tests with flying colors, completely ruining some marshmallows in the process.

With a few dollars spent online for the special bits, it’s a build that any handy maker could throw together in a weekend. You can always go another route, though – like using an old fridge compressor to get the job done.

[Thanks to Keith O for the tip!]

Continue reading “Build Your Own Vacuum Chamber For Degassing And More”

This Bike Pump Now Sucks

Pulling a vacuum is something every proud maker must do once in a while. Whether you’re degassing epoxy or vacuum forming parts, you’ll need a reliable pump to get the job done. [drcrash] has just the guide to help – on how to convert a regular handpump to vacuum duty. (Video embedded after the break.)

[drcrash] recommends starting with a Slime brand 2060-A pump or similar. It’s a basic hand pump, with no pressure gauges or other frills to get in the way. It’s also got a strong steel shaft that can hold up to repeated use. You’ll also need some tubing and a check valve to get the job done.

The basic concept is to reconfigure the pump to suck air out of things rather than blowing it into them. By removing the original check valve and installing one in the opposite direction, and reversing the pump’s piston, it’s possible to pull good vacuum without breaking a sweat. [drcrash] reports that it’s possible to go up to 11 psi below atmospheric with this setup, which is plenty for a wide range of applications. If you need to go further, you can try building your own turbomolecular pump instead.

Continue reading “This Bike Pump Now Sucks”

Now Toto’s Africa Is Stuck In Our Heads

April Fool’s Day is bad. April Fool’s Day is a terrible, horrible, no good, very bad day. For one day a year, we’re inundated with pieces that can, accurately and without any sense of irony, be called fake news. YouTube is worse. But you know what’s worse than April Fool’s Day? A hundred children playing plastic recorders. But it’s April Fool’s Day, and things must get worse. Here’s a vacuum cleaner playing Africa by Toto.

This is the latest build from [James Bruton] or [Ecks Robots Dot Co Dot UK], who is the king of building just about anything with 3D printers. He’s got a BB8 and some of the cooler Star Wars droids, a Hulkbuster, and openDog. When it comes to confabulating robotics and 3D printers, [James] is the king. But this is April Fool’s Day, and if you’re a big YouTuber, you need to do something annoying. [James] is the king.

This build uses a Henry vacuum cleaner, a canister vacuum with a silk screened face, because why not, and you’re not truly living until you put googly eyes on your Roomba. Also, all vacuums in England are Hoovers, because reasons. In collaboration with [Mothcub], [James] adapted cheap children’s plastic recorders to a Henry vacuum cleaner with a few 3D printed parts, some servo-controlled valves, and a bit of plastic tubing. While using cheap kid’s recorders as the tone generator in what is effectively a pipe organ is interesting (the stickers over the holes are a great idea), this is something that should not be done ever. This idea should not be replicated. These recorders are not in tune and I don’t know how because they’re just one piece of plastic that came out of the same mold.

The servos, and therefore the entire pipe organ, are controlled via MIDI, which makes this the first DIY MIDI pipe organ we’ve seen. It’s a proof of concept, and a pretty good one. It also sounds terrible. This is proof that cheap plastic recorders don’t sound good. The video is below, and I highly suggest skipping the second half.

Continue reading “Now Toto’s Africa Is Stuck In Our Heads”

Downdraft Table Inhales Dust, Not Cash

We always look forward to the builds [MakerMan] sends in, and it’s not just because we dig his choices in royalty free music (though it helps). He always manages to put together his projects with a minimum of fuss, and perhaps more importantly, a minimum of funds. His builds use salvaged components, easily sourced materials, and common tools. Watching him work invariably makes us realize that we tend to overthink our own projects.

In his latest video, [MakerMan] was tasked with building a downdraft table for a local factory that makes jewelry boxes. By sucking air through a series of holes in the table’s surface, sawdust created while the workers are building the boxes will automatically be removed from the workspace. Even if you aren’t in the jewelry box making business, any task which produces fine particles (such as sanding) could benefit from such a setup. You probably won’t need a downdraft table quite as large as the one he builds, but the principles will be the same if you get inspired to build a somewhat smaller version.

The build starts with sheets of MDF, which get cut, glued, and screwed together to make the basic tabletop shape. To this, [MakerMan] attaches a welded steel frame which will give it the strength MDF itself lacks. With careful measurement, lines are plotted across the top of the MDF sheet and all the holes are drilled with a simple hand drill; no fancy CNC here.

With the table doing its best colander impression, [MakerMan] adds an air box to the bottom which is similarly made of thin MDF sheets. All of the joints are sealed up with caulk, because at this point you want things to be as air tight as possible. A large blower is attached to the bottom, which gets piped to a dust collection system that’s made of a garbage can and…you guessed it, more MDF.

Watching [MakerMan] turn what’s often literal trash into a functional build never gets old. We’ve seen him create everything from a gorgeous origami chandelier to a very impressive diode laser cutter using little more than scrap parts and hand tools, and we can’t wait to see what he comes up with next.

Continue reading “Downdraft Table Inhales Dust, Not Cash”

Vacuum-Powered Rotary Tool Redux, This Time Machined

We love to see projects revisited, especially when new materials or methods make it worth giving the first design another go around. This twin-turbine vacuum-powered Dremel tool is a perfect example of what better tools can do for a build.

You may recall [JohnnyQ90]’s first attempt at a vacuum powered rotary tool. That incarnation, very similar in design to the current work, was entirely 3D-printed, and caused no little controversy in the comments about the wisdom of spinning anything made on an FDM printer at 43,000 RPM. Despite the naysaying, [Johnny] appears to have survived his own creation. But the turbo-tool did have its limitations, including somewhat anemic torque. This version, machined rather than printed and made almost completely from aluminum, seems to have solved that problem, perhaps thanks to the increased mass of the rotating parts. The twin rotors and the stator were milled with a 5-axis CNC machine, which has been a great addition to [JohnnyQ90]’s shop. The turbine shaft, looking like something from a miniature jet engine, was meticulously balanced using magnets mounted in the headstock and tailstock of a lathe. The video below shows the build and a few tests; we’re not big fans of the ergonomics of holding the tool on the end of that bulky hose, but it sure seems to work well. And that sound!

We first noticed [JohnnyQ90] when he machined aluminum from soda cans to make a mini Tesla turbine. His builds have come a long way since then, and we look forward to what he’ll come up with next.

Continue reading “Vacuum-Powered Rotary Tool Redux, This Time Machined”