Gorgeous Bartop Arcade Build Is A Cut Above

At this point we’ve seen a good number of desktop-sized arcade cabinets, and while they’ve naturally all been impressive in their own ways, they do tend to follow a pretty familiar formula. Cut the side panels out of MDF (or just buy a frame kit), stick a Raspberry Pi and an old LCD monitor in there, and then figure out how to control the thing. Maybe a couple strategically placed stickers and blinking LEDs to add a few extra horsepower, but nothing too surprising.

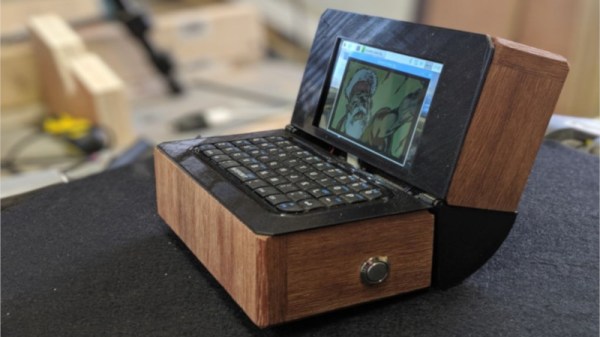
[Andy Riley] had seen plenty of builds like that, and he wasn’t having any of it. With the heart of an old laptop and bones made of IKEA cutting boards, his build is proof positive that there’s always more than one way to approach a problem that most would consider “solved” already. From the start, he set out to design and build a miniature arcade cabinet that didn’t look and feel like all the other ones he’d seen floating around online, and we think you’ll agree he delivered in a big way.

Powering the arcade with an old laptop is really a brilliant idea, especially since you can pick up older models for a song now that they’re considered nearly disposable by many users. As long as it doesn’t have a cracked display, you’ll get a nice sized LCD panel and potentially a rather powerful computer to drive it. Certainly the graphical capabilities of even the crustiest of used laptops will run circles around the Raspberry Pi, and of course it opens the possibility of playing contemporary PC games. As [Andy] shows in his detailed write-up, using a laptop does take more custom work than settling for the Pi, but we think the advantages make a compelling case for putting in the effort.

Of course, that’s only half the equation. Arguably the most impressive aspect of this build is the cabinet itself, which is made out of a couple IKEA bamboo cutting boards. [Andy] used his not inconsiderable woodworking skills, in addition to some pretty serious power tools, to turn the affordable kitchen accessories into a furniture-grade piece that really stands out from the norm. Even if you aren’t normally too keen on working with dead trees, his step-by-step explanations and pictures are a fascinating look at true craftsman at work.

If you’re more concerned with playing Galaga than the finer points of varnish application, you can always just turbocharge the old iCade and be done with it. But we think there’s something to be said for an arcade cabinet that could legitimately pass as a family heirloom.

Printed Parts Turn Ruler Into Marking Gauge

For Hackaday readers who spend more time with a soldering iron than a saw, a marking gauge is a tool used to put parallel lines on a piece of wood (and occasionally metal or plastic) for cutting. The tool is run across the edge of the piece to be marked, and an adjustment allows the user to set how far in the line will be made. As an example, if you wanted to cut a board into smaller strips, a marking gauge would be an ideal choice for laying out your lines ahead of time.

But as with many niche tools, it’s not something you’re going to use every day. For [chaosbc], this meant he wanted to see if he could come up with a DIY solution on the cheap. Plus he could have it in hand now, rather than waiting for it to take the slow boat from overseas. With the addition of a few clever 3D printed components, he was able to turn his trusty aluminum ruler into a serviceable marking gauge for the cost of filament and a few bits of hardware.

The general design of a marking gauge is fairly simple: there’s a block that rides up and down a graduated shaft (known as the headstock) which allows you to set the depth of the line, and then a piece on the end which holds your marking tool. The marking tool could be a blade if you’re working with something soft enough, but for wood is usually going to be a pencil.

[chaosbc] provides all the STL files for his DIY marking gauge, though they might need adapting as they were created for his specific ruler. Luckily the parts aren’t that complex so it shouldn’t be too difficult to get it sorted out. He also has a useful hint for anyone looking to duplicate his work: a few drops of super glue on the bolt used to lock down the headstock is enough to create a non-marring surface so you don’t tear up your ruler.

We’ve got a few other tips for woodworking on a budget, as well as a primer about this whole making stuff with dead trees concept.

Continue reading “Printed Parts Turn Ruler Into Marking Gauge”

Cool Tools: The Pantorouter Turns Tracing On Its Side

Not too long ago we wrote about a small CNC tool for automating certain parts of the woodworking process. At the time it seemed unusual in its intentionally limited scope but a few commenters mentioned it reminded them of another device, [Matthias]’s Pantorouter. It didn’t take much investigation to see that the commenters were right! The MatchSticks device does feel a bit like a CNC version of the Pantorouter, and it seemed like it was more than worth of a post by itself. The Pantorouter is a fascinating example of another small manual-but-automated tool for optimized for accelerating and improving certain woodworking operations.

Continue reading “Cool Tools: The Pantorouter Turns Tracing On Its Side”

Behold A DIY, Kid-Friendly Table Saw

The “table saw” swaps the saw for a nibbler; here it is cutting corrugated cardboard in a manner much like the saw it replaces.

“Kid-friendly table saw” seems like either a contradiction, a fool’s errand, or a lawsuit waiting to happen; but this wooden table saw for kids actually fits the bill and shows off some incredible workmanship and attention to detail as well. The project works by using not a saw blade, but a nibbler attached to a power drill embedded inside.

Unsurprisingly, the key to making a “table saw” more kid-friendly was to remove the saw part. The nibbler will cut just about any material thinner than 3 mm, and it’s impossible for a child’s finger to fit inside it. The tool is still intended for supervised use, of course, but the best defense is defense in depth.

The workmanship on the child-sized “table saw” is beautiful, with even the cutting fence and power switch replicated. It may not contain a saw, but it works in a manner much like the real thing. The cutting action itself is done by an economical nibbler attachment, which is a small tool with a slot into which material is inserted. Inside the slot, a notched bar moves up and down, taking a small bite of any material with every stroke. Embedding this into the table allows for saw-like cutting of materials such as cardboard and thin wood.

The image gallery is embedded below and shows plenty of details about the build process and design, along with some super happy looking kids.

Continue reading “Behold A DIY, Kid-Friendly Table Saw”

Salvaging An Ancient, Dangerous Machine With Wood

What do you do when you have a gigantic old drum sander with a bent table? Scrapping it will give you a few cents per pound, but this machine is just too cool, and would be too useful to just throw away. That’s when inspiration strikes. To fix this old machine, [Frank Howarth] built a new bed for an old drum sander out of wood.

The machine in question is a Frank H. Clement Surface Sanding Machine from the early part of the 20th century. This machine is basically a 30 inch long, 14 inch diameter drum that’s wrapped in sandpaper. There are removable tables for this machine, and basically what we’re looking at here is a jointer that can handle 30-inch wide boards, only it’s a sander. [Frank] picked up this machine way back in 2015 from a friend for free, but everything has a cost. There’s a problem with this sander: one of the previous owners stored a heavy jointer on the table, and the hefty iron bed was bent down in the middle. This makes the vintage surface sanding machine absolutely useless for anything. A new bed would have to be constructed.

[Frank] is a master craftsman, though, and he has enough scrap wood sitting around to build just about anything. After taking some careful measurements of the frame of the sander, he cut and glued up a few large panels of a glueLam beam, salvaged from an earlier operation. This beam is tremendously strong, and resawing and gluing it up into a panel produced a very hefty board that’s perfect for the bed of a gigantic, ancient surface sanding machine.

The actual fabrication of the new bed happened on [Frank]’s CNC router. The bottom of the bed was easy enough to fit to the cast iron frame, but there was an issue: because these tables are meant to butt up against a spinning drum, [Frank] needed to cut away a cove underneath the table. A CNC router can easily do this, but apparently the glueLam beam couldn’t handle it — a bit of the edge split off. These panels are basically made of glue, though, and some quick action with a few clamps saved the project.

The bed for this sander is now done, and a change in the pulley brought the speed of the drum down to something reasonable. Of course, this is a woodworking machine from the early 1900s, and safety was a secondary concern. We’re not worried, though. [Frank] still has all his fingers. A guard for the belt is in the works, though.

Continue reading “Salvaging An Ancient, Dangerous Machine With Wood”

A CNC Woodworking Tool That Does The Hard Parts

Drawn along in the wake of the 3d printing/home shop revolution has been the accessibility of traditional subtractive CNC equipment, especially routers and mills. Speaking of, want a desktop mill? Try a Bantam Tools (née Othermachine) Desktop Milling Machine or a Carvey or a Carbide 3D Nomad. Tiny but many-axis general purpose mill? Maybe a Pocket NC. Router for the shop? Perhaps a Shapeoko, or an X-Carve, or a ShopBot, or a… you get the picture. [Rundong]’s MatchSticks device is a CNC tool for the shop and it might be classified as a milling machine, but it doesn’t quite work the way a more traditional machine tool does. It computer controls the woodworker too.

Sample joints the MatchSticks can cut

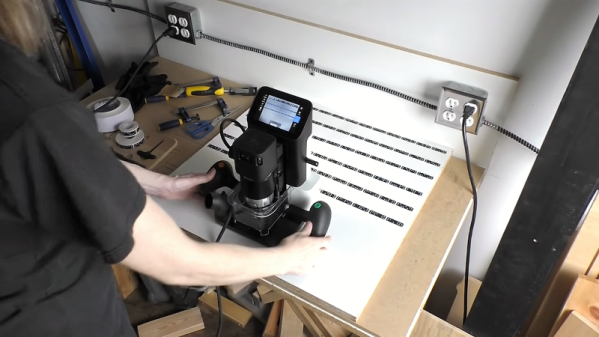
At a glance MatchSticks probably looks most similar to a Pocket NC with a big Makita router sticking out the side. There’s an obvious X-axis spoilboard with holes for fixturing material, mounted to a gantry for Z-axis travel. Below the big friendly handle on top is the router attached to its own Y-axis carriage. The only oddity might be the tablet bolted to the other side. And come to think of it the surprisingly small size for such an overbuilt machine. What would it be useful for? MatchSticks doesn’t work by processing an entire piece of stock at once (that what you’re for, adaptable human woodworker) it’s really a tool for doing the complex part of the job – joinery – and explaining to the human how to do the rest.

The full MatchSticks creation flow goes like this:

  1. Choose a design to make on the included interface and specify the parameters you want (size, etc).
  2. The MatchSticks tool will suggest what material stocks you need, and then ask you to cut them to size and prepare them using other tools.
  3. For any parts which require CNC work the tool will help guide the user to fixture the stock to its bed, then do the cutting itself.
  4. Once everything is ready for final assembly the MatchSticks will once again provide friendly instructions for where to pound the mallet.

In this way [rundong], [sarah], [jeremy], [ethan], and [eric] were able to build a much smaller machine tool without sacrificing much practical functionality. It’s almost software-like in it’s focus on a singular purpose. Why reinvent what the table saw can do when the user probably already has access to a table saw that will cut stock better? MatchSticks is an entire machine bent around one goal, making the hard stuff easier.

It’s worth noting that MatchSticks was designed as an exploration into computer/human interaction for the ACM Conference on Human Factors in Computing Systems so it’s not a commercial product quite yet (we’re eagerly waiting!). For a much more in depth look at the project and its goals and learnings the full research paper is available here. Their intro video is down after the break.

Thanks [ethan] for the tip!

Continue reading “A CNC Woodworking Tool That Does The Hard Parts”

Every Shop Needs A Giant Wooden Utility Knife

Generally speaking, we don’t cover that many woodworking projects here at Hackaday. What’s the point? It’s bad enough that wood reminds us of the outside world, but it hardly ever blinks, and forget about connecting it to Wi-Fi. This doesn’t seem to bother you fine readers, so we have to assume most of you feel the same way. But while we might not always “get” large woodworking projects around these parts, we’re quite familiar with the obsession dedication required to work on a project for no other reason than to say you managed to pull it off.

On that note, we present the latest creation of [Paul Jackman], a supersized replica of a Stanley utility knife made entirely out of wood. All wooden except for the blade anyway, which is cut from 1/8″ thick knife steel. That’s right, this gigantic utility knife is fully functional. Not that we would recommend opening too many boxes with it, as you’re likely to open up an artery if this monster slips.

We can’t imagine there are going to be many others duplicating this project, but regardless [Paul] has done a phenomenal job documenting every step of the build on his site. From cutting the rough shape out on his bandsaw to doing all painstaking detail work, everything is clearly photographed and described. After the break there’s even a complete build video.

The most interesting part has to be all of the little internal mechanisms, each one carefully reproduced at perfect scale from different woods depending on the requirements of the component. For example [Paul] mentions he choose white oak for the spring due to its flexibility. Even the screw to hold the knife closed was made out of a block of wood on the lathe.

For whatever reason, people seem to enjoy building scaled up replicas of things. We’ve seen everything from LEGO pieces to gold bars get the jumbo treatment. We suppose it’s easier than the alternative: building very tiny versions of big things.

Continue reading “Every Shop Needs A Giant Wooden Utility Knife”