A CNC Woodworking Tool That Does The Hard Parts

Drawn along in the wake of the 3d printing/home shop revolution has been the accessibility of traditional subtractive CNC equipment, especially routers and mills. Speaking of, want a desktop mill? Try a Bantam Tools (née Othermachine) Desktop Milling Machine or a Carvey or a Carbide 3D Nomad. Tiny but many-axis general purpose mill? Maybe a Pocket NC. Router for the shop? Perhaps a Shapeoko, or an X-Carve, or a ShopBot, or a… you get the picture. [Rundong]’s MatchSticks device is a CNC tool for the shop and it might be classified as a milling machine, but it doesn’t quite work the way a more traditional machine tool does. It computer controls the woodworker too.

Sample joints the MatchSticks can cut

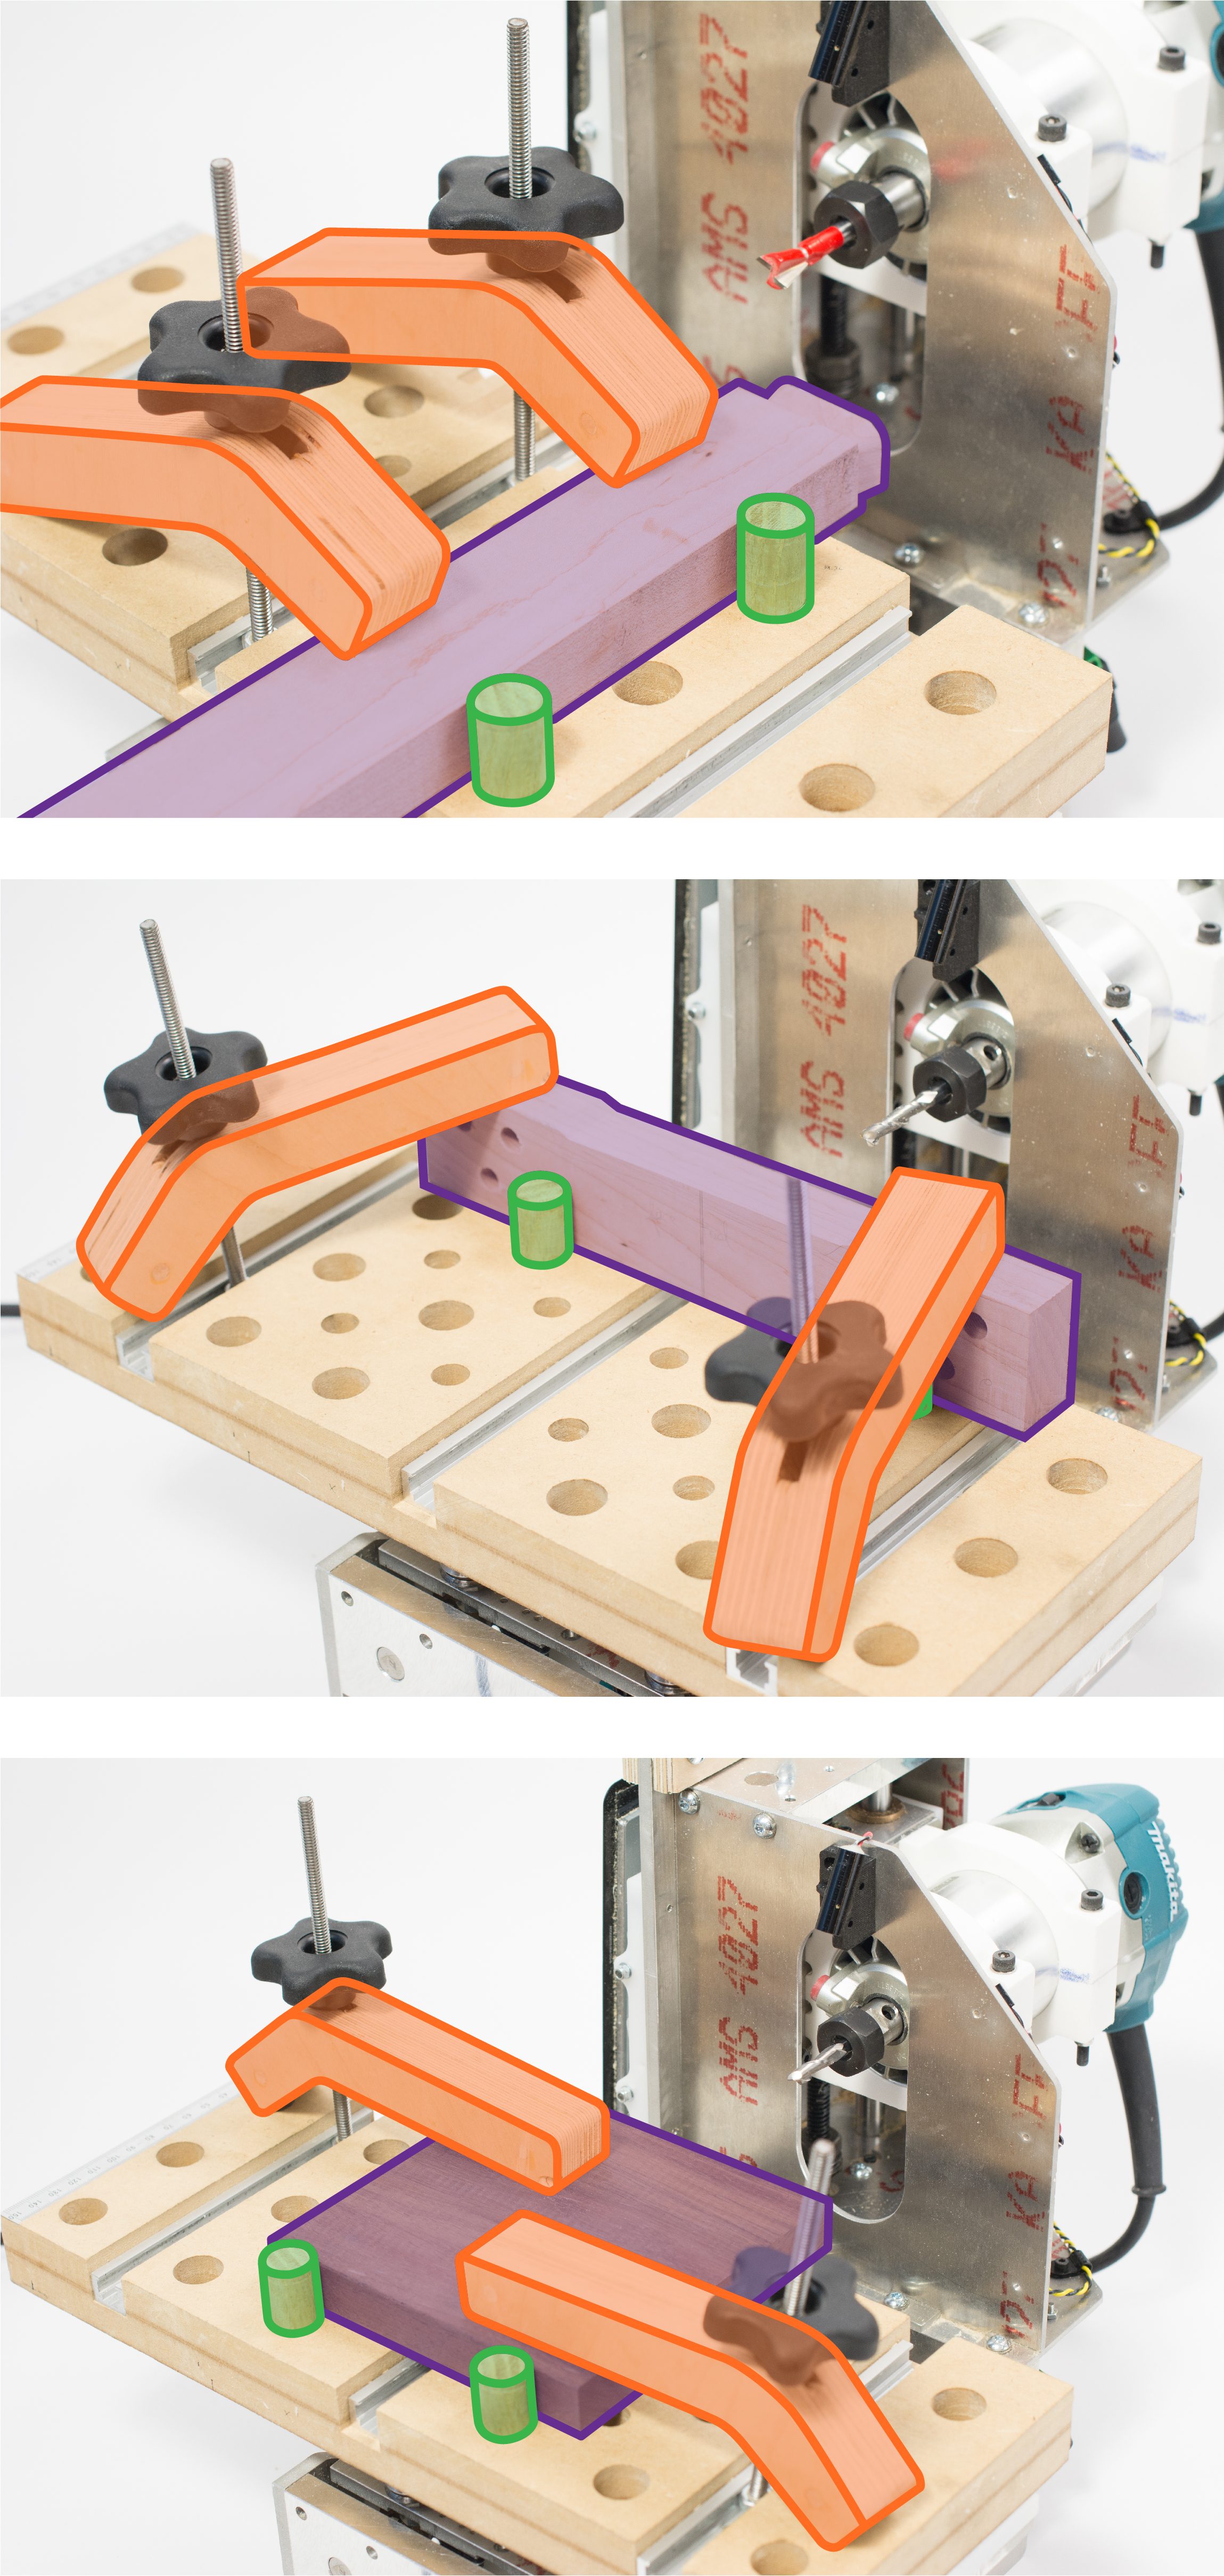
At a glance MatchSticks probably looks most similar to a Pocket NC with a big Makita router sticking out the side. There’s an obvious X-axis spoilboard with holes for fixturing material, mounted to a gantry for Z-axis travel. Below the big friendly handle on top is the router attached to its own Y-axis carriage. The only oddity might be the tablet bolted to the other side. And come to think of it the surprisingly small size for such an overbuilt machine. What would it be useful for? MatchSticks doesn’t work by processing an entire piece of stock at once (that what you’re for, adaptable human woodworker) it’s really a tool for doing the complex part of the job – joinery – and explaining to the human how to do the rest.

The full MatchSticks creation flow goes like this:

  1. Choose a design to make on the included interface and specify the parameters you want (size, etc).
  2. The MatchSticks tool will suggest what material stocks you need, and then ask you to cut them to size and prepare them using other tools.
  3. For any parts which require CNC work the tool will help guide the user to fixture the stock to its bed, then do the cutting itself.
  4. Once everything is ready for final assembly the MatchSticks will once again provide friendly instructions for where to pound the mallet.

In this way [rundong], [sarah], [jeremy], [ethan], and [eric] were able to build a much smaller machine tool without sacrificing much practical functionality. It’s almost software-like in it’s focus on a singular purpose. Why reinvent what the table saw can do when the user probably already has access to a table saw that will cut stock better? MatchSticks is an entire machine bent around one goal, making the hard stuff easier.

It’s worth noting that MatchSticks was designed as an exploration into computer/human interaction for the ACM Conference on Human Factors in Computing Systems so it’s not a commercial product quite yet (we’re eagerly waiting!). For a much more in depth look at the project and its goals and learnings the full research paper is available here. Their intro video is down after the break.

Thanks [ethan] for the tip!

Continue reading “A CNC Woodworking Tool That Does The Hard Parts”

NASA Shows Off Its Big Computer In 1986

Sometimes it is hard to remember just how far computers have come in the last three or four decades. An old NASA video (see below) has been restored with better sound and video recently that shows what passed for a giant computer in 1986. The Cray 2 runs at 250 MHz and had two gigabytes of memory (256 megabytes of million 64-bit words).

Despite the breathless praise, history hasn’t been kind to the Cray 2. Based on ECL, it had 4 processors and –in theory — could reach 1,900 megaFLOPs/second (a FLOP is a floating point operation). However, practical problems made it difficult to get to that theoretical maximum.

Continue reading “NASA Shows Off Its Big Computer In 1986”

Empty Can Upcycled Into Portable Speaker

We aren’t suggesting you go digging through the trash looking for empty cans, but if you’ve already got some empty cans in the privacy of your own home, you could certainly do worse than turning them into unique enclosures for your electronics projects. Better than sitting in the landfill, surely.

This hack from [Robin Hartley] turns an empty Cadbury hot chocolate can into a portable speaker that’s sure to get some attention. But don’t be fooled: a surprisingly amount of engineering went into this project in the form of a 3D printed structure on the inside of the can. Even if you aren’t big on the idea of putting your next project into a piece of literal trash, there’s something to be said for how professionally everything fits together in this build.

The key to this build is the 3D printed “skeleton” that holds the speaker and circuit board in place. An especially nice touch is how [Robin] designed the mount for the speaker: as it had no flange to attach to, he made a two piece clamp that screws together around the rear of the speaker and holds it in place.

You may wonder why somebody who’s clearly as well versed in CAD and 3D printing as [Robin] is might want to use an empty can as an enclosure; surely he could just design and print a case? Undoubtedly. But the goal here is to reuse what would otherwise be trash, and that occasionally means taking the “scenic” route as it were.

To take this concept to the next level, check out the upcycled speaker box we recently covered. We’ve seen some gorgeous home audio builds that started as a curbside find, but depending on how lucky you are, it’s almost like cheating.

Continue reading “Empty Can Upcycled Into Portable Speaker”

Recreating The Amiga 1200 PCB From Pictures

In the past we’ve talked about one of the major downsides of working with vintage computer hardware, which of course is the fact you’re working with vintage computer hardware. The reality is that these machines were never designed to be up and running 20, 30, or even 40-odd years after they were manufactured. Components degrade and fail, and eventually you’re going to need to either find some way to keep your favorite classic computer up and running or relegate it to becoming a display piece on the shelf.

If you’re like [John Hertell], you take the former option. Knowing that many an Amiga 1200 has gone to that great retrocomputing museum in the sky due to corroded PCBs, he decided to recreate the design from scans of an unpopulated board. While he was at it, he tacked on a few modern fixes and enhancements, earning his new project the moniker: “Re-Amiga 1200”.

To create this updated PCB, [John] took high quality scans of an original board and loaded them up into Sprint Layout, which allows you to freely draw your PCB design over the top of an existing image. While he admits the software isn’t ideal for new designs, the fact that he could literally trace the scan of the original board made it the ideal choice for this particular task.

After the base board was recreated in digital form, the next step was to improve on it. Parts which are now EOL and hard to come by got deleted in place of modern alternatives, power traces were made thicker, extra fan connectors were added, and of course he couldn’t miss the opportunity to add some additional status blinkenlights. [John] has released his Gerber files as well as a complete BOM if you want to make your own Re-Amiga, and says he’ll also be selling PCBs if you don’t want to go through the trouble of getting them fabricated.

It seems as if Amiga fans never say never, as this isn’t the first time we’ve seen one brought back from the brink of extinction by way of a modernized motherboard. Whatever it takes to keep the vintage computing dream alive.

[Thanks to Anders for the tip.]

Continue reading “Recreating The Amiga 1200 PCB From Pictures”

See The Fabulous Workmanship In This Smart Pressure Regulator

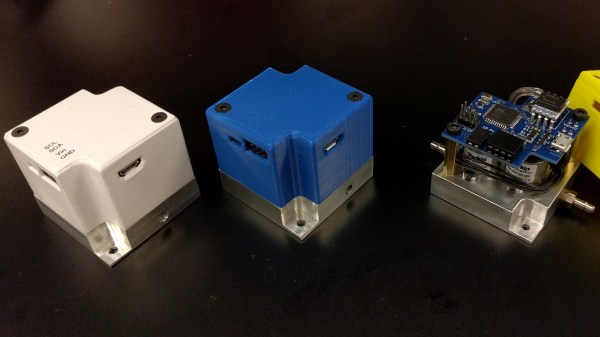
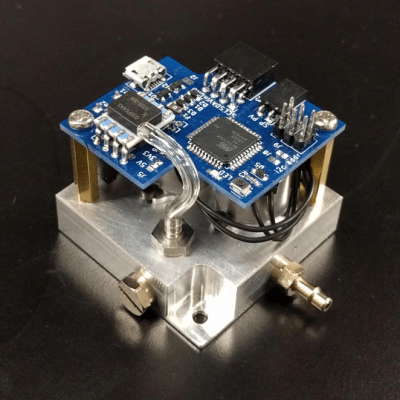
For many projects that require control of air pressure, the usual option is to hook up a pump, maybe with a motor controller to turn it on and off, and work with that. If one’s requirements can’t be filled by that level of equipment and control, then it’s time to look at commercial regulators. [Craig Watson] did exactly that, but found the results as disappointing as they were expensive. He found that commercial offerings — especially at low pressures — tended to leak air, occasionally reported incorrect pressures, and in general just weren’t very precise. Out of a sense of necessity he set out to design his own electronically controlled, closed-loop pressure regulator. The metal block is a custom manifold with valve hardware mounted onto it, and the PCB mounted on top holds the control system. The project logs have some great pictures and details of the prototyping and fabrication process.

This project was the result of [Craig]’s work on a microfluidics control system, conceived because he discovered that much of the equipment involved in these useful systems is prohibitively expensive for small labs or individuals. In the course of developing the electronic pressure regulator, he realized it could have applications beyond microfluidics control, and created it as a modular device that can easily be integrated into other systems and handle either positive or negative pressure. It’s especially well-suited for anything with low air requirements and a limited supply, but with a need for precise control.

Publish Or Perish: The Sad Genius Of Ignaz Semmelweis

Of all the lessons that life hands us, one of the toughest is that you can be right about something but still come up holding the smelly end of the stick. Typically this is learned early in life, but far too many of us avoid this harsh truth well into adulthood. And in those cases where being right is literally a matter of life or death, it’s even more difficult to learn that lesson.

For Ignaz Semmelweis, a Hungarian physician-scientist in the mid-19th century, failure to learn that being right is attended by certain responsibilities had a very high cost. Ironically it would also save the lives of countless women with a revolutionary discovery that seems so simple today as to be self-obvious: that a doctor should wash his hands before seeing patients.

Continue reading “Publish Or Perish: The Sad Genius Of Ignaz Semmelweis”

OpenSCAD Handles The Math In 3D Printed Holder For Magnetic Spheres

3D printed holder mounted to bike wheel, fitting precisely 38 magnetic spheres around its perimeter. Tedious math? Not if you make OpenSCAD do it.

Off-the-shelf components are great; the world and our work simply wouldn’t be the same without. But one of the constraints is that one has to design around them, and that’s what led [Antonio Ospite] to create a parametric design in OpenSCAD for a 3D printed holder which snugly fits a number of magnetic spheres around its diameter.

If that sounds a bit esoteric, it will become much clearer in the context of [Antonio]’s earlier work in making a DIY rotary encoder out of a ring of magnetic spheres. He found that such a ring in front of two Hall effect sensors was low in cost, high in precision, and thanks to 3D printing it also had a lot of potential for customizing. But hampering easy design changes was the need for the spheres to fit snugly around whatever shape was chosen for the hardware, which meant constraints on the encoder diameter.

In this case, [Antonio] wished to create an encoder that could be attached to a bicycle wheel but needed to know what outer diameter would best fit a ring of magnetic balls perfectly, given that the balls were each 5 mm. OpenSCAD did the trick, yielding a design that fit the bike wheel and spokes while perfectly nestling 38 magnetic balls around the outside edge with a minimum of wasted space.

OpenSCAD is a CAD program that’s really more like a programming language than anything else. For those who are not familiar with it, [Brian Benchoff] walked through how to make a simple object in OpenSCAD, and [Elliot] has sung the praises of a few advanced functions. Now that this project makes DIY encoders easier, perhaps they could be used to add intuitive new controls to OpenSCAD itself.