In the first installment of this series we had a brief look at the steps needed to get a bare-metal application running on an STM32 microcontroller. While this allowed us to quickly get to the juicy stuff, there are two essential elements which make an MCU so easy to use. One is found on the hardware side, in the form of so-called memory-mapped I/O (input/output), the other is the information contained in the files that are passed to the linker when we build a firmware image.
Memory-mapping of hardware peripheral registers is a straightforward way to make them accessible to the processor core, as each register is accessible as a memory address. This is both convenient when writing the firmware code, as well as for testing, as we can use a memory mapping specific for unit or integration testing.
There are a lot of ARM microcontrollers out there, and the parts from ST are featured prominently is the high-power builds we’re seeing. The STM32F4 and ~F7 are powerhouses with great support, and the STM32F0 and the other younger children of the family make for very good, low-power microcontrollers. Now, the STM32 family is getting a big brother. It runs Linux. It’s two ARM Cortex-A7 cores and one M4 core on the same chip. The STM32MP1 is the chip you want if you still can’t figure out how to waste computing cycles by blinking LEDs.
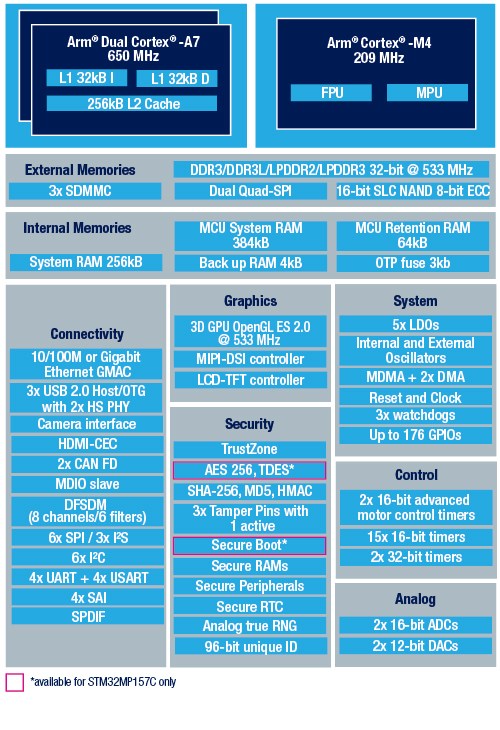
Block diagram of the STM32MP157 Image: ST
First, that Linux support. The STM32MP157C was mainlined into Linux last summer, and there is support for Android. So yes, this chip can run Linux. There is an optional 3D GPU in this family, a MIPI-DSI controller, support for HDMI-CEC, USB 2.0, and 10/100M or Gigabit Ethernet. This brings us the inevitable question of whether you can build a Raspberry Pi clone with these parts. Maybe, champ, but if you’re asking that question it’s probably not you that’s going to build one. It looks as if this chip is designed for phones, set-top boxes, and smart TVs. That doesn’t preclude a single board computer, but the biggest problem there is maintaining software support anyway.
The chip family in question all come with dual ARM Cortex-A7 processors running at a nominal 650MHz. There’s also a Cortex-M4 running at 209MHz, and the ST literature suggests that engineers are already running Linux on the A7 and an RTOS on the M4. This chip will need external memory, but DDR3 / DDR3L / LPDDR2 / LPDDR3 are supported.
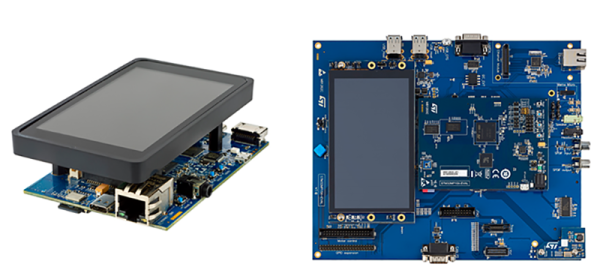
This chip is only announced right now, you can’t get it on Mouser or Digikey yet, and there’s no information on pricing. However, there are two development boards available, the Evaluation board, which features 1 GB of DDR3L, 128 MB of Flash, and an 8 GB eMMC. There’s a 5.5″ display, and enough connectors to make your heart flutter. The Discovery board is a bit more cut down, and comes with a 4″ 480×800 LCD, WiFi, Bluetooth LE, and of course it comes with GPIO expansion connectors for an Arduino and Raspberry Pi. The Discovery Board is not available at this time, but it will sell for $99 USD.
When it comes to displays, there is a gap between a traditional microcontroller and a Linux system-on-a-chip (SoC). The SoC that lives in a smartphone will always have enough RAM for a framebuffer and usually has a few pins dedicated to an LCD interface. Today, Microchip has announced a microcontroller that blurs the lines between what can be done with an SoC and what can be done with a microcontroller. The PIC32MZ ‘DA’ family of microcontrollers is designed for graphics applications and comes with a boatload of RAM and a dedicated GPU.
The key feature for this chip is a boatload of RAM for a framebuffer and a 2D GPU. The PIC32MZ DA family includes packages with 32 MB of integrated DRAM designed to be used as framebuffers. Support for 24-bit color on SXGA (1280 x 1024) panels is included. There’s also a 2D GPU in there with support for sprites, blitting, alpha blending, line drawing, and filling rectangles. No, it can’t play Crysis — just to get that meme out of the way — but it is an excellent platform for GUIs.
[Gpuhackr] chose his username to explain exactly how he spends his time. For instance, here he’s using an STM32 Discovery board to drive an AMD Radeon HD 2400 graphics card. The ARM microcontroller isn’t actually using the PCIe interface on the card. Instead, [Gpuhackr] has patched into the debugging interface built into the card itself. This isn’t quite as straight forward as it sounds, but if you do the wiring carefully it’s a pretty intersting way to connect an ARM to an LCD monitor.
This project would be almost impossible if it weren’t for the open source code which AMD has released. This lets him implement the card’s 3D rendering features. The demo directly programs the UVD Xtensa CPU which is on the video card. It draws a cube with color gradients on each side. The cube spins while the debug information is overlaid on the screen. In this case the ARM chip/board is really being used as a programmer to upload some custom firmware. But we think a real code-ninja could implement a communications protocol to open up a simple way to drive the card in real-time.
In the most simple computer system architecture, all control lies with the CPU (Central Processing Unit). This means not only the execution of commands that affect the CPU’s internal register or cache state, but also the transferring of any bytes from memory to to devices, such as storage and interfaces like serial, USB or Ethernet ports. This approach is called ‘Programmed Input/Output’, or PIO, and was used extensively into the early 1990s for for example PATA storage devices, including ATA-1, ATA-2 and CompactFlash.
Obviously, if the CPU has to handle each memory transfer, this begins to impact system performance significantly. For each memory transfer request, the CPU has to interrupt other work it was doing, set up the transfer and execute it, and restore its previous state before it can continue. As storage and external interfaces began to get faster and faster, this became less acceptable. Instead of PIO taking up a few percent of the CPU’s cycles, a big transfer could take up most cycles, making the system grind to a halt until the transfer completed.
DMA (Direct Memory Access) frees the CPU from these menial tasks. With DMA, peripheral devices do not have to ask the CPU to fetch some data for them, but can do it themselves. Unfortunately, this means multiple systems vying for the same memory pool’s content, which can cause problems. So let’s look at how DMA works, with an eye to figuring out how it can work for us. Continue reading “Direct Memory Access: Data Transfer Without Micro-Management”→
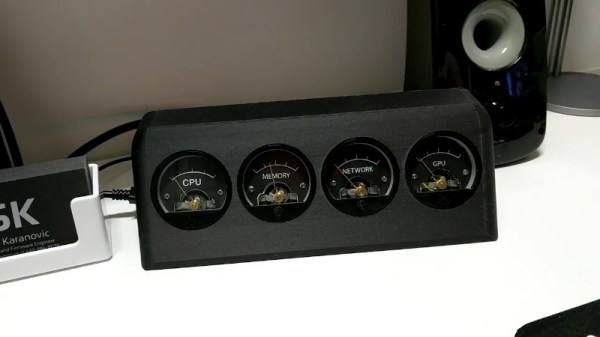
Keeping an eye on your computer’s resource utilization can be useful, particularly if you’re regularly doing computationally intensive tasks. While it’s entirely possible to achieve this with software tools, creating a dedicated hardware monitor can be cool too. [Sasa Karanovic] did just that, with a set of old-school analog gauges.
The build uses an STM32 microcontroller to drive a series of four galvanometers through an MCP4728 digital-to-analog converter. Data on CPU, memory, network and GPU utilization is collected by a Python script, and sent over a USB serial connection. This data drives the four-channel DAC, which in turn creates the voltages which control the needle position on the gauges. Aesthetically, the build features a few nice touches, including custom gauge faces and a 3D printed enclosure with a tasteful matte finish. A custom PCB keeps the electronics and wiring neat and tidy.
[Sasa] does a great job of explaining the basic theory of the device, as well as practical considerations for working with galvanometer-based gauges. It would make a great weekend project for anyone seeking to add some vintage charm to their desktop rig. There’s also scope to monitor other variables, like hard drive usage or CPU temperature. There’s bonus points if you integrate this into a laptop; the tip line would love to know. We’ve seen LED-based monitoring systems before, too. Video after the break.
There are a few dozen classic re-imaginings of classic game consoles, using hardware ranging from the ATMegas of the Uzebox to everyone’s favorite, stuffing some ROMs on a Raspi and calling it a day. You don’t necessarily learn anything doing that, which puts [Mike]’s custom game console head and shoulders above the rest.
The build started off as a plan for a Z80 computer with a dual ATMega GPU. He progressed far enough in the design where it would have been a masterpiece, but the inability to mill double-sided boards at home killed the design. Plans then moved on to an FPGA, then to an ATMega with the Analog Device AD725 PAL/NTSC encoder chip. That idea had a similar architecture to the Uzebox, but [Mike] wanted more power. He eventually settled on a PIC32 with the AD725.
This setup was capable of pumping out some impressive graphics, but for moving bits to a screen, you need DMA. [Mike] ran into a problem where the DMA timer runs at a maximum rate of 3.7 MHz. It’s a problem documented in a few projects, leading [Mike] to change his plan once again, this time to the STM32F4.
The bugs are worked out, and now [Mike] can stream a whole lot of pixels to a screen while still having some processing power left over to play a game. It’s a project that’s more than a year and a half old at this point, and so far he’s learned a lot.