In the past few years, we’ve seen a growth in car hacking. Newer tools are being released, which makes it faster and cheaper to get into automotive tinkering. Today we’re taking a first look at the M2, a new device from the folks at Macchina.
The Macchina M1 was the first release of a hacker friendly automotive device from the company. This was an Arduino compatible board, which kept the Arduino form factor but added interface hardware for the protocols most commonly found in cars. This allowed for anyone familiar with Arduino to start tinkering with cars in a familiar fashion. The form factor was convenient for adding standard shields, but was a bit large for using as a device connected to the industry standard OBD-II connector under the dash.
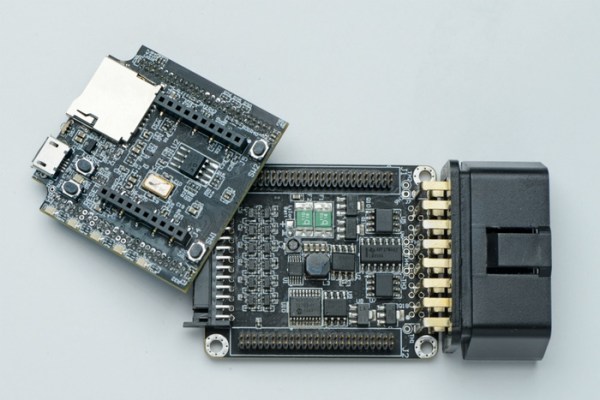
The Macchina M2 is a redesign that crams the M1’s feature set into a smaller form factor, modularizes the design, and adds some new features. With their Kickstarter launching today, they sent us a developer kit to review. Here’s our first look at the device.
We’re just over a month into the new year, and some people’s resolve on those exercise plans are already dwindling. There’s some good news though. That treadmill can be hacked into a nice belt grinder for your shop.
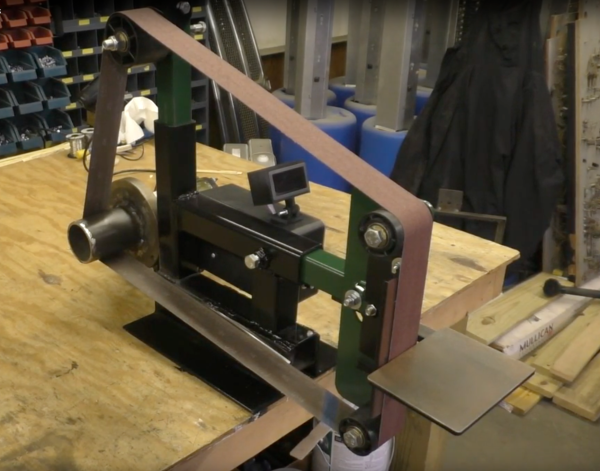
[Bob]’s treadmill belt grinder is based on a 2.5 horsepower motor he salvaged from a broken, donated treadmill. This motor needs 130 VDC to run, which is a bit of a challenge to generate. Fortunately, lots of treadmills seem to use the same MC-60 motor controller, which is compatible with this motor. Due to the widespread use of this controller, they can be found on eBay for about $30.
With the motor spinning, [Bob] built up a frame for the grinder, added rollers to hold the belt, and a spring based belt tensioner. The motor’s speed set point is controlled by a potentiometer, and the controller varies the power to keep a constant speed. Since the motor is capable of some serious RPM, a tachometer was added for feedback to prevent high-speed belt shredding.
The final result is a very professional looking tool for under $200. What would a grinder like this be used for? Knives of course! 2″ belt grinders are perfect for shaping and grinding knives and swords. In fact, you can see one in use in this sword hack.
Watch aficionados have a certain lust for mechanical watches. These old school designs rely on a spring that’s wound up to store energy. The movement, an intricate set of gears and other mechanical bits, ensures that the hands on the watch face rotates at the right speed. They can be considered major feats of mechanical engineering, with hundreds of pieces in an enclosure that fits on the wrist. They’re quite cheap, and you have to pay a lot for accuracy.
Quartz watches are what you usually see nowadays. They use a quartz crystal oscillator, usually running at 32.768 kHz. These watches are powered by batteries, and beat out their mechanical counterparts for accuracy. They’re also extremely cheap.
Back in 1977, a watchmaker at Seiko set off to make a mechanical watch regulated by a quartz crystal. This watch would be the best of both words. It did not become a reality until 1997, when Seiko launched the Spring Drive Movement.
A Blog To Watch goes through the design and history of the Spring Drive movement. Essentially, it uses a super low power integrated circuit, which consumes only 25 nanowatts. This IC receives power from the wound up spring, and controls an electromagnetic brake which allows the movement to be timed precisely. The writeup gives a full explanation of how the watch works, then goes through the 30 year progression from idea to product.
Back in the 90s, gamers loaded out their PCs with Creative’s Sound Blaster family of sound cards. Those who were really serious about audio could connect a daughterboard called the Creative Wave Blaster. This card used wavetable synthesis to provide more realistic instrument sounds than the Sound Blaster’s on board Yamaha FM synthesis chip.
The DreamBlaster X2 is a modern daughterboard for Sound Blaster sound cards. Using the connector on the sound card, it has stereo audio input and MIDI input and output. If you’re not using a Sound Blaster, a 3.5 mm jack and USB MIDI are provided. Since the MIDI uses TTL voltages, it can be directly connected to an Arduino or Raspberry Pi.
This card uses a Dream SAM5000 series DSP chip, which can perform wavetable synthesis with up to 81 polyphonic voices. It also performs reverb, chorus, and equalizer effects. This chip sends audio data to a 24 bit DAC, which outputs audio into the sound card or out the 3.5 mm jack.
The DreamBlaster X2 also comes with software to load wavetables, and wavetables to try out. We believe it will be the best upgrade for your 486 released in 2017. If you’re interested, you can order an assembled DreamBlaster. After the break, a review with audio demos.
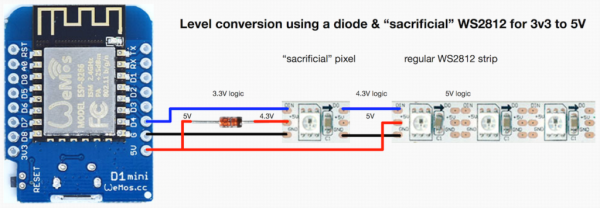
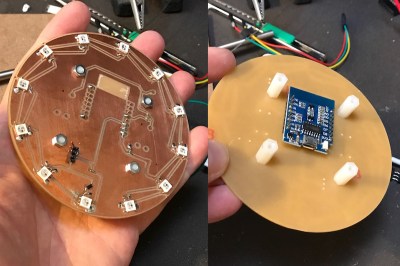
If you’re looking to control WS2812 (or Neopixel) LEDs using a microcontroller running at 3.3 volts, you might run into some issues. The datasheet tells us that a logic high input will be detected at a minimum voltage of 0.7 * Vcc. If you’re running the LED at 5V, this means 5 V * 0.7 = 3.5 V will be needed for the WS2812 to detect a ‘1’ on the data line. While you might get away with using 3.3 V, after all the specification in the data sheet is meant to be a worst case, it’s possible that you’ll run into reliability issues.
So usually we’d say “add a level shifter to convert 3.3V to 5V” and this post would be over. We even have a whole post on building level shifters which would work fine for this application. However [todbot] at CrashSpace came up with a nifty hack that requires fewer components yet ensures reliability.
For the Big Button project at CrashSpace, [todbot] used an ESP8266 running at 3.3 volts and WS2812 LEDs running at 5 V. To perform the level shift, a signal diode is placed in series with the power supply of the first LED. This drops the first LED to 4.3 V, which means a 4.3 V * 0.7 = 3.01 V signal can be used to control it. The logic out of this LED will be at 4.3 V, which is enough to power the rest of the LEDs running at 5 V.
This little hack means a single diode is all that’s needed to control 5 V LEDs with a 3.3 V microcontroller. The first LED might be a little less bright, since it’s operating at a lower voltage, but that’s a trade off [todbot] made to simplify this design. It’s a small part of a well-executed project so be sure to click-through and enjoy all the thought [todbot] put into a great build.
Autodesk has announced that EAGLE is now only available for purchase as a subscription. Previous, users purchased EAGLE once, and used the software indefinitely (often for years) before deciding to move to a new version with another one-time purchase. Now, they’ll be paying Autodesk on a monthly or yearly basis.
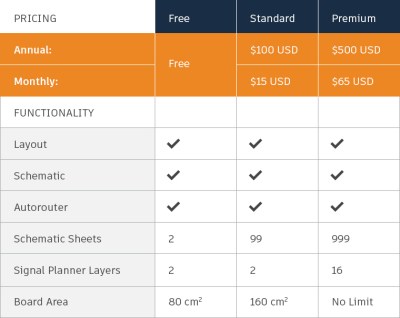
Lets break down the costs. Before Autodesk purchased EAGLE from CadSoft, a Standard license would run you $69, paid once. The next level up was Premium, at $820, paid once. The new pricing tiers from Autodesk are a bit different. Standard will cost $15/month or $100/year, and gives similar functionality to the old Premium level, but with only 2 signal layers. If you need more layers, or more than 160 cm^2 of board space, you’ll need the new Premium level, at $65/month or $500/year.
New Pricing Table for EAGLE
This is a bad deal for the pocket book of many users. If you could have made do with the old Standard option, you’re now paying $100/year instead of the one-time $69 payment. If you need more space or layers, you’ll likely be up to $500/year. Autodesk also killed the lower cost options for non-commercial use, what used to be a $169 version that was positioned for hobbyists.
The free version still exists, but for anyone using Eagle for commercial purposes (from Tindie sellers to engineering firms) this is a big change. Even if you agree with the new pricing, a subscription model means you never actually own the software. This model will require licensing software that needs to phone home periodically and can be killed remotely. If you need to look back at a design a few years from now, you better hope that your subscription is valid, that Autodesk is still running the license server, and that you have an active internet connection.
On the flip side of the coin, we can assume that Eagle was sold partly because the existing pricing model wasn’t doing all it should. Autodesk is justifying these changes with a promise of more frequent updates and features which will be included in all subscriptions. But sadly, Autodesk couldn’t admit that the new pricing has downsides for users:
“We know it’s not easy paying a lump sum for software updates every few years. It can be hard on your budget, and you never know when you need to have funds ready for the next upgrade.”
In their press release, they claim the move is only good for customers. Their marketing speak even makes the cliche comparison to the price of a coffee every day. Seriously.
[Garrett Mace] summarized his view on this nicely on Twitter: “previously paid $1591.21 for 88 months == $18.08/mo. Moving to $65/mo? KICAD looks better.”
We agree [Garrett]. KiCad has been improving steadily in the past years, and now is definitely a good time for EAGLE users to consider it before signing on to the Autodesk Subscription Plan™.
While there are apps that will display plane locations, [squix] wanted to build a dedicated device for plane spotting. The ESP8266 PlaneSpotter Color is a standalone device that displays a live map with plane data on a color TFT screen. This device expands on his PlaneSpotter project, adding a color display and mapping functions.
First up, the device needs to know where planes are. The ADS-B data that is transmitted from planes contains useful data including altitude, velocity, position, and an identifier unique to the aircraft. While commercial services exist for getting this data, the PlaneSpotter uses ADS-B Exchange. You can set up a Raspberry Pi to record this data, and provide it to ADS-B Exchange.
With the plane data being received from the ADS-B Exchange API, it’s time to draw to the screen. The JPEGDecoder fork for ESP8266 is used for drawing images, which are fetched from the MapQuest API as JPEGs.
Finally, geolocation is needed to determine where in the world the PlaneSpotter is. Rather than adding a GPS module, [squix] went with a cheap solution: WiFi geolocation. This uses identifying information and signal strengths from nearby WiFi access points to determine location. This project uses a public API by [Alexander Mylnikov], which returns a JSON object with longitude and latitude.
This project demonstrates what the ESP8266 is capable of, and brings together some neat techniques. If you’re looking to geolocate or display maps on an ESP8266, the code is available on Github.


 For the