Infinite Water


It’s Independence Day, so if you have pets and planned a trip, chances are you wrangled a pet sitter to keep your pet from starving or dehydrating to death. Next time, consider letting this infinite water dispenser help you instead.

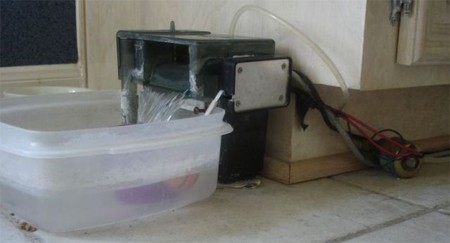
The dispenser is made of a Tupperware tub, a fish tank water filter, a float switch, and a water solenoid valve. It works essentially the same way as any toilet: the solenoid valve lets water into the filter where it is dispensed to the Tupperware container. The float switch is activated when the water in the container reaches a certain level. When the water level drops due to evaporation or thirsty pets, the float switch goes down and triggers the solenoid to let in more water. The whole works are powered by a GFI outlet for safety since this project involved water, electricity and pets.

LED Battery Level Indicator

[Kc7fys] came up with a this simple battery level indicator. It uses a single LED to display a battery’s voltage; if the voltage exceeds 12V, it glows green. If it is below 11V, the LED glows red. Anything in between generates an orange glow. The meter is built around an LM358 chip per this schematic, but his actual build looks pretty sloppy because of the dead-bug assembly (check out NASA’s pretty version). Nonetheless, it works, so clean it up and build one if you want to put it (or your batteries) to the test.

Recon 2008 Recap

[Tiller Beauchamp] gave a presentation on applied reverse engineering in OS X at this year’s REcon, but he also attended many of the other talks and gives his take on the highlights of REcon 2008 in a guest post on the ZDNet blog, Zero Day.

One of the highlights for him was Neohapsis’s [Chris Smith] discussing virtual machines implementing code obfuscation. The method uses custom instructions and runtime interpreter, which can help make the task of reverse engineering markedly more difficult if implemented properly.

On the opposite end of the spectrum, [Beauchamp] noted [Gerardo Richarte]’s software reverse engineering tools that decompile and recompile software in iterative portions. This allows the recompiled software to be tested piece by piece. Be sure to read his post and see what you missed.

Tea Cup Theremin


Hardware modding can take you to some strange places: sometimes, you think of really useful improvements to your most practical devices. Other times, you turn a cup of tea into a theremin. This is true at least for [Kyle McDonald], who immersed the L/R leads of an 1/8″ cable in a cup of tea, and connected it to a computer running Max/MSP with a special patch. The result is a working, miniature theremin you can drink after you’re done playing. This process should work with any liquid, so feel free to use beer, cola, water, or anything you think will taste better after you’ve run a small charge through it.

[via Matrixsynth]

Monome Keyboard


If you asked [David Phipps] whether he prefers Monomes or traditional keyboards, he might ask you “why not have both?” We don’t presume to speak for him, but that’s what we think he’d say based on his Monome-keyboard combination, which puts a Monome right in the keyboard’s console, giving the user the best of both worlds.

[Phipps] calls his device The Peaceblaster (also the name of his album), and it is constructed from a 5-octave Fatar keybed, MKE electronic components, and a Doepfer PKE for the faders and knobs. Everything is available via USB and MIDI out. The project is as yet unfinished, and he hopes to fit a mac mini into the works. If he succeeds, this will be one of the most elegant, powerful and fun keyboards we’ve seen in quite some time.

Reusing PCB Components


If you’re anything like us, you have a closet full of old electronics, some broken, some obsolete. You can stop using those as paperweights with the help of this guide that shows you how to recycle and reuse PCB components.

The first step of the process is finding electronics you don’t mind taking apart. Next place the PCB you’ll be stripping in a vice, with the components facing away from you and the solder side facing towards you. Grip the component you want with a pair of pliers, and apply a hot soldering iron to the solder that is holding the component. The solder will melt and allow you to safely and cleanly remove the component.

This process can be applied to virtually any component on an PCB, and the author of the guide, [Patented], got a lot of components this way, including resistors, capacitors, switches, audio jacks, and much more. Don’t forget to toss any free-floating metal or plastic parts in the recycle bin when you’re done. You can feel good about the fact that nothing was wasted, you found parts for your next project, and you cleared out some space.

ThingamaKIT: Make Your Own Thingamagoop


Bleep Labs’ Thingamagoop is a small synthesizer packed with wacky controls for generating unique sounds; you can now build an expanded version yourself with the ThingamaKit. Made “because there are not nearly enough beeping, zapping, bixxerfouping, anthropomorphic synthesizer monsters in the world,” it generates sounds of different pitches depending on the type and intensity of light hitting a photocell on the front panel. It’s most unique feature, is its LEDacle, which is something like a tentacle with an LED on the end. This can be pointed towards the photocell to modulate the sound. Output is through a 1/4″ audio jack.

Bleep Labs sells fully assembled Thingamagoops for $100, but the new DIY kit is available for half price. The kit version of the Thingamagoop has more controls, two photosensors, and two LEDacles. You can buy it with or without the case, and it doesn’t require any complex wiring. Look after the break for video of some Thingamagoops in action.

Continue reading “ThingamaKIT: Make Your Own Thingamagoop”