It’s Bad Apple, But On A 32K EPROM

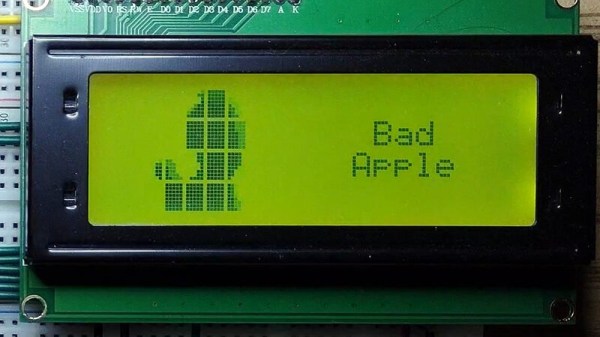
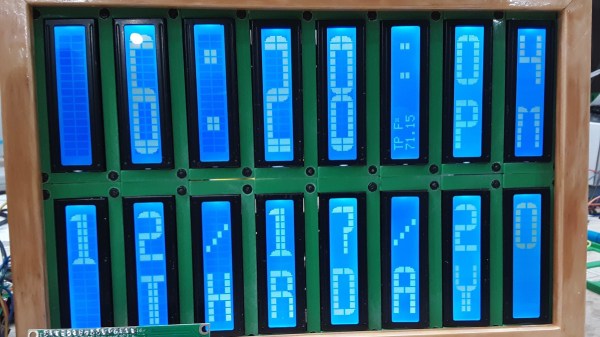
The Bad Apple!! video with its silhouette animation style has long been a staple graphics demo for low-end hardware, a more stylish alternative to the question “Will it run DOOM?”. It’s normal for it to be rendered onto a screen by a small microcomputer or similar but as [Ian Ward] demonstrates in an unusual project, it’s possible to display the video without any processor being involved. Instead he’s used a clever arrangement involving a 32K byte EPROM driving a HD44780-compatible parallel alphanumeric LCD display.

While 32K bytes would have seemed enormous back in the days of 8-bit computing, even when driving only a small section of an alphanumeric LCD it’s still something of a struggle to express the required graphics characters. This feat is achieved by the use of a second EPROM, which carries a look-up table.

It’s fair to say that the result which can be seen in the video below the break isn’t the most accomplished rendition of Bad Apple!! that we’ve seen, but given the rudimentary hardware upon which it’s playing we think that shouldn’t matter. Why didn’t we think of doing this in 1988!

Continue reading “It’s Bad Apple, But On A 32K EPROM”

Backpack Board For OLEDs Boasts Fancy Features

Back when LCD character displays based on the HD44780 controller were the bee’s knees, a way to make them easier to work with came in the form of “backpack” PCBs, which provided an accessible serial interface and superior display handling at the same time. [Barbouri] has updated that idea with a backpack board that mounts to OLED displays using the US2066 display driver, and provides an I2C interface with powerful and convenient high-level functions that make the display simple to use.

On the software side, the backpack uses this I2cCharDisplay driver project which provides functions like cursor control, fading, display shifting, and of course writing characters or strings. While [Barbouri] designed the board specifically to accommodate Newhaven Slim Character OLED displays, it should in theory work with any US2066-based OLED character display. [Barbouri]’s design files for the Slim-OLED Display backpack board are available for download directly from the project page (link is near the bottom), or boards can be purchased directly from OSH Park.

OLED technology is nifty as heck; we’ve seen some neat tricks done by stacking transparent OLED displays, and even seen OLEDs made in the home lab.

Arduino Caller ID Display Is Better Late Than Never

It’s no secret that the era of the landline telephone is slowly coming to a close. As of 2020, it was estimated that less than half the homes in America still subscribed to plain old telephone service (POTS). But of course, that still amounts to millions upon millions of subscribers that might get a kick out of this Arduino caller ID developed by [Dilshan Jayakody].

HT9032D caller ID decoder board
The completed HT9032D board.

Truth be told, until this point, we hadn’t really given a lot of thought to how the caller ID system works. But as [Dilshan] explains, you can actually pick up a dedicated IC that can decode incoming caller data that’s sent over the telephone line. In this case he’s using a Holtek HT9032D, which comes in a through-hole DIP-8 package and can be picked up for around $2 USD. The chip needs a handful of passives and a 3.58 MHz crystal to help it along on its quest, but beyond that, it’s really just a matter of reading the decoded data from its output pin.

To display the caller’s information, [Dilshan] is using an Arduino Uno and common 16×2 HD44780 LCD. As a nice touch, the code will even blink the Arduino’s onboard LED when you’ve missed a call. As a proof of concept there’s been no attempt to condense the hardware or ditch the breadboard, but it’s not hard to imagine that all the components could be packed into a nice 3D printed enclosure should you want something a bit more permanent.

We’ve seen caller ID data being collected in previous projects, but they used a USB modem combined with a software approach. We really like the idea of doing it with a cheap dedicated IC, though we’ll admit this demonstration would probably have been a bit more exciting a decade ago.

Continue reading “Arduino Caller ID Display Is Better Late Than Never”

Coding A Dynamic Menu For Character LCDs On Arduino

These days, there’s a huge variety of screens on the market for use with microcontrollers. OLEDs and graphic LCDs abound, while e-ink devices tempt the user with their clean look and low energy consumption. However, for many purposes, the humble HD44780 character LCD does the job just fine. If you’re using such a device, you might want to implement a simple menu system, and in that case, [MyHomeThings] has you covered.

The menu code is simple to modify and implement. It allows the user to define a certain number of menu items, along with button labels and functions to be executed with button presses. By default, it’s set up to work with  left and right function buttons, with up and down buttons to toggle through the menu’s various entries. This suits the commonly available Arduino shields which combine a 16×2 character LCD with a set of four tactile buttons in a cross formation. However, modifying the code to use an alternate button scheme would be simple for those eager to tweak things to their liking.

For the absolute beginner to programming, it’s a great way to put together a simple interface for your microcontroller projects. It’s the sort of thing you might use if you’d built a do-everything Arduino handheld device, as we’ve seen built before. If you find text menus too archaic for your purposes, though, be sure to sound off with your favourite solutions in the comments.

GME-Tracking Rocketship For The Diamond-Handed Traders

If you’ve been on the internet lately, you’ve been bombarded by stories about retail traders attempting to beat Wall Street at their own game by trying to force a short squeeze on GameStop stock. It’s inspired memes, songs, and all manner of political discourse, along with this cute stock-tracking device built by [dickdemodickmarcinko].

The device is based on the typical exhortation that a given stock or cryptocurrency is going “to the moon”, i.e. skyrocketing upwards to great heights. IT consists of an ESP8266 in a 3D printed housing, with a HD44780 alphanumeric LCD displaying the GME stock price and percentage change over time. The microcontroller also controls a stepper motor, which rotates a 3D-printed rocketship up or down relative to the stock’s price changes. If it’s pointing straight up, prospects are good for those holding the stock!

Whether or not the GME squeeze happens, the build is a fun way to learn about electronics and the stock market at the same time, and could be readily repurposed to track other markets in future. We’ve featured other price trackers before, like this traffic light keeping an eye on Bitcoin. Video after the break.

Big Time Character LCD Clock

While the SSD1306 OLED has somewhat become the go-to display for up-to-date projects, the good old character displays with their Hitachi HD44780 controller don’t seem to be disappearing just yet either. And why would they, especially if you want to show just text, having a built-in font has certainly its perk compared to worrying about integrating your own characters — which you can still do on top as well. Or perhaps you can combine both worlds, which is what [oldmaninSC] did with his digital clock that takes an entire 16×2 LCD to show each single digit.

The whole clock uses 16 individual, upright rotated 16×2 LCDs that are arranged in two rows of eight LCDs each, turning the entire construct sort of into a giant 8×2 display itself. For some additional information such as the date, there’s also a smaller font available that uses only half the height, allowing up to four total rows of information. To communicate with each LCD via I2C, two TCA9548A I2C multiplexers are connected to an Arduino, along with an RTC to keep track of the time and date itself.

As the TCA9548A has three pins dedicated to define its own address, the entire clock could be scaled up to a total of 64 LCDs — so how about a 16×4 display made out of 16×4 displays? Sure, adding smooth scrolling might become a bit tricky at some point, but imagine playing Tetris on that one!

Smoothing Big Fonts On Graphic LCDs

Here’s a neat little trick: take the jaggies out of scaled fonts on the fly! This technique is for use on graphic displays where you might want to scale your fonts up. Normally you’d just write a 2×2 block of pixels for every area where there would have been one pixel and boom, larger font. Problem is, that also multiplies each empty area and you end up with jagged edges in the transitions that really catch your eye.

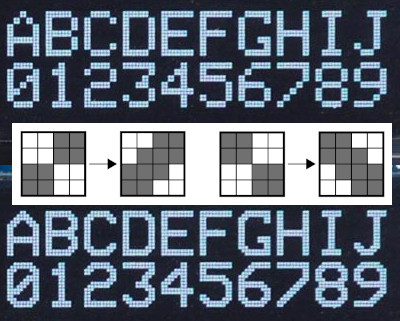
[David Johnson-Davies] entered big-brain mode and did something much cleverer than the obvious solution of using multiple font files. Turns out if you analyze the smoothing problem you’ll realize that it’s only the angled areas that are to blame, horizontal and vertical scaling are nice and smooth. [David’s] fix looks for checker patterns in what’s being drawn, adding a single pixel in the blank spots to smooth out the edge incredibly well!

The technique has been packaged up in a simple function that [David] wrote to play nicely in the Arduino ecosystem. However, the routine is straightforward and would be quick to implement no matter the language or controller. Keep this one in your back pocket!

Now if all you have on hand is an HD44780 character LCD, that one’s arguably even more fun to hack around on just because you’re so limited on going beyond the hard-coded font set. We’ve seen amazing things like using the custom character slots to play Tetris.