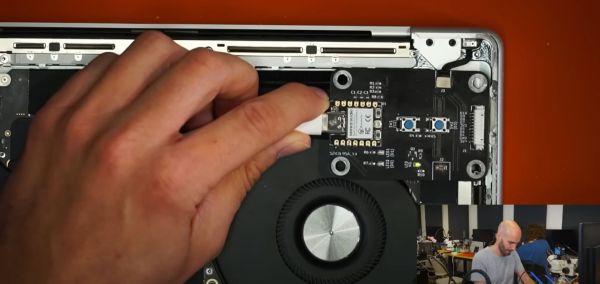
Future Brings CPU Modules, And The Future Is Now

Modularity is a fun topic for us. There’s something satisfying about seeing a complex system split into parts and these parts made replaceable. We often want some parts of our devices swapped, after all – for repair or upgrade purposes, and often, it’s just fun to scour eBay for laptop parts, equipping your Thinkpad with the combination of parts that fits you best. Having always been fascinated by modularity, I believe that hackers deserve to know what’s been happening on the CPU module front over the past decade.

A Youtube thumbnail showing a Thinpad in the background with "Not Garbage" written over its keyboard, and one more keyboard overlaid onto the picture with "garbage" written on that one.
This “swap your Thinkpad keyboard” video thumbnail captures a modularity-enabled sentiment many can relate to.

We’ve gotten used to swapping components in desktop PCs, given their unparalleled modularity, and it’s big news when someone tries to split a yet-monolithic concept like a phone or a laptop into modules. Sometimes, the CPU itself is put into a module. From the grandiose idea of Project Ara, to Intel’s Compute Card, to Framework laptop’s standardized motherboards, companies have been trying to capitalize on what CPU module standardization can bring them.

There’s some hobbyist-driven and hobbyist-friendly modular standards, too – the kind you can already use to wrangle a powerful layout-demanding CPU and RAM combo and place it on your simple self-designed board. I’d like to tell you about a few notable modular CPU concepts – their ideas, complexities, constraints and stories. As you work on that one ambitious project of yours – you know, the one, – it’s likely you will benefit a lot from such a standard. Or, perhaps, you’ll find it necessary to design the next standard for others to use – after all, we all know there’s never too few standards! Continue reading “Future Brings CPU Modules, And The Future Is Now”

Build A Tablet Out Of Your Framework Motherboard

The Framework laptop project is known for quite a few hacker-friendly aspects. For example, they encourage you to reuse its motherboard as a single-board computer – making it into a viable option for your own x86-powered projects. They have published a set of CAD files for that, and people have been working on their own Framework motherboard-based creations ever since; our hacker, [whatthefilament], has already built a few projects around these motherboards. Today, he’s showing us the high-effort design that is the FrameTablet – a 15″ device packing an i5 processor, all in a fully 3D printed chassis. The cool part is – thanks to his instructions, you can build one yourself!

This tablet sports a FullHD touchscreen IPS display and shows some well-thought-out component mounting, using heat-set inserts and screws, increasing such a build’s mechanical longevity. You lose one of the expansion card slots to the USB-C-connected display, but it’s a worthwhile tradeoff, and the touchscreen functionality works wonders in Windows. [whatthefilament] has also published a desk holder and a wall mount to accompany this design – if it’s a bit too large for you to hold in some situations, you can mount it in a more friendly, hands-free way. This is a solid and surprisingly practical tablet, and unlike the Raspberry Pi tablet builds we’ve seen, its x86 heart packs enough power to let you do things like CAD on the go.

With STLs and STEPs available, his build is a decent option for when you’ll want to replace your Framework’s motherboard with a new, upgraded one. You might’ve already noticed a few high-effort projects with these motherboards on our pages – perhaps, this transparent shell handheld with a mech keyboard and trackball, or this personal terminal with a futuristic-looking round display. This project is part of the “send 100 motherboards to hackers” initiative that Framework organized a few months ago, and we can’t say it hasn’t been working out for them!

render of the MNT Pocket Reform on a desk

MNT Reform Goodness, Now Even Smaller With Pocket Reform

You might have already seen the pretty pictures in pastel colors online — a small netbook-like computer with a full-size keyboard. This, while a render, is what the MNT Pocket Reform is going to look like. Reminiscent of the netbook aesthetic in all the right ways, it’s a small device with a mechanical keyboard taking as much space as possible, trackball for navigation, and we assume, exactly the kind of screen that’d be comfortable to use.

We’ve reviewed the MNT Reform a year ago, and this device inherits a lot of its good parts. The motherboard’s connectivity is likely subject to change, but on the motherboard renders, we can spot three USB-C ports, a Micro HDMI port, a microSD card slot, ix Industrial Ethernet, and M.2 B-key and M-key slots for WWAN and SSD cards respectively.

If you expected computational specs, there isn’t really a specific CPU+RAM configuration announced – for a good reason. The Pocket Reform takes advantage of the CPU card concept designed into the MNT Reform – able to take a card with an NXP i.MX8M CPU, Raspberry Pi CM4, Pine SOQuartz, a Kintex-7 FPGA, or any of the cards yet to be developed. The design files are open-source, the prototype motherboards have been ordered, mechanical usability aspects have been worked through. This is a very compelling project, and we can’t wait to see it bear fruit!

A laptop with a mahogany case

The Compu-tor Is A Raspberry Pi Laptop In A Mahogany Case

The Compu-tor, designed by [Henry Edwards], is one of those things that doesn’t neatly fit into any categories. It is a clamshell-type portable computer, although unlike most laptops, it doesn’t come with a built-in battery. It has a sleek custom-designed case, but lacks the futuristic sci-fi looks typical of a cyberdeck. The keyboard can act as an input device, but can also turn into a musical instrument.

In short, it’s a bit of all of those things, but the most striking part is the beautifully-machined mahogany case. The two halves are connected through two beefy friction hinges and a silicone ribbon cable: the bottom half contains the keyboard, speakers, USB ports and power connections, while the top half holds a Raspberry Pi and a 10″ touchscreen. The display bezel has that curved shape typical of CRT monitors, fitting nicely with the 1970s vibe given off by the dark wood.

Another retro touch is in the connections between the various circuit boards and the front panel switches: [Henry] used wire-wrapping, something we haven’t seen for a while. The keyboard is a simple grid of identical keys with handwritten labels. Other labels, like that of the power connector, are made from traditional embossing tape.

The Compu-tor runs Debian, and seems to be quite usable as a compact laptop. It even comes with USB ports to hook up external devices, and with a simple 12 V input it should be no problem to find an external power source for it. Wood seems to be a popular material to build Raspberry Pi-based laptops from: we’ve seen them housed in anything ranging from wooden cigar-boxes to laser-cut plywood, and even incredibly tiny boxes.

Continue reading “The Compu-tor Is A Raspberry Pi Laptop In A Mahogany Case”

DIY Laptop Stand: Why Stop At One When You Can Slot Three?

We make the tools we need, and that’s definitely the case with [Marco Schulte]’s laptop stand. It slots not one, not two, but three laptops at once.

For all their portability, multiple laptops can be a bit clunky to manage on a desk, so [Marco]’s solution definitely saves space while keeping things accessible. The laptop in the front can be open for use and easy access, while the two in the back are held vertically and can be attached to external monitors or other peripherals.

Not only does it save space, but the stand provides ample spots to anchor cable ties for securing the inevitable mess of wires and cables that dealing with three laptops brings. It makes for a tidier desk, that’s for sure.

The stand was designed in Fusion 360 and was cut from plywood with a CNC router. Does this design give you any ideas, or would you like to make one for yourself? The design files are here.

No access to a CNC router? No problem if you have glue and some spare boxes laying around! You might be surprised at how sturdy a few layers of cardboard and glue can be.

Picture of the setup described in the article, with PCI-E cards strewn around the desk, all interconnected, and a powered-up laptop, a large TV screen behind the laptop

This Laptop Gets All The PCIe Devices

Did you ever feel like your laptop’s GPU was sub-optimal, or perhaps that your laptop could use a SAS controller? [Rob Rogers] felt like that too, so now he has the only Dell Latitude business-class laptop that’s paired with an AMD RX580 GPU – and more. Made possible because of a PCIe link he hijacked from the WiFi card, he managed to get a SAS controller, a USB 3.0 expansion card, the aforementioned GPU and a dual-port server network adapter, all in a single, desk-top setup, as the video demonstrates.

First off, we see a PCIe packet switch board based on a PLX-made chip, wrapped in blue tape, splitting a single PCIe x1 link into eight. The traditional USB 3.0 cables carry the downstream x1 links to the four PCIe cards connected, all laid out on [Rob]’s desk. [Rob] demonstrates that all of the cards indeed function correctly – the SAS controller connected to a server backplane with whole 22 TB of storage in it, a few devices plugged into a USB 3.0 card, an Ethernet cable with an active link in the network card, and wrapping up the video showing 3DMark results of the RX580 clearly paired with the laptop’s mobile CPU. There’s four more spots on the PCIe switch card, so if you wanted to connect a few NVMe SSDs without the costly USB enclosures that usually entails, you absolutely could!

The setup on the desk, laptop-less, still interconnected and with the mini pci-e adapter visibleNow, there’s a reason why we don’t see more of such hacks. This seems to be a Latitude E5440 and the card is plugged into a mini-PCIe slot, which means the entire contraption is bound by a single PCI-E Gen2 x1 link, heavily offsetting the gains you’d get from an external GPU when, say, gaming. However, when it comes to the types and amount of peripherals, this is unbeatable – if you want to add an external GPU, high-speed networking and a SAS controller to the same computer that you usually lug around, there isn’t really a dock station you can buy for that!

Our collection of cool PCIe hacks has been growing, with hackers adding external GPUs through ExpressCard and mini PCIe alike, fitting PCIe slots where the factory refused to provide one, and extending the onboard M.2 slots for full-size PCIe cards. Nowadays, with these packet switches, it’s easy as ever to outfit any PCIe capable device with a whole slew of features – as this Raspberry Pi Computer Module motherboard with eleven PCIe slots demonstrates. Wonder how PCIe works, and why all of that is possible? We’ve written an entire article on that!

Continue reading “This Laptop Gets All The PCIe Devices”

Laptop USB-C Charging Hack Lets You Leave The Brick At Home

At their best, laptops are a compromise design. Manufacturers go to great lengths to make the slimmest, lightest, whatever-est laptops possible, and the engineering that goes into doing so is truly amazing. But then they throw in the charger, which ends up being a huge brick with wire attached to it, and call it a day.

Does it have to be that way? Probably, but that doesn’t mean we can’t try to slim down the overall footprint of laptops at least a little. That’s what [Joe Gaz] did when he hacked his laptop to allow for USB-C charging. Tired of the charger anchoring down his HP X360, [Joe] realized that he could harvest the PCB from a USB-C charger adapter dongle and embed it inside his laptop. We’ve seen similar modifications made to Thinkpads in the past, and it’s good to see the process isn’t that far removed with other brands.

After popping open the laptop, which is always an adventure in reverse mechanical engineering, he found that removing the OEM charger jack left just enough room for the USB-C charger. Mounting the board required a 3D printed bracket, while enlarging the original hole in the side of the laptop case took some cringe-inducing work with a file. It looked like it was going to be pretty sloppy at first, but he ended up doing a pretty neat job in the end. The whole modification process is in the video below.

The end result is pretty slick — [Joe] can now carry a much more compact USB wall-wart-style charger, or eschew the charger altogether and rely on public USB charging stations. Either way, it sure beats lugging a brick around. If you’re interested in laptop hacking, or even if you just want to harvest the goodies from a defunct machine, check out this guide to laptop anatomy by our own [Arsenijs Picugins].

Continue reading “Laptop USB-C Charging Hack Lets You Leave The Brick At Home”