An IBM PC showing "68000 IBM PC" on its monitor

IBM PC Runs BASIC With Motorola 68000 CPU Upgrade

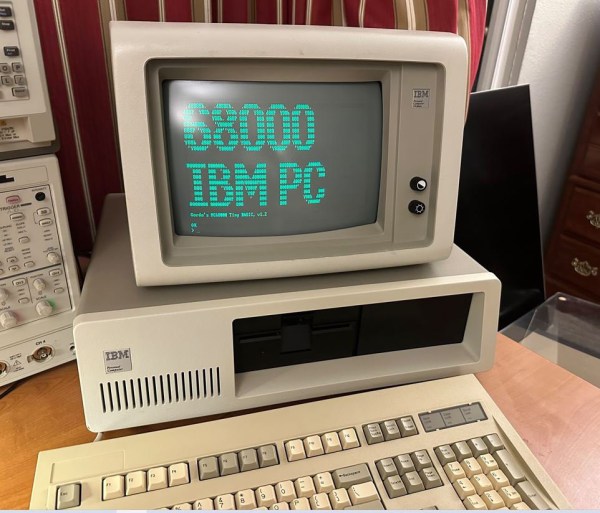
Although ARM CPUs have been making headway in several areas of computing over the last decade or so, the vast majority of desktop, laptop and server CPUs are still based on the x86 architecture. How that came to be is no secret, of course: IBM chose the Intel 8088 to power its model 5150 PC back in the early 1980s, and since it became the dominant PC platform, everyone else followed suit. But what if IBM’s purchasing department had got a good deal at Motorola instead? [Ted Fried] has been experimenting with that scenario, by equipping an IBM PC with a 68000 CPU.

To be fair, he didn’t use an actual Motorola chip; instead, he emulated a 68k core on a Teensy 4.1 and implemented the 8088’s bus interface on its pins. The emulated core does exactly the same thing an actual CPU would do, while the rest of the computer works the same way it always did – data is stored in the motherboard’s DRAM chips, keystrokes are processed by the standard 8255 chip and progam output is displayed on the monitor through the MDA video card. Continue reading “IBM PC Runs BASIC With Motorola 68000 CPU Upgrade”

E-Bike Battery Tapped For Off-Grid Laptop Power

If you’ve travelling via bike, you’ll know there’s a certain advantage to packing light. But what if you need to take your beefy desktop-replacement laptop with you on one of these trips? These power hungry machines can’t go far without their chargers (or a place to plug them in), which generally makes them poor traveling companions.

Luckily, [transistor-man] came up with a solution to this particular problem by reusing his e-bike’s battery pack as a mobile power source for his Lenovo laptop. The energy demands of this particular computer are too high for USB-C Power Delivery, and as such, he had to hack up a way to feed it 20 volts DC via its proprietary square power connector. His bike’s battery puts out between 30 and 42 VDC depending on charge, so at least on paper, it should work out fine. Continue reading “E-Bike Battery Tapped For Off-Grid Laptop Power”

NASA’s Curiosity Mars Rover Gets A Major Software Upgrade

Although the Curiosity rover has been well out of the reach of human hands since it touched down on Mars’ surface in 2012, this doesn’t mean that it isn’t getting constant upgrades. Via its communication link with Earth it receives regular firmware updates, with the most recent one being the largest one since 2016. In addition to code clean-up and small tweaks to message formats, this new change should make Curiosity both smarter and have its wheels last longer.

The former helps to avoid the long idle times between navigating, as unlike its younger sibling, Curiosity does not have the dedicated navigation computer for more autonomous driving. Although it won’t make the 11-year old rover as nimble as its sibling, it should shorten these pauses and allow for more navigating and science to be done. Finally, the change to reduce wear on the wheels is fairly simple, but should be rather effective: this affects the amount of steering that Curiosity needs to do while driving in an arc.

With these changes in place, Curiosity should be all ready to receive its newest sibling as it arrives in a few years along with even more Mars helicopters.

An image of a powered-off device screen. Part of the screen is raised in the configuration of a mobile keyboard. A ribbon cable extends from the left of a PCB underneath the screen and the PCB extends below the bottom edge of the screen with a sticker that has a stylized manufacturer logo that may read "Wisecoco."

Electroosmotic Haptics For More Tactile Touch Devices

If you’re like us, one of the appeals of retro tech is the tactile feedback you get from real buttons. Researchers at Carnegie Mellon have developed a new method for bringing haptic feedback to touchscreen devices.Labeled exploded view of the device stackup. The individual layers from top (output) to bottom (reservoir) are labeled Silicone, PCB & Electrodes, Adhesive, Glass Fiber, PET, Adhesive, PCB & Electrodes, Adhesive, Delrin, Adhesive, and PET. It also shows the different parts as sections of Output Layer (silicone), Pumping Layer, and Reservoir Layer (Adhesive, Delrin, Adhesive, PET).

Using an array of miniaturized electroosmotic pumps, the current prototype devices offer 5 mm of displacement from a 5 mm stackup which is a significant improvement over previous technologies which required a lot more hardware than the displacement provided. When placed under a flexible screen, notifications and other user interactions like the keyboard can raise and lower as desired.

Each layer is processed by laser before assembly and the finished device is self-contained, needing only electrical connections. No need for a series of tubes carrying fluid to make it work. Interaction surfaces have been able to scale from 2-10 mm in diameter with the current work, but do appear to be fixed based on the video (below the break).

You might find applications for haptics in VR or want to build your own Haptic Smart Knob.

Continue reading “Electroosmotic Haptics For More Tactile Touch Devices”

Hackaday Prize 2023: Eye Tracking On A Budget

There is a lot to be learned from the experience of building something functional, and even better if doing so doesn’t break the bank. [Sergej Stoetzer]’s 20€ DIY-Eyetracker aims to be an educational process that covers everything from hardware to functional software in an accessible way.

Hardware based on an economical USB endoscope, and can be used as-is or repackaged with IR illumination.

The eye tracker is based on an economical USB endoscope, which is a small camera optimized for up-close applications. By attaching the camera to a pair of common safety glasses so that it looks at one’s eye, some OpenCV and Python code can do simple tracking and interfacing with other projects.

Basic eye tracking — like determining whether a user is looking up, down, left, or right — can be all that’s needed depending on one’s application. That means that it’s possible to get something working with very little hardware and some easy-to-use OpenCV functions.

Even better performance can be had by adding IR illumination and repackaging the camera into a 3D printed enclosure. The pupil of the eye is an aperture in the iris that appears as a black circle, and that’s even more true under IR illumination which is invisible to the naked eye. If you’re curious about what’s inside those USB endoscope cameras and how to remove their IR filter, there are some good pictures of that process in this project.

The ability to get something prototyped quickly and working well enough to learn new things is a valuable skill, and that’s why re-engineering Education is one of the challenges in the 2023 Hackaday Prize.

FET: Fun Endeavors Together

Last time, we’ve looked over FET basics, details, nuances and caveats. Basics aren’t all there is to FETs, however – let’s go through real-world uses, in all their wonderful variety! I want to show you a bunch of cool circuits where a friendly FET, specifically a MOSFET, can help you – and, along the way, I’d also like to introduce you to a few FETs that I feel like you all could have a good long-term friendship with. If you don’t already know them, that is!

Driving Relays

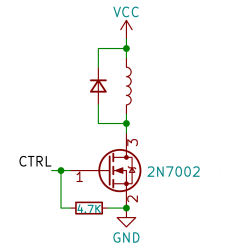
Perhaps, that’s the single most popular use for an NPN transistor – driving coils, like relays or solenoids. We are quite used to driving relays with BJTs, typically an NPN – but it doesn’t have to be a BJT, FETs often will do the job just as fine! Here’s an N-FET, used in the exact same configuration as a typical BJT is, except instead of a base current limiting resistor, we have a gate-source resistor – you can’t quite solder the BJT out and solder the FET in after you have designed the board, but it’s a pretty seamless replacement otherwise. The freewheel (back EMF protection) diode is still needed for when you switch the relay and the coil produces wacky voltages in protest, but hey, can’t have every single aspect be superior.

The reason you can drive it the same way is quite simple: in the usual NPN circuit, the relay is driven by a 3.3 V or a 5 V logic level GPIO, and for small signal FETs, that is well within Vgs. However, if your MCU has 1.8 V GPIOs and your FET’s Vgs doesn’t quite cut it, an NPN transistor is a more advantageous solution, since that one will work as long as you can source the whatever little current and the measly 0.7 V needed.

Continue reading “FET: Fun Endeavors Together”

Op Amp Challenge: An Ultra-Cheap PH Sensor Amplifier

It’s rare in 2023 for an instrument to be entirely analog, instead it’s more normal for a front-end to feed the analog-to-digital converter (ADC) in a microcontroller. Typically the front-end will do the job of transforming whatever the output range of the sensor is, and present it to the microcontroller in whatever range it accepts. [David] had exactly this problem with a pH sensor, and rather than buy an expensive module to do the job he designed his own.

The sensor in question produces a relatively tiny voltage of -0.414 to +0.414 volts, and requires a very high input impedance. A FET input op-amp is selected, with the ground of the sensor shifted upwards into the positive range by a voltage divider. This then feeds a second op-amp that amplifies the resulting DC voltage for the microcontroller input.

This circuit is an especially simple op-amp application, and is a typical one for a sensor interface where a DC voltage needs to be brought into range of a microcontroller. If you’re not used to op-amp circuits then take a look, this type of analogue circuit is not difficult and might just save your butt some time.

Want to know more about simple op-amp circuits? Have we got the video for you!