Dead E. Ruxpin Appears Alive And Well

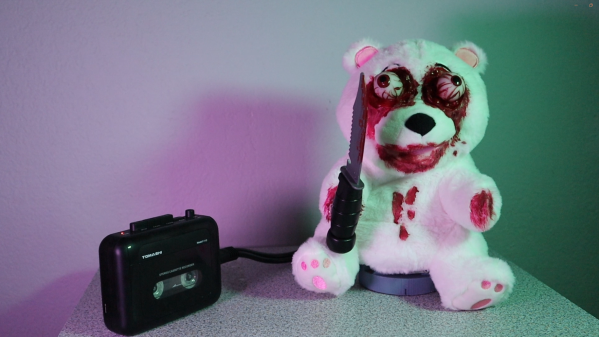
What are you doing to scare trick-or-treaters this Halloween? Surely something, right? Well, Hackaday alum [CameronCoward] certainly has his holiday under control with Dead E. Ruxpin, a murderous, cassette tape-controlled animatronic bear.

Readers of a certain vintage will no doubt see the correlation to Teddy Ruxpin, an animatronic bear from the 1980s whose mouth moved as it read stories from cassette tapes. Cleverly, the engineers used one stereo channel for the story’s audio, and the other channel to control the bear’s mouth.

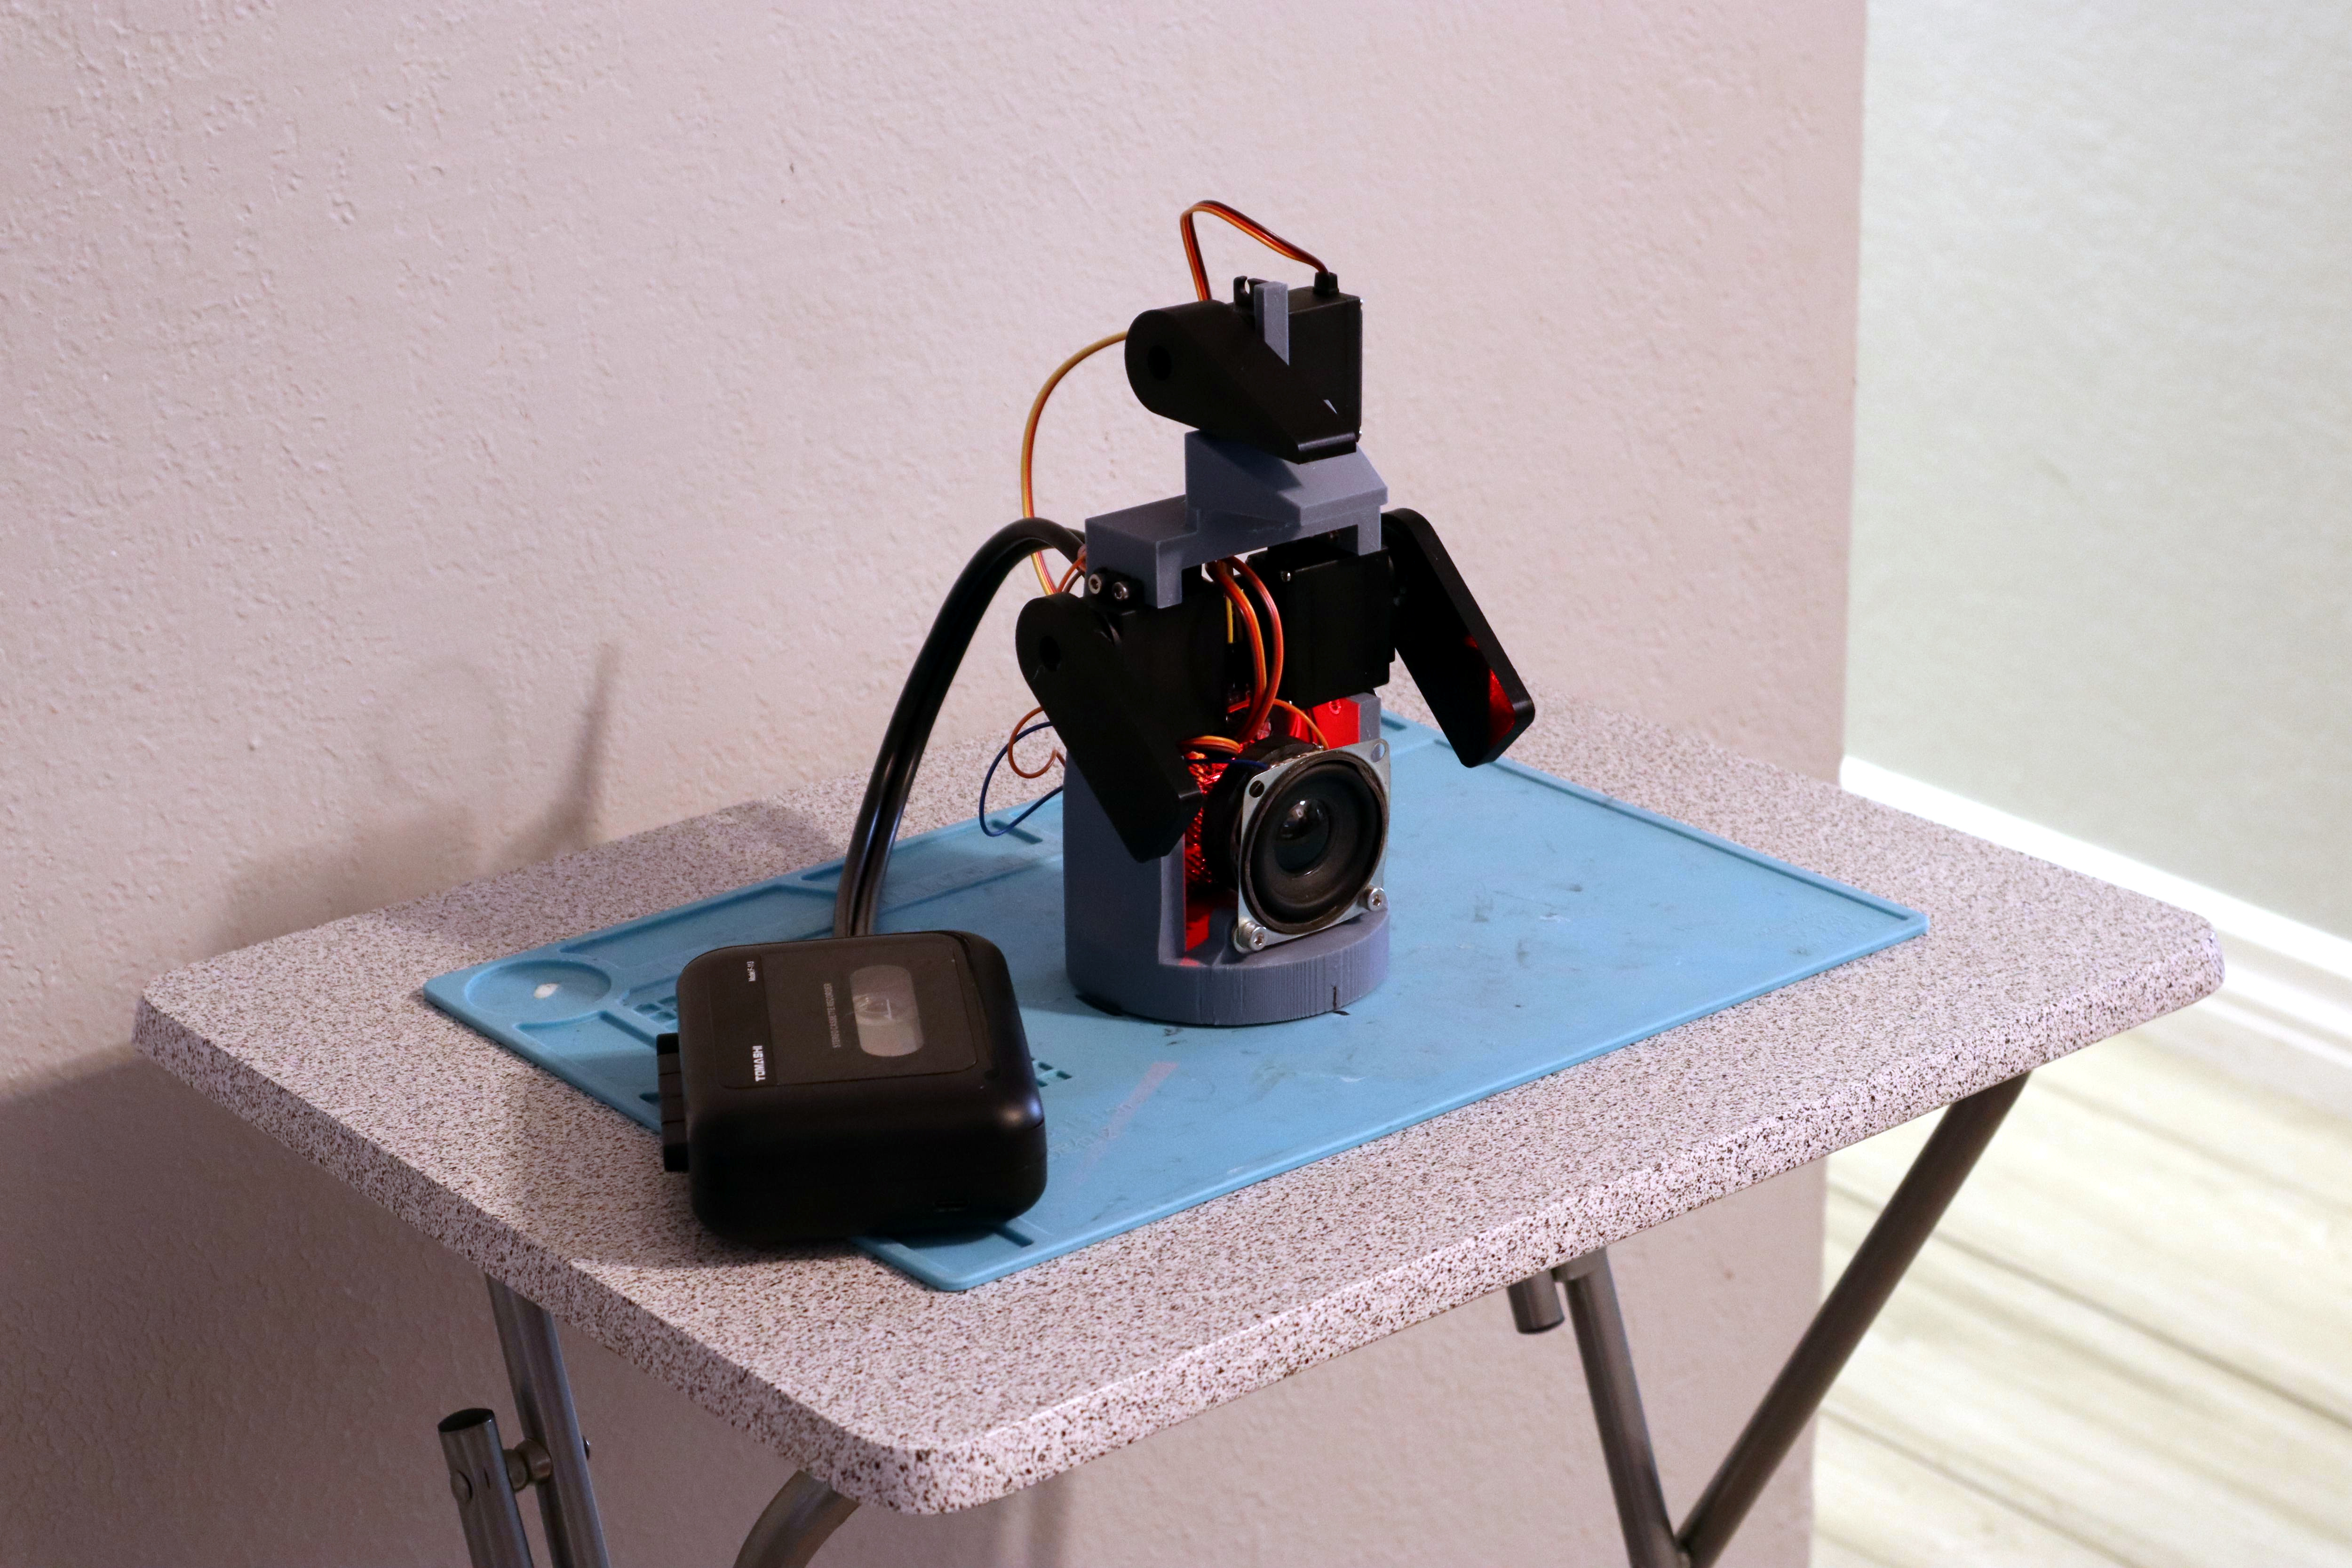
Dead E. Ruxpin takes this idea and expands it, using the same two channels to send audio and control three servo motors that move both arms and the mouth. How is this possible? By sending tones built from one or more frequencies.

Essentially, [Cameron] assigned a frequency to each movement: mouth open/closed, and left and/or right arm up or down. These are all, of course, synced up with specific points in the audio so Dead E. doesn’t just move randomly, he dances along with the music.

The bear is actually a hand puppet, which leaves room for a 3D-printed skeleton that holds the RP2040 and the servos and of course, moves the puppet’s parts. We can’t decide if we prefer the bulging bloodshot eyes, or think the cutesy original eyes would have made a scarier bear. Anyway, check out the build/demo video after the break to see it in action.

Are you now into Teddy Ruxpin? Here’s a bit more about those scare bears. And don’t forget, Halloween Hackfest runs now until October 31st.

Continue reading “Dead E. Ruxpin Appears Alive And Well”

Beating Apple’s Secret Lid Angle Sensor Calibration With Custom Tool

Among the changes made by Apple to its laptops over the years, the transition from a Hall sensor-based sleep sensor to an angle sensor that determines when the lid is closed is a decidedly unpopular one. The reason for this is the need to calibrate this sensor after replacement, using a tool that Apple decided to keep for itself. That is, until recently [Stephan Steins] created a tool which he creatively called the ‘nerd.tool.1‘. This widget can perform this calibration procedure with the press of its two buttons, as demonstrated on [Louis Rossmann]’s YouTube channel.

This new angle sensor was first introduced in late 2019, with Apple’s official reason being an increased level of ‘precision’. As each sensor has to be calibrated correctly in order to measure the magnetic field and determine the associated lid angle, this means that third-party repair shops and determined MacBook owners have to transplant the chip containing the calibration data to a replacement sensor system. Until now, that is. Although the nerd.tool.1 is somewhat pricey at €169 ($179 USD), for a third-party MacBook repair shop this would seem to be a steal.

It is however unfortunate that Apple persists in such anti-repair methods, with recently [Hugh Jeffreys] also calling Apple out on this during a MacBook Pro M1/M2 teardown video. During this teardown [Hugh] came across this angle sensor issue by swapping parts between two otherwise identical MacBook Pros, indicating just how annoying this need to calibrate one tiny lid angle sensor is.

Continue reading “Beating Apple’s Secret Lid Angle Sensor Calibration With Custom Tool”

Feed Your Fasteners In Line, With A Bowl Feeder

If you spend much time around industrial processes, you may have seen a vibrating bowl feeder at work. It’s a clever but simple machine that takes an unruly pile of screws or nuts and bolts, and delivers them in a line the correct way up. They do this by shaking the pile of fasteners in a specific way — a spiral motion which encourages them to work to the edge of the pile and align themselves on a spiral track which leads to a dispenser. It’s a machine [Fraens] has made from 3D printed parts, and as he explains in the video below the break, there’s more to this than meets the eye.

The basic form of the machine has a weighted base and an upper bowl on three angled springs. Between the two is an electromagnet, which provides the force for the vibration. The electromagnet needed to be driven with a sine wave which he makes with an Arduino and delivers as PWM via an H-bridge, but the meat of this project comes in balancing the force and frequency with the stiffness of the springs. He shows us the enormous pile of test prints made before the final result was achieved, and it’s a testament to the amount of work put into this project. The final sequence of a variety of objects making the march round the spiral is pure theatre, but we can see his evident satisfaction in a job well done.

Oddly this isn’t the first bowl feeder we’ve seen, though it may be one of the most accomplished. We particularly like this tiny example for SMD parts.

Continue reading “Feed Your Fasteners In Line, With A Bowl Feeder”

$13 Scope And Logic Analyzer Hits 18 Msps

We aren’t sure what’s coolest about [Richard Testardi’s] Flea-Scope. It costs about $13 plus the cost of making the PCB. It operates at 18 million samples per second. It also doesn’t need any software — you connect to it with your browser! It works as an oscilloscope, a logic analyzer, and a waveform generator. Not bad. The board is basically a little life support around a PIC32MK and the software required to run it.

Of course, for $13, you need to temper your expectations. One analog input reads from -6 to 6V (hint: use a 10X probe). The goal was for the instrument to be accurate within 2%.  There are also nine digital inputs sampled simultaneously with the analog sampling. The signal generator portion can output a 4 MHz square wave or a 40 kHz arbitrary waveform.

Continue reading “$13 Scope And Logic Analyzer Hits 18 Msps”

Drop-In Upgrade PCB Brings USB-C To DualShock 4

Despite a somewhat shaky start, it seems like everyone is finally embracing USB-C. Most gadgets have made the switch these days, and even Apple has (with some external persuasion) gotten on board. That’s great for new hardware, but it can lead to a frustrating experience when you reach for an older device and find a infuriatingly non-oval connector on the bottom.

If one of those devices happens to be Sony’s DualShock 4 controller, [DoganM95] has the fix for you. Sony wisely put the controller’s original micro USB connector on a separate PCB so it could be cheaply replaced without having to toss the main PCB — that same modularity also means it was relatively easy to develop a USB-C upgrade board.

That said, there was a bit of a catch. The USB board on the DualShock 4 also carries a LED module that illuminates the “Light Bar” on the rear of the controller. In this design, [DoganM95] has replaced the original component with a pair of side-firing LEDs. Combined with the extra pins in the flexible printed circuit (FPC) connector necessary to control them, and the pair of 0603 resistors required for USB-C to actually provide power, putting this board together might take a bit more fine-pitch soldering than you’d expect.

Over the last couple of years, we’ve seen a wide array of devices receive DIY USB-C upgrades. In fact, this isn’t even the first time we’ve seen it done on the DualShock 4. But there’s something about hacking a modern port onto a legacy piece of hardware that we just can’t seem to get enough of.

Tech In Plain Sight: Microwave Ovens

Our homes are full of technological marvels, and, as a Hackaday reader, we are betting you know the basic ideas behind a microwave oven even if you haven’t torn one apart for transformers and magnetrons. So we aren’t going to explain how the magnetron rotates water molecules to produce uniform dielectric heating. However, when we see our microwave, we think about two things: 1) this thing is one of the most dangerous things in our house and 2) what makes that little turntable flip a different direction every time you run the thing?

First, a Little History

Westinghouse Powercaster which could, among other things, toast bread in six seconds

People think that Raytheon engineer Percy Spenser, the chief of their power tube division, noticed that while working with a magnetron he found his candy bar had melted. This is, apparently, true, but Spenser wasn’t the first to notice. He was, however, the first to investigate it and legend holds that he popped popcorn and blew up an egg on a colleague’s face (this sounds like an urban legend about “egg on your face” to us). The Raytheon patent goes back to 1945.

However, cooking with radio energy was not a new idea. In 1933, Westinghouse demonstrated cooking foods with a 10 kW 60 MHz transmitter (jump to page 394). According to reports, the device could toast bread in six seconds.  The same equipment could beam power and — reportedly — exposing yourself to the field caused “artificial fever” and an experience like having a cocktail, including a hangover on overindulgence. In fact, doctors would develop radiothermy to heat parts of the body locally, but we don’t suggest spending an hour in the device.

Continue reading “Tech In Plain Sight: Microwave Ovens”

How To Chase The Beam With A Z80

The more accomplished 8-bit microcomputers of the late 1970s and early 1980s had a dedicated display chip, a CRT controller. This took care of all the jobs associated with driving a CRT display, generating the required timing and sequencing all the dots to make a raster. With a CRT controller on hand the CPU had plenty of time to do other work, but on some cheaper machines there was no CRT controller and the processor had to do all the work of assembling the display itself.

[Dr. Matt Regan] had a Sinclair ZX81 which relied on this technique, and he’s put up the first of what will become a series of videos offering a deep dive into this method of creating video. The key to its operation lies in very careful use of timing, with operations executed to keep a consistent number of clock cycles per dot on the display. He’s making a very low resolution version of the display in the first video, which he manages to do with only an EPROM and a couple of 74 logic chips alongside the Z80. We’re particularly impressed with the means of creating the sync pulses, using opcodes carefully chosen to do nothing of substance except setting a particular bit.

This method of assembling a display on such a relatively slow microprocessor has the drawback of no means of creating a grayscale, and of course it’s only available in glorious black and white. But it’s the system which gave a first experience of computing to millions, and for that we find the video fascinating. Take a look, below the break.

If this has caused you to yearn for all things Sinclair, read our tribute to the man himself.

Continue reading “How To Chase The Beam With A Z80”