Asahi GPU Hacking

[Alyssa Rosenzweig] has been tirelessly working on reverse engineering the GPU built into Apple’s M1 architecture as part of the Asahi Linux effort. If you’re not familiar, that’s the project adding support to the Linux kernel and userspace for the Apple M1 line of products. She has made great progress, and even got primitive rendering working with her own open source code, just over a year ago.

Trying to mature the driver, however, has hit a snag. For complex rendering, something in the GPU breaks, and the frame is simply missing chunks of content. Some clever testing discovered the exact failure trigger — too much total vertex data. Put simply, it’s “the number of vertices (geometry complexity) times amount of data per vertex (‘shading’ complexity).” That… almost sounds like a buffer filling up, but on the GPU itself. This isn’t a buffer that the driver directly interacts with, so all of this sleuthing has to be done blindly. The Apple driver doesn’t have corrupted renders like this, so what’s going on?
Continue reading “Asahi GPU Hacking”

A Real GPU On The Raspberry Pi — Barely.

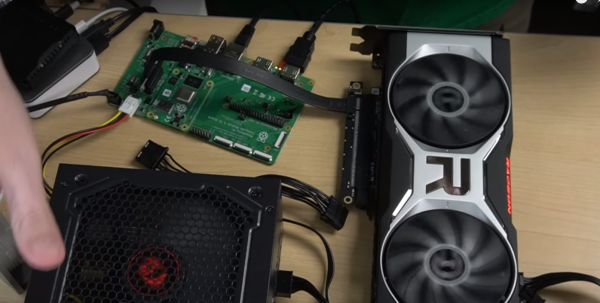
[Jeff Geerling] saw the Raspberry Pi Compute Module 4 and its exposed PCI-Express 1x connection, and just naturally wondered whether he could plug a GPU into that slot and get it to work. It didn’t. There were a few reasons why, such as the limited Base Address Register space, and drivers that just weren’t written for ARM hardware. A bit of help from the Raspberry Pi software engineers and other Linux kernel hackers and those issues were fixed, albeit with a big hurdle in the CPU. The Broadcom chip in the Pi 4, the BCM2711, has a broken PCIe implementation.

There has finally been a breakthrough — Thanks to the dedicated community that has sprung up around this topic, a set of kernel patches manage to work around the hardware issues. It’s now possible to run a Radeon HD 5000/6000/7000 card on the Raspberry Pi 4 Compute Module. There are still glitches, and the Kernel patches to make this work will likely never land upstream. That said, It’s possible to run a desktop environment on the Radeon GPU on a Pi, and even a few simple benchmarks. The results… aren’t particularly inspiring, but that wasn’t really ever the point. You may be asking what real-world use is for a full-size GPU on the Pi. Sure, maybe crypto-mining or emulation, or being able to run more monitors for digital signage. More than that, it might help ensure the next Pi has a working PCIe implementation. But like many things we cover here, the real reason is that it’s a challenge that a group of enthusiasts couldn’t leave alone.

Continue reading “A Real GPU On The Raspberry Pi — Barely.”

Copper Modding Helps Cool A Toasty GPU

[DandyWorks] had an NVIDIA RTX 3070 Ti GPU, and found it was running incredibly hot, with the card’s memory hitting temperatures of 110 °C. He decided to try “copper modding” to solve the problem, and made some impressive improvements along the way.

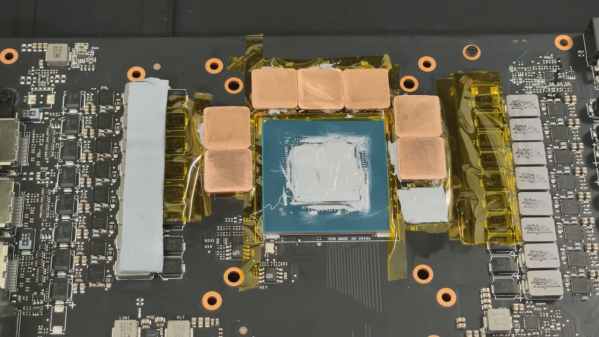
Copper modding is where small copper shims are used to connect hot chips on the GPU to the heatsink more effectively than the standard thermal pads used by the manufacturer. Copper has much better thermal conductivity than thermal pads, and thus can help improve cooling of components when used in this fashion.

With the GPU carefully disassembled, [DandyWorks] notes the design uses a sub-heatsink specifically for the memory chips. He then sets about removing the thermal pads from the chips with isopropyl alcohol to help. They’re replaced with copper shims of a precise thickness, with a thin layer of thermal paste to ensure good heat flow. [DandyWorks] also shields all surrounding parts of the board with Kapton tape to avoid shorts if the copper shims happen to shift at any point.

Running the same hashing operation, the GPU now operates with its memory at a much cooler temperature of just 64 °C. [DandyWorks] ran the test for hours and temperatures didn’t climb beyond there. It’s evidence that the copper shims do a far better job of conducting the heat out of the memory chips versus the stock thermal pad setup.

We’ve seen some other interesting mods in this vein before, such as CPU die lapping for better thermal performance. Video after the break.

Continue reading “Copper Modding Helps Cool A Toasty GPU”

WebGPU… Better Than WebGL?

As the browser becomes more like an operating system, we are seeing more deep features being built into them. For example, you can now do a form of assembly language for the browser. Sophisticated graphics have been around using WebGL since around 2011, but some people find it hard to use. [Surma] was one of those people and tried a new method that is just surfacing to do the same thing: WebGPU.

[Surma] liked it better and shares a lot of information in the post and — oddly — the post doesn’t use WebGPU for graphics very much. Instead, the post focuses on using GPU cores for fast computation, something else you can do with WebGPU. If your goal is to draw on the screen, though, you need to know the basics and the post links to a site with examples of doing this.

Continue reading “WebGPU… Better Than WebGL?”

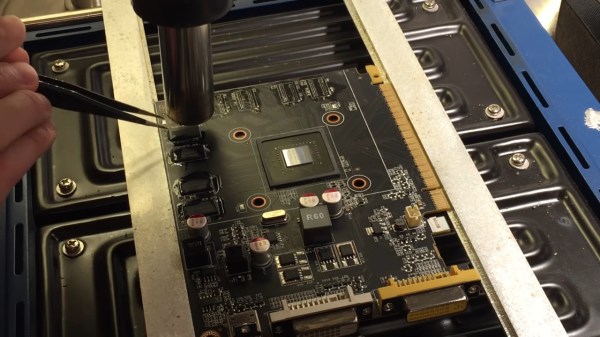
A GPU PCB mounted on top of a preheater, with a hot air gun blowing on top of one of the DDR chips, held with tweezers, about to be removed from the board. Most of the other chips are already gone from the board, with only a few left.

GPU RAM Upgrades Are Closer Than You Think

We’re all used to swapping RAM in our desktops and laptops. What about a GPU, though? [dosdude1] teaches us that soldered-on RAM is merely a frontier to be conquered. Of course, there’s gotta be a good reason to undertake such an effort – in his case, he couldn’t find the specific type of Nvidia GT640 that could be flashed with an Apple BIOS to have his Xserve machine output the Apple boot screen properly. All he could find were 1GB versions, and the Apple BIOS could only be flashed onto a 2GB version. Getting 2GB worth of DDR chips on Aliexpress was way too tempting!

The video goes through the entire replacement process, to the point where you could repeat it yourself — as long as you have access to a preheater, which is a must for reworking relatively large PCBs, as well as a set of regular tools for replacing BGA chips. In the end, the card booted up, and, flashed with a new BIOS, successfully displayed the Apple bootup logo that would normally be missing without the special Apple VBIOS sauce. If you ever want to try such a repair, now you have one less excuse — and, with the GT640 being a relatively old card, you don’t even risk all that much!

This is not the first soldered-in RAM replacement journey we’ve covered recently — here’s our write-up about [Greg Davill] upgrading soldered-in RAM on his Dell XPS! You can upgrade CPUs this way, too. While it’s standard procedure in sufficiently advanced laptop repair shops, even hobbyists can manage it with proper equipment and a good amount of luck, as this EEE PC CPU upgrade illustrates. BGA work and Apple computers getting a second life go hand in hand — just two years ago, we covered this BGA-drilling hack to bypass a dead GPU in a Macbook, and before that, a Macbook water damage revival story.

Continue reading “GPU RAM Upgrades Are Closer Than You Think”

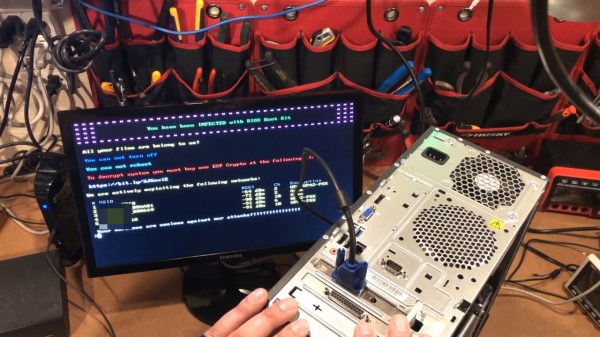
Picture of a monitor with a fake "ransomware" banner on it, and a PC with the ESP32 VGA devboard mounted into it in the foreground

ESP32 Pretends To Be GPU; Gives You A Ransomware Scare

Sometimes a piece of hardware meets a prank idea, and that’s how the fun Hackaday articles are born. [AnotherMaker] shows us some harmless entertainment at the expense of an IT enthusiast in your life – programming an ESP32-powered devboard with a VGA output to show an ever-feared “all your files are encrypted” screen on a monitor connected to it. The ASCII text in its 8-bit glory helps sell this prank, making it look exactly like a BIOS-hijacking piece of malware it claims to be; akin to UIs of the past that skilled hackers would whip up in x86 assembly. The devboard’s integration into a PCI card backplate is a cherry on top, a way to seamlessly integrate this into a PC case, making it look not particularly different from an old graphics card. In such a configuration, we don’t doubt that this would be a head-scratcher to a certain kind of an IT department worker.

If you already have someone in mind as a target for this prank, you’re in luck, since [AnotherMaker] has shared his source code, too, and all you need is a ESP32 with a VGA port set up. You can get the same devboard, or you can even solder it all together with an ESP32 breakout and resistors, if you’re on a time or money budget, since the schematics for the LilyGO devboard are public. Not all devboards gets such a fun application, but it’s always fun to see when someone thinks of one – a perfect prank scenario that calls for a very specific devboard.

Wondering how it’s even possible to output VGA from the ESP32? We’ve covered this in the past – like this R&D project done by [bitluni], who then went ahead and expanded on it by connecting six displays at once. If you’ve connected your ESP32 to a VGA port and ran some test sketches, a UI library will help you upgrade your idea into a ready project in no time.

Continue reading “ESP32 Pretends To Be GPU; Gives You A Ransomware Scare”

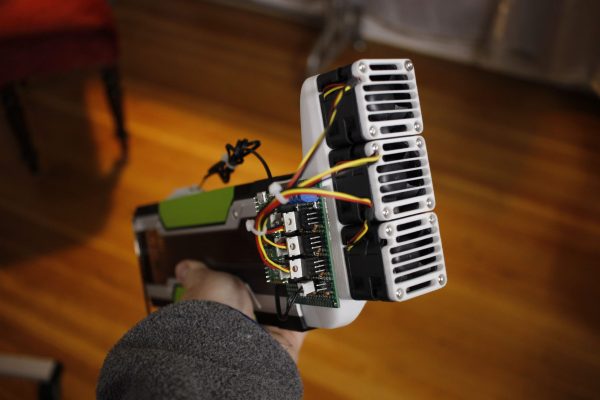
A GPU card with a home-made fan assembly

3D-printed Fan Mount Keeps Server GPU Cool In Desktop Case

Most readers of Hackaday will be well aware of the current shortages of semiconductors and especially GPUs. Whether you’re planning to build a state-of-the art gaming PC, a mining rig to convert your kilowatt-hours into cryptocoins, or are simply experimenting with machine-learning AI, you should be prepared to shell out quite a bit more money for a proper GPU than in the good old days.

Bargains are still to be had in the second-hand market though. [Devon Bray] chanced upon a pair of Nvidia Tesla K80 cards, which are not suitable for gaming and no longer cost-effective for mining crypto, but ideal for [Devon]’s machine-learning calculations. However, he had to make a modification to enable proper thermal management, as these cards were not designed to be used in regular desktop PCs.

The reason for this is that many professional-grade GPU accelerators are installed in rack-mounted server cases, and are therefore equipped with heat sinks but no fans: the case is meant to provide a forced air flow to carry away the card’s heat. Simply installing the cards into a desktop PC case would cause them to overheat, as passive cooling will not get rid of the 300 W that each card pumps out on full load.

[Devon] decided to make a proper thermal solution by 3D printing a mount that carries three fans along with an air duct that snaps onto the GPU card. In order to prevent unnecessary fan noise, he added a thermal control system consisting of a Raspberry Pi Pico, a handful of MOSFETs, and a thermistor to sense the GPU’s temperature, so the fans are only driven when the card is getting hot. The Pi Pico is of course way more powerful than needed for such a simple task, but allowed [Devon] to program it in MicroPython, using more advanced programming techniques than would be possible on, say, an Arduino.

We love the elegant design of the fan duct, which enables two of these huge cards to fit onto a motherboard side-by-side. We’ve seen people working on the opposite problem of fitting large fans into small cases, as well as designs that discard the whole idea of using fans for cooling.

Continue reading “3D-printed Fan Mount Keeps Server GPU Cool In Desktop Case”