A GPU PCB mounted on top of a preheater, with a hot air gun blowing on top of one of the DDR chips, held with tweezers, about to be removed from the board. Most of the other chips are already gone from the board, with only a few left.

GPU RAM Upgrades Are Closer Than You Think

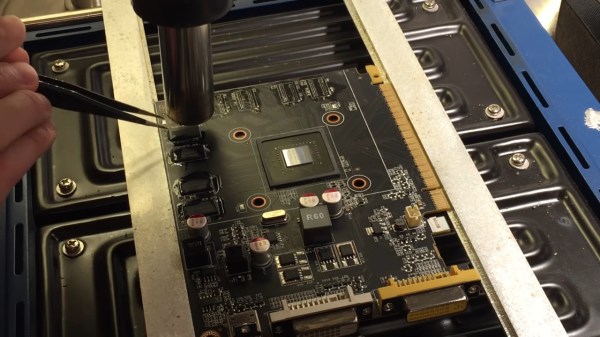
We’re all used to swapping RAM in our desktops and laptops. What about a GPU, though? [dosdude1] teaches us that soldered-on RAM is merely a frontier to be conquered. Of course, there’s gotta be a good reason to undertake such an effort – in his case, he couldn’t find the specific type of Nvidia GT640 that could be flashed with an Apple BIOS to have his Xserve machine output the Apple boot screen properly. All he could find were 1GB versions, and the Apple BIOS could only be flashed onto a 2GB version. Getting 2GB worth of DDR chips on Aliexpress was way too tempting!

The video goes through the entire replacement process, to the point where you could repeat it yourself — as long as you have access to a preheater, which is a must for reworking relatively large PCBs, as well as a set of regular tools for replacing BGA chips. In the end, the card booted up, and, flashed with a new BIOS, successfully displayed the Apple bootup logo that would normally be missing without the special Apple VBIOS sauce. If you ever want to try such a repair, now you have one less excuse — and, with the GT640 being a relatively old card, you don’t even risk all that much!

This is not the first soldered-in RAM replacement journey we’ve covered recently — here’s our write-up about [Greg Davill] upgrading soldered-in RAM on his Dell XPS! You can upgrade CPUs this way, too. While it’s standard procedure in sufficiently advanced laptop repair shops, even hobbyists can manage it with proper equipment and a good amount of luck, as this EEE PC CPU upgrade illustrates. BGA work and Apple computers getting a second life go hand in hand — just two years ago, we covered this BGA-drilling hack to bypass a dead GPU in a Macbook, and before that, a Macbook water damage revival story.

Continue reading “GPU RAM Upgrades Are Closer Than You Think”

Retro Gaming With Retro Joysticks

One of the biggest reasons for playing older video games on original hardware is that emulators and modern controllers can’t replicate the exact feel of how those games would have been originally experienced. This is true of old PC games as well, so if you want to use your original Sidewinder steering wheel or antique Logitech joystick, you’ll need something like [Necroware]’s GamePort adapter to get them to communicate with modern hardware.

In a time before USB was the standard, the way to connect controllers to PCs was through the GamePort, typically found on the sound card. This has long since disappeared from modern controllers, so the USB interface [Necroware] built relies on an Arduino to do the translating. Specifically, the adapter is designed as a generic adapter for several different analog joysticks, and a series of DIP switches on the adapter select the appropriate mode. Check it out in the video after the break. The adapter is also capable of automatically calibrating the joysticks, which is necessary as the passive components in the controllers often don’t behave the same way now as they did when they were new.

Plenty of us have joysticks and steering wheels from this era stored away somewhere, so if you want to experience Flight Simulator 5.0 like it would have been experienced in 1993, all it takes is an Arduino. And, if you want to run these programs on bare metal rather than in an emulator, it is actually possible to build a new Intel 486 gaming PC, which operates almost exactly like a PC from the 90s would have.

Continue reading “Retro Gaming With Retro Joysticks”

Hackaday Links Column Banner

Hackaday Links: January 30, 2022

After all the fuss and bother along the way, it seems a bit anticlimactic now that the James Webb Space Telescope has arrived at its forever home orbiting around L2. The observatory finished its trip on schedule, arriving on January 24 in its fully deployed state, after a one-month journey and a couple of hundred single-point failure deployments. The next phase of the mission is commissioning, and is a somewhat more sedate and far less perilous process of tweaking and trimming the optical systems, and getting the telescope and its sensors down to operating temperature. The commissioning phase will take five or six months, so don’t count on any new desktop photos until summer at the earliest. Until then, enjoy the video below which answers some of the questions we had about what Webb can actually see — here’s hoping there’s not much interesting to see approximately in the plane of the ecliptic.

Continue reading “Hackaday Links: January 30, 2022”

T-shirt folding robot

Laundry Bot Tackles The Tedium Of T-Shirt Folding

Roomba aside, domestic robots are still in search of the killer app they need to really take off. For the other kind of home automation to succeed, designers are going to have to find the most odious domestic task and make it go away at the push of the button. A T-shirt folding robot is probably a good first step.

First and foremost, hats off to [] for his copious documentation on this project. Not only are complete instructions for building the laundry bot listed, but there’s also a full use-case analysis and even a complete exploration of prior art in the space. [Stefano]’s exhaustive analysis led to a set of stepper-actuated panels, laser-cut from thin plywood, and arranged to make the series of folds needed to take a T-shirt from flat to folded in just a few seconds.

The video below shows the folder in action, and while it’s not especially fast right now, we’ll chalk that up to still being under development. We can see a few areas for improvement; making the panels from acrylic might make the folded shirt slide off the bot better, and pneumatic actuators might make for quicker movements and sharper folds. The challenges to real-world laundry folding are real, but this is a great start, and we’ll be on the lookout for improvements.

Continue reading “Laundry Bot Tackles The Tedium Of T-Shirt Folding”

ESP32 And Raspberry Pi Take Over Game Boy LCD

The Nintendo Game Boy and its many permutations represent one of the most well-known and successful gaming platforms ever produced. There was a decades-long stretch of time where the most popular kid in the lunch room was the one who brought in their Game Boy so the rest of the class could huddle around and check out the latest Pokemon title.

But those days are long gone, and now these once-coveted handhelds can be had for a song on the second-hand market. Which makes it the perfect time to check out this project [kgsws] released recently that allows you to interface the Game Boy LCD with the ESP32 or the Raspberry Pi. In the most basic of applications, it lets you push video from your Linux computer out to the Game Boy LCD over WiFi. But as the video below illustrates, that’s just the tip of the iceberg.

With the ESP32 wired between the handheld’s LCD and main PCB, the microcontroller can also act as a capture device using I2S camera mode. Compared to what ends up showing on the handheld’s LCD, the recorded gameplay [kgsws] shows off looks fantastic. Visuals are crisp and fluid, and naturally devoid of the Game Boy’s iconic (if slightly nauseating) greenish tint.

The project also includes the capability to control an array of Game Boy LCDs, which allows for some interesting possibilities. The image can be stretched to cover multiple displays, which [kgsws] demonstrates by playing a game on 3 x 3 grid of salvaged panels, but each LCD also can be controlled individually as is the case with the large digital clock seen above.

Whether you’re looking for a way to capture gameplay on the real hardware, or want to run RetroPie on a real Game Boy screen, we’re excited to see what folks come up with using this project.

Continue reading “ESP32 And Raspberry Pi Take Over Game Boy LCD”

Power For Nothing And Your Kicks For Free

We all know that you can convert heat into electricity. Usually, you do that with some form of steam, but there are other methods, too, including thermocouples. If you’ve ever seen something producing waste heat, you’ll appreciate Penn State’s work to harvest power from hot pipes. The idea is simple in theory: create a flexible thermoelectric generator that can wrap around hot pipes or other surfaces to gather otherwise lost heat. The full (paywalled) paper is also available.

The devices can produce up to 150% more power per unit area compared to other thermoelectric generators. A three-square-inch test device produced over 50 watts. Scale that up to an industrial pipe hundreds of feet long, and you could create some serious power. To accomplish this, the scientists used strips of six thermocouples and connected them for a total of 72 thermocouples. Liquid metal between layers improved the device’s performance.

This isn’t a totally new idea. Russia was famous for making radios in the 1950s that operated using a generator that went around the flue of a kerosene lamp. Since the Russians were pulling this off in the 1950s, converting heat into electricity is obviously nothing new. Of course, your body creates heat, too, so why not use that?

A black PCB with four numeric Nixie tubes on the top, showing 9:26. Under them, a group of black relays is located.

Relay-Driven Nixie Clock Gets You To Stop Scrolling

We don’t often get a Tips line submission where the “Subject” line auto-translates as “Yoshi Yoshi Yoshi”, linking to a short video by [Yasunari Industries] (embedded below). For many, it might be hard to tell what this is at a first glance – however, if the myriad of relays clacking won’t draw your attention, the four Nixie digits on the top definitely will! The gorgeous black PCB has two buttons on the bottom, incrementing hour and minute hours respectively, and observant readers will notice how the LEDs near the relays respond to binary-coded-decimal representation of the digits being shown. This appears to be a relay-based clock with Nixie tubes for digit outputs, and on a scale from “practical” to “eye candy”, it firmly points towards the latter!

The project’s description is quite laconic, but it’s fun to try to figure out what is what based off the few pictures available. The top part with the Nixies and the PIR sensor (presumably for conserving the Nixie tube resources) is V-scored, and a small jumper PCB on the back connects the Nixie module to the relay board – likely, we might see these boards reassembled in a different form-factor, or perhaps find their way into [Yasunari Industries]’ different projects altogether! We can see a Digispark board in the bottom right corner, and wonder if, with addition of that, this board is able to function as a standalone clock — hopefully it does, because that’s one gorgeous addition. And, of course, it all couldn’t happen without help of a bunch of red wires on the back of the board – the author says that some segments were reversed, and the high-voltage PSU section of the board was mis-wired.

Nixie tubes have a dedicated fan base over here, and we keep covering projects that find yet unexplored ways to use Nixies, such as a circular FFT display, or a high-speed camera calibration fixture. Sometimes, Nixie tubes feel like this special sauce you can add to your creation, which explains their popularity in all kinds of barely even counting-adjacent projects, like this TODO indicator. And when we run out of Nixies, we find ways to imitate them – whether it’s with tiny IPS displays, or with layered laser-cut acrylic!

Continue reading “Relay-Driven Nixie Clock Gets You To Stop Scrolling”