Arduino PLC Keeps The Beat

For most of our prototype, hobby, or one-off electronics projects it’s perfectly fine to use a development platform like an Arduino Uno or something to that effect. They’re both easy to program and easy to wire up to projects without breaking the bank. But if you step into an industrial setting where reliability is paramount even in places that are noisy, vibrating all the time, hot, or otherwise unpleasant for electronics, you’ll want to reach for a programmable logic controller (PLC) that are much more robust. There is actually a PLC from Arduino, and if you want to dip your toes into the PLC world then take a look at this drum kit based on the Arduino Opta.

With the PLC at the core of the build, it’s on to making the drumming mechanisms themselves. For that, project creator [JC Audio] is using a series of solenoids attached to camera mounts with a custom 3D printed part that allows for quick assembly and disassembly so he can get the positioning of each drum sound just right. The high hat is taken care of by the noise of an internal solenoid, with the other drums striking various real drums and other solid objects in his shops. The solenoids themselves are driven by a solid-state relay expansion module to ensure there’s enough power

While the build doesn’t sit inside a factory and run for years at a time, a musician’s stage is certainly a rough enough environment that we might reach for a PLC over a standard development board for its benefits. The code for this project is available as well at the project’s GitHub page for those looking for a more advanced timekeeper to play along with their music practice, and for more details on why you might choose a PLC for your project take a look at this Arduino vs PLC showdown from a few years ago.

Continue reading “Arduino PLC Keeps The Beat”

An Arduino Nano Clone In A DIP-Sized Footprint

Nobody doubts the utility of the Arduino Nano and its many clones, and chances are good you’ve got at least one or two of the tiny dev boards within arm’s reach right now. But as small as it is, the board still takes up a fair amount of real estate, especially on solderless breadboards during the prototyping phase of a project. Wouldn’t it be nice to shrink down the Nano just a bit and regain a couple of rows for plugging in components and jumpers?

It looks like [Albert van Dalen] thought so, and he managed to get a Nano’s functionality — and then some — onto a DIP-26 footprint. The aptly named “Nano DIP,” which at 33 mm x 10 mm — about the same size as the ATmega328 on the Arduino Uno — will tickle the miniaturization fans out there. The board is built around an ATtiny3217 and has almost all of the Nano’s features, like a USB port, reset button, built-in LEDs, 5 V regulator, and preloaded bootloader. Its big extra feature is the 350-kilosamples-per-second 8-bit DAC, while sacrificing external crystal pins and a 3.3 V regulator.

To make the board cheap enough to manufacture, [Albert] elected a minimum component size of 0402, which made squeezing all the parts onto the board challenging. The MCU barely fits between the header pin pads, and the Micro USB jack had to be a vertical-mount type. It does the business, though, so if you’re looking to free up a little breadboard space, check it out.

Arduino + TFT = Micro Star Chart

We always look at the round LCDs and wonder what to do with them other than, of course, a clock. Well, [shabaz] had a great idea: use it as a star map display. The project combines the Arduino, a round TFT, a GPS receiver, and some external flash memory to store data. You can get by without the GPS receiver or flash memory, but you’ll lose features if you do.

We like how he approached the problem. The project contains four major parts and he developed each part independently before integrating them into a whole. The four parts are: reading the GPS, driving the LCD, providing storage for star data, and determining the position of stars. The heavy lifting is done using some public domain code ported over. This code derives from a book called Astronomical Algorithms and uses the Yale Bright Star Catalog database.

The post mentions that the screen might well be a larger rectangular screen and we agree that would make this more usable. Now if you could cram it all into a watch, that might be different. If you want to play with the code, you can actually run the core on Linux. You’ll have to settle for a PNG output of the night sky, but that would be handy for debugging.

We have seen a star chart in a watch before. While this is more a star chart than a planetarium, we have no doubt the early planetarium builders would be suitably impressed.

Continue reading “Arduino + TFT = Micro Star Chart”

Rotary Phone Lives On As Arduino Kitchen Timer

It’s safe to say that few people still use rotary phones on a daily basis. Hell, most of us don’t even use landline telephones anymore. But just because these classic phones are no longer being used for their original purpose doesn’t necessarily mean they’re doomed to become e-waste.

[Scott-28] recently sent in a particularly well-documented project that turned an antique rotary phone into a digital kitchen timer using an internal Arduino. While we’re not sure practical is a word most folks would use to describe the resulting device, it’s certainly a conversation starter, and the details on how it was all implemented make for an interesting read.

As explained in the README, [Scott-28] first used an oscilloscope to figure out the pulses generated by the phone’s dial. From there, it was relatively easy to connect the dial to one of the pins on an Arduino Uno to determine which numbers the user had entered. The trickier part was getting the original bells to work — in North America, it takes up to 90 VAC to get a phone’s ringer going, which is quite a bit more than the lowly Arduino can handle.

Continue reading “Rotary Phone Lives On As Arduino Kitchen Timer”

This Arduino Is Feeding The Fishes

Depending on the species, a fish can be a fairly low-maintenance pet. But of course even the most laid back of creatures needs to eat, so you’ll have to make sure to feed them regularly. If you’re a fish owner who would like to simplify tending to your creatures, you might find value in this project from [CrazyScience].

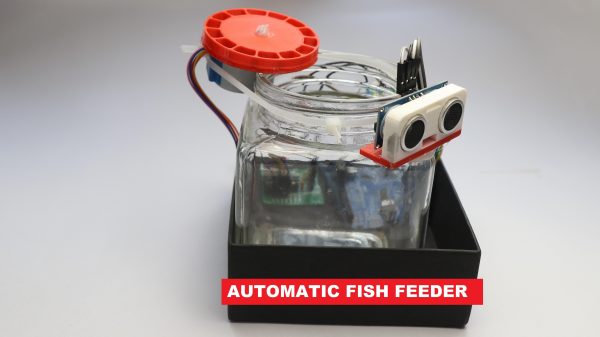
This fish feeder is based on an Arduino Uno, the 8-bit microcontroller development board which has done so much for so many. The Arduino drives a stepper motor, which rotates a 3D printed disc mechanism for dispensing food. Each slot of the disc is loaded with a small amount of fish food, so that when it rotates, a slot dumps its contents through a slot into the water.

Activating the system is as easy as a wave of the hand. That’s thanks to an ultrasonic sensor, which detects movement close by, and triggers the food delivery mechanism in turn. We’d love to see this upgraded with a timer mode too, though it would require the addition of a real-time clock module to the humble Arduino Uno.

It’s a simple project, but one that teaches all kinds of useful skills, from programming to design and 3D printing. We just worry that the fish bowl in the demo is a far too small for fish to remain healthy. We’ve seen some other similar projects before, too.

Continue reading “This Arduino Is Feeding The Fishes”

Tiny Arduino Drone Even Has An FPV Camera

In the turmoil of today’s world, drones are getting bigger, badder, and angrier. [Max Imagination] has gone the other way with his work, though, building a teeny Arduino drone that can fit in the palm of your hand. Even if you have a small hand!

The drone is based around an Arduino Pro Mini, and uses an MPU6050 IMU for motion sensing and flight control. Communication with the drone is via an NRF24L01. Four small coreless motors are used for propulsion, driven by tiny MOSFETs, and the whole assembly is run via a teeny 220 mAh lithium-polymer battery. Oh, and there’s an FPV camera so you can put on some goggles and see where it’s going!

Control is via MultiWii software, written specifically for building multirotor craft. [Max] flies the craft using a controller of his own creation, again using an NRF24L01 for communication.

It’s a neat build, and a titchy one too! Tiny drones have a character all their own, even if they can’t really stand up to windier outdoor environments. Video after the break.

Continue reading “Tiny Arduino Drone Even Has An FPV Camera”

Arduino Gear Shift Indicator Finds ‘Em So You Won’t Grind ‘Em

Now, it’s been a shamefully long time since we’ve driven a car with a manual transmission, but as we recall it was pretty straightforward. It certainly didn’t require a lot of help with the shifting pattern, at least not enough to require a technical solution to know what gear you’re in. But then again, we suspect that’s not really the point of [upir]’s latest build.

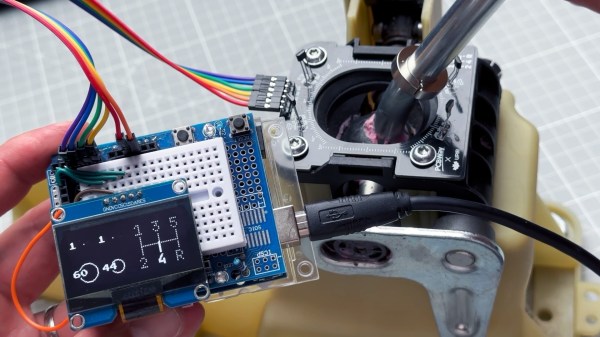
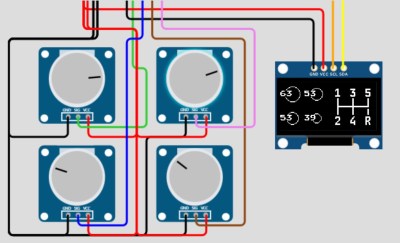
Oh sure, it’s pretty cool to display your current gear selection on a little LCD screen using an Arduino. And [upir] promises a follow-up project where the display goes inside the shifter knob, which will be really cool. But if you take a look at the video below, you’ll see that the real value of this project is the stepwise approach he takes to create this project. [upir] spends most of the time in the video below simulating the hardware and the code of the project in Wokwi, which lets him make changes and tune the design up before committing anything to actual hardware.

That turned out to be particularly useful with this build since he chose to use analog Hall sensors to detect the shift lever position and didn’t know exactly how that would work. Wokwi let him quickly build a virtual prototype for one sensor (using a potentiometer as a stand-in, since the simulator lacked a Hall sensor model), then quickly expand to the four sensors needed to detect all six gear positions.

By the time his simulation was complete, the code was almost entirely written. [upir] also walks us through his toolchains for both designing the graphics and laying out the PCB, a non-trivial task given the odd layout. We particularly enjoyed the tip on making smooth curved traces around the oval cutout for the shift lever in the board.

The video below is on the longish side, but it’s chock full of great little tips. Check out some more of [upir]’s work, like his pimped-out potentiometer or his custom animations on 16×2 LCDs.

Continue reading “Arduino Gear Shift Indicator Finds ‘Em So You Won’t Grind ‘Em”