Mapping Out The LEDs On An Outlet Tester

The concept of an outlet tester is pretty simple: plug the gadget into a suspect wall receptacle, and an array of LEDs light up in various patterns to alert the user to any wiring faults. They’re cheap, reliable, and instantaneous. Most people wouldn’t give them much more thought than that, but like any good hacker, [Yeo Kheng Meng] wanted to know how these devices worked.

After picking up a relatively advanced model that featured an LCD display capable of showing various stats such as detected voltage in addition to the standard trio of LEDs, he started by using some test leads to simulate various fault conditions to understand the basic principle behind its operation. The next step was to disassemble the unit, which is where things went briefly sideways — it wasn’t until [Yeo Kheng Meng] and a friend had nearly cut through the enclosure that they realized it wasn’t ultrasonically welded liked they assumed, and that the screws holding it together were actually hidden under a sticker. Oops.

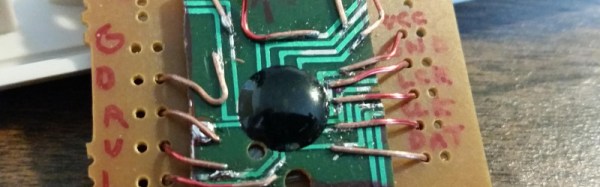
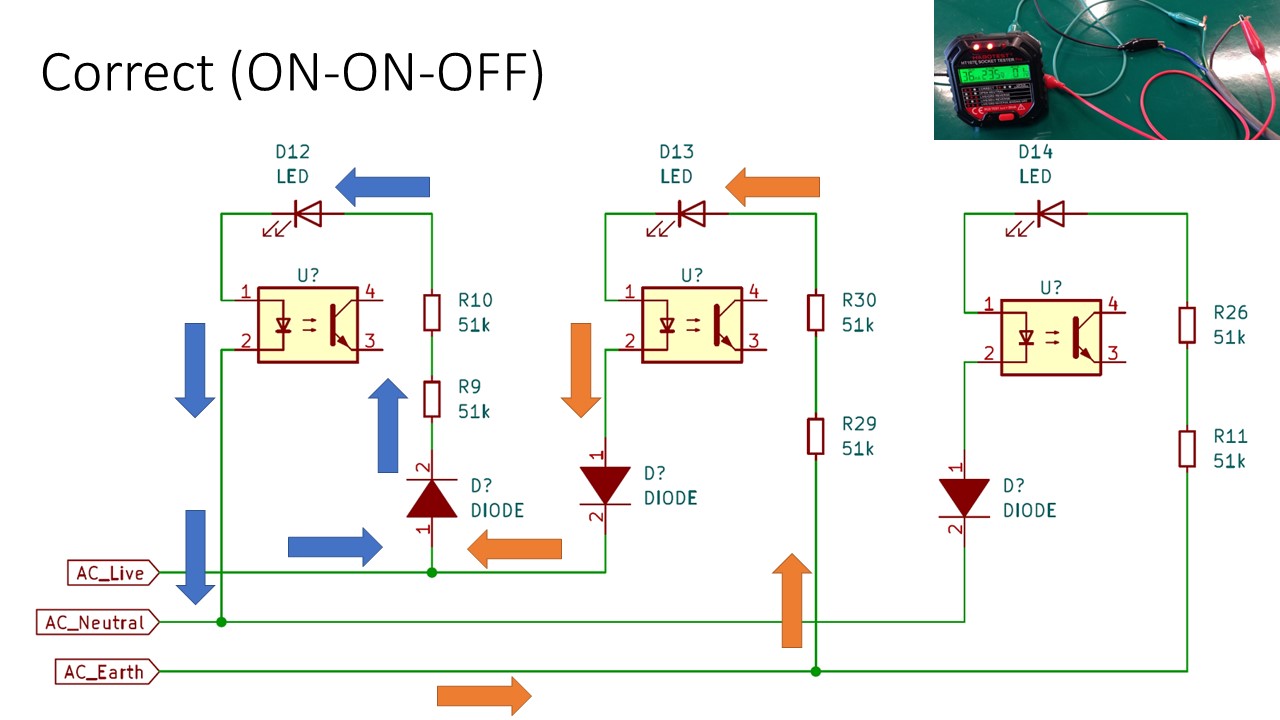
The write-up includes some excellent PCB shots, and [Yeo Kheng Meng] was able to identify several components and ascertain their function. He was even able to find some datasheets, which isn’t always such an easy task with these low-cost devices. Unfortunately the MCU that controls the device’s more advanced features is locked away with a black epoxy blob, but he was able to come up with a schematic that explains the rather elegant logic behind the LED display.

This isn’t the first time [Yeo Kheng Meng] has taken apart an interesting piece of hardware for our viewing pleasure, and given the fine job he does of it, we hope it’s not the last either.

Inputs Of Interest: SafeType™ Vertical Keyboard With Mirrors Puts Pain In The Rear-View

Yep, this keyboard is another ebay special. I can’t stay away! This is a SafeType™ V801 from probably the early 2000s, although there is no date on it anywhere. I’m basing my guess on the fact that there are so many media buttons. I’ve been eyeing these weirdo mirrored keebs for a while, and when I saw how cheaply this one was going for, I had to have it. That’s just how it goes. I was really excited to clack on it and I’m only marginally disappointed by it. But I can tell you that if my Kinesis were to suddenly die, I would probably reach for this keyboard until the new one showed up.

Yes, mirrors on a keyboard are weird. But if you can’t touch-type the numerals and F keys, they’re absolutely necessary.

So, why does it look like this? There are varying levels of ergonomics when it comes to keyboards. This one fights strongly against wrist pronation and forces you into a position that helps the shoulders and neck as well. You’d think it would be weird to hold your arms aloft at right angles, but it’s actually not that strange in practice because you’re pressing inward to type, kind of like playing an accordion or something.

The weird part is looking in the rear-view mirrors to accurately hit the numerals and F keys, though I’ll be honest: in my test drives, I found myself using the mirrors mostly to make sure my hands were on the home row. And that’s with three homing protrusions apiece on F and J! More about that later.

So yes, some of the keycap legends are backwards so you can read them in the mirror. If you don’t like using the numeral row, there’s a num pad in the center, along with the Home/End cluster, a quartet of comically large arrow keys, and a boatload of dedicated media and program launch buttons. All the buttons in the middle are fairly awkward to reach because you must either pull your hand down and around the bottom, or else go over the top. Continue reading “Inputs Of Interest: SafeType™ Vertical Keyboard With Mirrors Puts Pain In The Rear-View”

Teardown: Generation NEX

Today if you wanted a little gadget to sit on your shelf and let you play classic games from the early console era, you’d likely reach for the Raspberry Pi. With slick emulator front-ends like RetroPie and DIY kits available on Amazon, you don’t even need to be a technical wizard or veteran penguin wrangler to set it up. If you can follow an online tutorial, you can easily cram the last few decades of gaming into a cheap and convenient package.

But things were a bit different back in 2005. There weren’t a lot of options for playing old games on the big screen, and what was out there tended to be less than ideal. You could hack an original Xbox or gut an old laptop to make an emulation box that could comfortably blend in with your DVD player, but that wasn’t exactly in everyone’s wheelhouse. Besides, what if you had the original cartridges and just wanted to play them on a slightly more modern system?

I’m willing to bet whoever wrote this owns a katana.

Enter Messiah, and their Generation NEX console. As you might have gathered from their ever-so-humble name, Messiah claimed their re-imagined version of the Nintendo Entertainment System would “Bring Gaming Back to Life” by playing the original cartridges with enhanced audio and visual clarity. It also featured integrated support for wireless controllers, which at the time was only just becoming the standard on contemporary consoles. According to the manufacturer, the Generation NEX used custom hardware based on the “NES algorithm” that offered nearly 100% game compatibility.

Unfortunately, the system was a complete bomb. Despite Messiah’s claims, the Generation NEX ended up being yet another “NES-on-a-chip” (NOAC) clone, and a pretty poor one at that. Reviewers at the time reported compatibility issues with many popular titles, despite the fact that they were listed as working on Messiah’s website. The touted audio and video improvements were nowhere to be found, and in fact many users claimed the original NES looked and sounded better in side-by-side comparisons.

It didn’t matter how slick the console looked or how convenient the wireless controllers were; if the games themselves didn’t play well, the system was doomed. Predictably the company folded not long after, leaving owners stuck with the over-priced and under-performing consoles. Realistically, most of them ended up in landfills. Today we’ll take a look inside a relatively rare survivor and see just what nostalgic gamers got for their money in 2005.

Continue reading “Teardown: Generation NEX”

Teardown: 168-in-1 Retro Handheld Game

The holidays are upon us, and that can mean many furrowed brows trying to figure out what token gift they can give out this year as stocking-stuffers. Something that’s a bit more interesting than a coupon book or a lotto scratcher, but also affordable enough that you can buy a few of them without having to take part in that other great holiday tradition: unnecessary credit debit.

Includes the NES classic Super Militarized Police Bros 3

Which is how I came to possess, at least temporarily, one of these cheap handheld multi-games that are all over Amazon and eBay. The one I ordered carries the brand name Weikin, but there are dozens of identical systems available, all being sold at around the same $20 USD price point. With the outward appearance of a squat Game Boy, these systems promise to provide precisely 168 games for your mobile enjoyment, and many even include a composite video out cable and external controller for the less ambulatory classic game aficionado.

At a glance, the average Hackaday reader will probably see right through this ploy. Invariably, these devices will be using some “NES on a Chip” solution to emulate a handful of legitimate classics mixed in with enough lazy ROM hacked versions of games you almost remember to hit that oddly specific number of 168 titles. It’s nearly a foregone conclusion that at the heart of this little bundle of faux-retro gaming lies a black epoxy blob, the bane of hardware tinkerers everywhere.

Of course, there’s only one way to find out. Let’s crack open one of these budget handhelds to see what cost reduction secrets are inside. Have the designers secured their place on the Nice List? Or have we been sold the proverbial lump of coal?

Continue reading “Teardown: 168-in-1 Retro Handheld Game”

Reusing A Wire Bonded Chip

We will all at some point have opened up a device to investigate its internal workings, and encountered a blob of resin on the PCB concealing an integrated circuit. It’s usually a cost thing, the manufacturer has sourced the chip as bare silicon rather than in encapsulated form, and it has been bonded to the board with its connections made directly using fine wires. The whole fragile component is then hidden by a protective layer of resin.

Normally these chips are off-limits to we experimenters because they can not be removed from the board without damage, and we have no information such as a part number about their function. Today though we have a rare example of a wire bonded chip being reused courtesy of Reddit user [BarockObongle], who has incorporated the controller from a multi-game joystick into his handheld NES project by cutting a square of PCB containing the chip, and soldering lengths of wire to the PCB tracks.

Of course, he’s in the rare position of knowing the function of the chip in question, and having a ready application for it. But it’s probable that few of us have considered the possibility of taking a resin blob from its original board and using it in a different way, so even though this is quite a straightforward piece of work it is sufficiently unusual to be worth a look. Sadly we don’t have the rest of the build to see it in context, it would be nice to think we’ll be able to feature it when it is completed.

If you are interested in what goes on underneath the blob, have a look at SparkFun’s explanation. Or charge your laser.