Printing Nintendo Portables With SLA

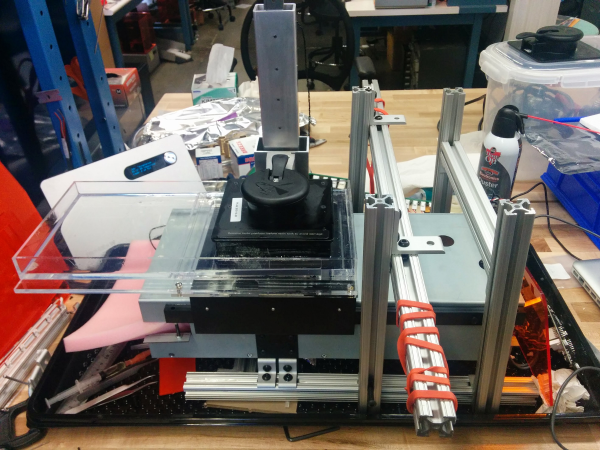
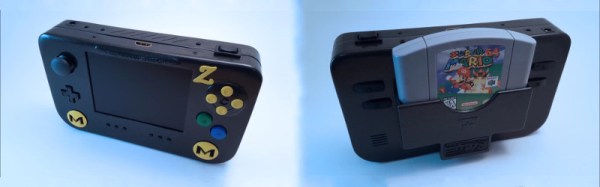
Downing] is no stranger to building portable consoles, employing all manner of techniques in the process. However, when it came time to start on this commission, [Downing] decided to take a different tack – employing a Form 2 SLA printer in this Nintendo 64 portable build.

Modifying home consoles to become portables often involves tricks like Frankencasing – hacking together original factory parts such as controllers, cases, and accessories, and using body filler and a lot of sanding to create a template for vacuum moulding, which then results in a seamless final product. It’s possible to get some really impressive results, but it does limit the builder to relying on existing parts.

By using the Form 2, [Downing] was able to take advantage of the SLA printer’s ability to create parts with good surface finish that would normally require a lot of post-print finishing when 3D printed with more common FDM technology. This was particularly useful as it allowed the creation of custom buttons and small parts that “just fit” – normally such parts are made from stock pieces that are then modified.

The build also features a few other cool features – there’s a breakout box which allows the connection of extra controllers, as well as hosting AV out for hooking up to a television. The breakout box connects to the portable over an HDMI cable. It’s a tidy choice – it’s a standard cable that has an abundance of conductors available so you don’t have to be particularly tricky to get 3 controllers and a few analog signals talking over it.

In the end, [Downing] wouldn’t use SLA printing again for the case itself – the process was too slow and expensive. In this respect, FDM may require more work after printing but it still comes out ahead in terms of time and money. But for small custom parts like buttons and structural brackets, the Form 2 is the machine for the job.

Video after the break.

Continue reading “Printing Nintendo Portables With SLA”

Sticking With The Script For Cheap Plane Tickets

When [Zeke Gabrielse] needed to book a flight, the Internet hive-mind recommended that he look into traveling with Southwest airlines due to a drop in fares late Thursday nights. Not one to stay up all night refreshing the web page indefinitely, he opted to write a script to take care of the tedium for him.

Settling on Node.js as his web scraper of choice, numerous avenues of getting the flight pricing failed before he finally had to cobble together a script that would fill out and submit the search form for him. With the numbers coming in, [Grabrielse] set up a Twilio account to text him  once fares dropped below a certain price point — because, again, why not automate?

Continue reading “Sticking With The Script For Cheap Plane Tickets”

Design And Testing Of The Form 2

Formlabs makes a pretty dang good SLA printer by all accounts. Though a bit premium in the pricing when compared to the more humble impact of FDM printers on the wallet, there’s a bit more to an SLA printer. The reasoning becomes a bit more obvious when reading through this two part series on the design and testing of the Form 2.

It was interesting to see what tests they thought were necessary to ensure the reliable operation of the machine. For example the beam profile of every single laser that goes into a printer is tested to have the correctly shaped spot. We also thought the Talcum powder test was pretty crazy. They left a printer inside a sandblast cabinet and blasted it with Talcum powder to see if dust ingress could cause the printer to fail; it didn’t.

The prototyping section was a good read. Formlabs was praised early on for the professional appearance of their printers. It was interesting to see how they went from a sort of hacky looking monstrosity to the final look. They started by giving each engineer a Form 1 and telling them to modify it in whatever way they thought would produce a better layer separation mechanism. Once they settled on one they liked they figured out how much space they’d need to hold all the new mechanics and electronics. After that it was up to the industrial designer to come up with a look that worked.

They’re promising a third part of the series covering how the feedback from beta testing was directed back into the engineering process. All in all the Form 2 ended up being quite a good printer and the reviews have been positive. The resin from Formlab is a little expensive, but unlike others they still allow users to put the printer in open mode and use other resin if they’d like. It was cool to see their engineering process.

A 3D Printed Camera (Including The Lens)

Barring the RepRap project, we usually see 3D printers make either replacement parts or small assemblies, not an entire finished product. [Amos] is the exception to this rule with his entirely 3D-printed camera. Everything in this camera is 3D printed, from the shutter to the lightproof box to the lens itself. It’s an amazing piece of engineering, and a testament to how far 3D printing has come in just a few short years.

35mm film is the most common film by far, and the only one that’s still easy to get and have developed at a reasonable price. This 3D-printed camera is based on that standard, making most of the guts extremely similar to the millions of film cameras that have been produced over the years. There’s a film cartridge, a few gears, a film takeup spool, and a lightproof box. So far, this really isn’t a challenge for any 3D printer.

The fun starts with the lens. We’ve seen 3D printers used for lens making before, starting with a 3D print used to create a silicone mold where a lens is cast in clear acrylic, 3D printed tools used to grind glass, and an experiment from FormLabs to 3D print a lens. All of these techniques require some surface finishing, and [Amos]’ lens is no different. He printed a lens on his Form 2 printer, and started polishing with 400 grit sandpaper. After working up to 12000 grit, the image was still a bit blurry, revealing microscopic grooves that wouldn’t polish out. This led him to build a tool to mechanically polish the lens. This tool was, of course, 3D printed. After polishing, the lens was ‘dip polished’ in a vat of uncured resin.

The shutter was the next challenge, and for this [Amos] couldn’t rely on the usual mechanisms found in film cameras. he did find a shutter mechanism from 1885 that didn’t take up a lot of depth, and after modeling the movement in Blender, designed a reasonable shutter system.

Building an entire camera in a 3D printer is a challenge, but how are the pictures? Not bad, actually. There’s a weird vignetting, and everything’s a little bit blurry. It’s hip, trendy, and lomo, and basically amazing that it works at all.

Building A Casting Furnace With Heat Exchanger

This completely DIY casting furnace turned out just great thanks to all the work [Biolit11] put into it along the way. He wanted to replace his older furnace with one that was more efficient, and to that end he built a heat exchanger into the design. This way the exhaust will preheat the intake air.

The furnace itself started with the shell of an old electric water heater. Excluding the design process, the majority of the build involved mold making. For circular parts he’s using quick tube, the paperboard forms used for pouring concrete footings. For more intricate parts he shaped polystyrene. They are layered in place and high-temperature cement is poured to form the permanent parts. After it hardens the polystyrene can be removed in chunks.

The heat exchanger is the part to the left. It includes several wide, flat pipes made of cement for removing the exhaust. Around those pipes a snaking metal chase carries the intake air which picks up the heat as it passes over the exhaust pipes.

For his first run with the new furnace he melted down a bunch of scrap aluminum and poured ingots.

[Thanks DC3]

Vacuum Forming At Home

A little dumpster-diving let [Nick Skvarla] build his vacuum form machine for around $5. He pulled a vacuum cleaner out of the trash, which was tossed away because of a broken power plug. He put it into a box which had been sealed with spray foam and used a piece of pegboard for the top side of the enclosure. He takes a piece of 40 mil PETG plastic from the hobby shop and mounts it in a wooden frame. That goes into the oven on broil until the entire sheet is sagging, then onto the vacuum former. Above he’s making forms out of some figurines which he’ll walk you through in the video after the break.

There’s a whole world of manufacturing processes that use these forms as a starting point. What would you use this for?

Continue reading “Vacuum Forming At Home”