Cara robot dog

From Leash To Locomotion: CARA The Robotic Dog

Normally when you hear the words “rope” and “dog” in the same sentence, you think about a dog on a leash, but in this robot dog, the rope is what makes it move, not what stops it from going too far. [Aaed Musa]’s latest project is CARA, a robotic dog made mostly of 3D printed parts, with brushless motors and ropes used to tie the motors and legs together.

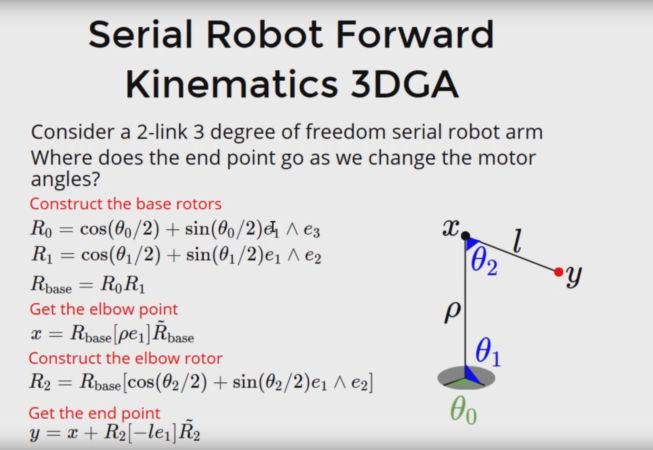
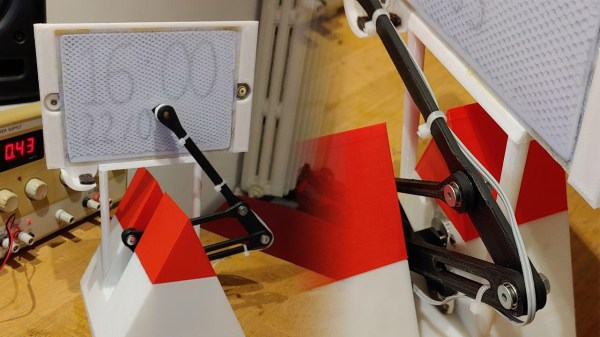
In a previous post, we covered [Aaed Musa]’s use of rope as a mechanism to make capstan drives, enabling high torque and little to no backlash. Taking that gearbox design, tweaking it a bit, and using three motors, he was able to make a leg capable of moving in all three axes. He had to do a good deal of inverse kinematics math to get the leg moving around as desired; once he had the motion of a step defined, it was time to build the rest of the dog.

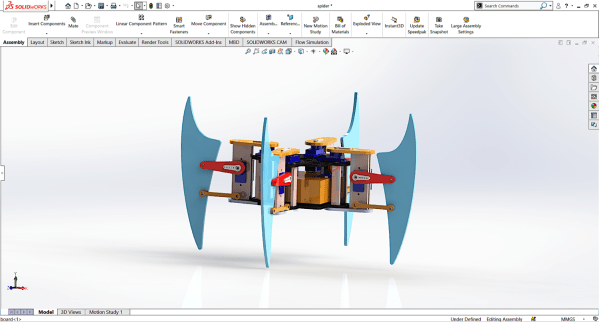
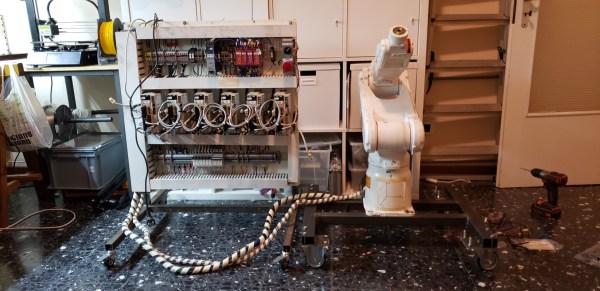
CARA is made primarily of 3D printed parts, with several carbon fiber tubes running its length for rigidity. The legs are all free to move not only forward and back but side to side some, as in a real dog. He uses 12 large brushless motors, as they provide the torque needed, and ODrive S1 motor controllers to control each one, controlled over CAN by a Teensy 4.1 microcontroller. There is also a small BNO086 IMU to sense CARA’s position relative to gravity, and a 24V cordless tool battery powers everything.

Once assembled, there was some more tuning of what type of motion CARA’s legs take while walking. There were a few tweaks to the printed parts to address some structural issues, and then a good deal more inverse kinematics math to make full use of the IMU, allowing CARA to handle inclines and make a much more natural movement style. [Aaed Musa] does a great job explaining his approach on his site as well as in the video below; we’re looking forward to seeing his future projects!

CARA isn’t alone on this site—be sure to check out the other robot dogs we’ve featured here.

Continue reading “From Leash To Locomotion: CARA The Robotic Dog”

Getting Started With Geometric Algebra For Robotics, Computer Vision And More

[Hugo Hadfield] wrote to let us know about an intriguing series of talks that took place in February of this year at GAME2020, on the many applications of geometric algebra. The video playlist of these talks can be found here along with the first video embedded after the break. For those of us who did not take advanced algebra during university, one can picture geometric algebra (GA) as an extension of vector algebra, adding more algebraic structures.

The essential difference is that GA adds a new vectors product, called the ‘geometric product’. The Cliff’s Notes version is that this is very useful for doing for example transformations, like in 3D spaces. For a quick algebraic introduction to GA for those familiar with vector algebra, the associated biVector website is helpful, from where one can also find additional information, software and other resources on getting started with GA.

These talks will take the viewer through the use of GA with robot kinematics (co-presented by [Hugo]), in astrophysics and AI. Definitely worth a watch, even algebra isn’t one’s strongest points.

Continue reading “Getting Started With Geometric Algebra For Robotics, Computer Vision And More”

Miles The Spider Robot

Who doesn’t love robotic spiders? Today’s biomimetic robot comes in the form of Miles, the quadruped spider robot from [_Robox].

Miles uses twelve servos to control its motion, three on each of its legs, and also includes a standard HC-SR04 ultrasonic distance sensor for some obstacle avoidance capabilities. Twelve servos can use quite a bit of power, so [_Robox_] had to power Miles with six LM7805 ICs to get sufficient current. [_Robox_] laser cut acrylic sheets for Miles’s body but mentions that 3D printing would work as well.

Miles uses inverse kinematics to get around, which we’ve seen in a previous project and is a pretty popular technique for controlling robotic motion. The Instructable is a little light on the details, but the source code is something to take a look at. In addition to simply moving around [_Robox_] developed code to make Miles dance, wave, and take a bow. That’s sure to be a hit at your next virtual show-and-tell.

By now you’re saying “wait, spiders have eight legs”, and of course you’re right. But that’s an awful lot of servos. Anyway, if you’d rather 3D print your four-legged spider, we have a suggestion.

Robotic Biped Walks On Inverse Kinematics

Robotics projects are always a favorite for hackers. Being able to almost literally bring your project to life evokes a special kind of joy that really drives our wildest imaginations. We imagine this is one of the inspirations for the boom in interactive technologies that are flooding the market these days. Well, [Technovation] had the same thought and decided to build a fully articulated robotic biped.

Each leg has pivot points at the foot, knee, and hip, mimicking the articulation of the human leg. To control the robot’s movements, [Technovation] uses inverse kinematics, a method of calculating join movements rather than explicitly programming them. The user inputs the end coordinates of each foot, as opposed to each individual joint angle, and a special function outputs the joint angles necessary to reach each end coordinate. This part of the software is well commented and worth your time to dig into.

In case you want to change the height of the robot or its stride length, [Technovation] provides a few global constants in the firmware that will automatically adjust the calculations to fit the new robot’s dimensions. Of all the various aspects of this project, the detailed write-up impressed us the most. The robot was designed in Fusion 360 and the parts were 3D printed allowing for maximum design flexibility for the next hacker.

Maybe [Technovation’s] biped will help resurrect the social robot craze. Until then, happy hacking.

Continue reading “Robotic Biped Walks On Inverse Kinematics”

Industrial Robot Given New Life And Controller

We all think we could use a third arm from time to time, but when we actually play this thought experiment out in our heads we’ll eventually come to the same hurdle [caltadaniel] found, which is a lack of a controller. His third arm isn’t just an idea, though. It’s a Yaskawa industrial robot that he was able to source for pretty cheap, but it was missing a few parts that he’s been slowly replacing.

The robot arm came without a controller or software, but also without any schematics of any kind, so the first step was reverse engineering the wiring diagram to get an idea of what was going on inside the arm. From there some drivers were built for the servos, but the key to all of it is the homemade controller. The inverse kinematics math was done in Python and runs on an industrial PC. Once it was finally all put together [caltadaniel] had a functioning robotic arm for any task he could think of.

Interestingly enough, while he shows the robot brushing his teeth for him, he also set it up to flip the switch of a useless machine that exists only to turn itself off. There’s something surreal about a massive industrial-sized robotic arm being used to turn on a $20 device which will switch itself back off instantly, but the absurdity is worth a watch.

Continue reading “Industrial Robot Given New Life And Controller”

Inverse Kinematics Robot Arm Magna-Doodles The Time For You

Following a surge of creativity fueled by the current lockdown, [Diglo] writes in with his tabletop clock driven by a robotic arm drawing on a Magna Doodle tablet. And if you have one of those still lying around with some old toys and don’t mind cannibalizing it for the project, you too can follow along the source files to build your own.

The clock works by exploiting the principle that Magna Doodle tablets work by being drawn on with a magnetic stylus. That way, to draw on one of them you don’t need to add a point of articulation to bring the pen up and down, [Diglo] simply attached a controllable electromagnet to the end of a two-dimensional SCARA arm. In total, the whole build uses three stepper motors, two to control the movement of the arm, and one on the back of the tablet to sweep a magnetic bar which “erases” it.

This clock is similar to another we’ve featured a few years ago, which also used a Magna Doodle, but greatly improves on the idea. If a Magna Doodle seems too childish to build a magnetic clock however, there’s always ferrofluidic displays to try to dip your fingers into, but we really think you should watch this one in action after the break first.

Continue reading “Inverse Kinematics Robot Arm Magna-Doodles The Time For You”

Smooth Moves From Cheap Motors

Building an electric motor isn’t hard or technically challenging, but these motors have very little in the way of control. A stepper motor is usually employed in applications that need precision, but adding this feature to a motor adds complexity and therefore cost. There is a small $3 stepper motor available, but the downside to this motor is that it’s not exactly the Cadillac of motors, nor was it intended to be. With some coaxing, though, [T-Kuhn] was able to get a lot out of this small, cheap motor.

To test out the motors, [T-Kuhn] built a small robotic arm. He began by programming his own pulse generating algorithm that mimics a sine wave in order to smooth out the movement of the motor. An Arduino isn’t fast enough to do these computations, though, so he upgraded to using the ESP32. He also was able to implement the inverse kinematics on his own. The result of all this work for a specific platform and motor type is a robotic arm that has a very low cost but delivers performance of much more expensive hardware.

The robot arm was built by [T-Kuhn] too, and all of the details on that build, as well as all the schematics and code, are available on the project site if you need a low-cost robot arm or a good stepper motor controller for a low cost. There are many other ways of getting the most out of other types of low-cost motors as well.

Continue reading “Smooth Moves From Cheap Motors”