Heirloom Knife Will Carve Pumpkins For Years To Come

Halloween may be behind us, but that just means that we’ve reached the best time to buy pumpkins. After all, it’s still fall, and there are pies to be made and tables to be decorated. Why should carved-up pumpkins be restricted to spooky season?

The only problem is that it’s 2022, and we’re still expected to use those terrible little serrated knives to carve our pumpkins. Those orange-handled garbage ‘knives’ are hardly suited to cut the lid, much less carve any of the intricate designs that come in the little booklet. So what’s a pumpkin-carving enthusiast to do? If you’re [XYZ Create], you make your own out of walnut, maple, and a gently-used jigsaw blade that’s still way sharp enough to tear through pumpkin flesh.

[XYZ Create] started with a nice chunk of walnut, which he split lengthwise in order to insert the blade, which sits in a cavity within a thin piece of maple. Once [XYZ Create] had the handle ready to go, he inserted the jigsaw blade and epoxied the sandwich together. After sanding down the edges to make a comfortable grip, he finished off the build by rubbing a bit of carving board wax into the handle. Check out the build video after the break.

Continue reading “Heirloom Knife Will Carve Pumpkins For Years To Come”

Jigsaw Puzzles Are Defeated

To some folx, puzzles are the ultimate single-player game, but to others, they are like getting a single Tootsie Roll on Halloween. [Shane] of Stuff Made Here must fall into the latter category because he spent the equivalent of 18 work-weeks to make a robot that solves them automatically. Shots have been fired in the war on puzzles.

The goal of this robot is to beat a hybrid idea of two devilish puzzles. The first is all-white which could be solved by taking a piece at random and then checking its compatibility with every unsolved piece. The second is a 5000-piece monster painted white. There is a Moby Dick theme here. Picking up pieces like a human with fingers is out of the question, but pick-and-place machines solved this long ago, and we learn a cool lesson about how shop-air can create negative pressure. Suction. We wonder if anyone ever repurposed canned air to create a vacuum cleaner.

The meat of this video is overcoming hurdles, like a rhomboidal gantry table, helping machine vision see puzzle pieces accurately, and solving a small puzzle. [Shane] explains the solutions with the ear of someone with a technical background but at a high enough level that anyone can learn something. All the moving parts are in place, but the processing power to decode the puzzle is orders of magnitude higher than consumer machines, so that will wait for part two.

Continue reading “Jigsaw Puzzles Are Defeated”

Building A Real Wooden Table Saw

A table saw is one of those tools that aren’t strictly necessary to have, but immensely helpful if you do happen to have one around. The folks at [I Build It] have made a three part series that features a homemade table saw build, so you can finally get around to adding one to your makerspace.

The build uses a real table saw arbor and is made from Baltic birch plywood and solid wood, with some plastic sheets for the trunnions and top. The blade is housed in a blade lift made out wooden panels with a pivot point and slot for the lift mechanism. Bearings allow the blade the freedom of movement, while a curved cutout allows it to stay flat against the wall of the slot while the blade lift mechanism moves.

Meanwhile a reused motor from a previous table saw is dusted, cleaned, and rewired to run in reverse. While most table saws only need two trunnions, a third is used for supporting the motor, since it has to move with the lift and tilt. Once the lift/tilt mechanism is complete, the frame for the table saw is more straightforward, with many steps involving clamping, measuring, cutting, fitting, and painting the assembly. For the final few steps, a switched is mounted outside the table saw in a small box that connected to the power supply and motor, as well as a shop vac for handling dust collection from the saw. While the enclosure isn’t a metal box, as long as the connections are secured properly the wires shouldn’t come loose.

If you want to see other examples of homemade table saws, check out this teeny tiny saw and this kid-friendly table saw build.

Continue reading “Building A Real Wooden Table Saw”

Curved Wood LED Lamp Needs No Fancy Tools

Those of us who aren’t familiar with woodworking might not expect that this curved wood and acrylic LED lamp by [Marija] isn’t the product of fancy carving, just some thoughtful design and assembly work. The base is a few inches of concrete in a plastic bowl, then sanded and given a clear coat. The wood is four layers of beech hardwood cut on an inverted jigsaw with the middle two layers having an extra recess for two LED strips. After the rough-cut layers were glued together, the imperfections were rasped and sanded out. Since the layers of wood give a consistent width to the recess for the LEDs, it was easy to cut a long strip of acrylic that would match. Saw cutting acrylic can be dicey because it can crack or melt, but a table saw with a crosscut blade did the trick. Forming the acrylic to match the curves of the wood was a matter of gentle heating and easing the softened acrylic into place bit by bit.

Giving the clear acrylic a frosted finish was done with a few coats of satin finish clear coat from a spray can, which is a technique we haven’t really seen before. Handy, because it provides a smooth and unbroken coating along the entire length of the acrylic. This worked well and is a clever idea, but [Marija] could still see the LEDs and wires inside the lamp, so she covered them with some white tape. A video of the entire process is embedded below.

Continue reading “Curved Wood LED Lamp Needs No Fancy Tools”

Hackit: Laser Cut Your Own Jigsaw Puzzle

If you have a laser printer, you’ve got your Christmas presents sorted out. At least if your family likes jigsaw puzzles. The idea is very simple, laminate a photograph onto some laser-cuttable board, and then run the laser over the outline of the pieces. Bam! Instant puzzle.

The trick is generating the puzzle outline, and of course there’s an online application for that. It’s got options that let you customize the piece count and shapes, and then download the result as an SVG image.

Unfortunately, it’s closed-source and makes the pieces a little bit too uniform for our liking — many of the pieces have exactly the same shape as each other. Are you up to the challenge of writing a better one? We’d love to see it, because the idea of a simple puzzle overlay for laser cutters is too good. Help us get started with some brainstorming in the comments below. How do you go about generating meaningfully unique jigsaw edges algorithmically?

Once you’ve got the puzzle cut out, you can seal up the surface nicely, toss it in a box, and then you’ve got a personalized present. To put it together, we suggest an accompanying DIY pick-and-place tool. (And kudos to [Kristina] for the best headline of 2015 on that one!)

Thanks to Hackaday alum [George Graves] for the tip!

Giant Spirograph Delights Children, Dwarfs Banana

giant spirograph
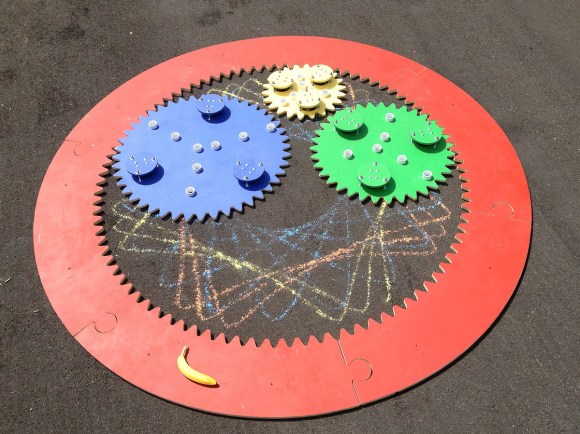
Late last year at a craft show, [hahabird] and a friend came across a laser-cut Spirograph and they both had a go at it. After mocking his friend’s lack of fine motor skills, [hahabird] was struck with the idea of making a giant-scale Spirograph that would (hopefully) be less frustrating for kids of all ages.

He generated the gears using an InkScape plugin, and then moved the project to Illustrator for adjustments. After nesting the inner gear drawings, he was able to print them out on one 3×3′ piece of paper at the local FedEx-Kinko’s. To make a template for routing he pieces that make up the eight-foot diameter outer ring, [hahabird] first cut it out of MDF and then bolted that to plywood. The outer ring’s size was dictated by the number of sections that fit on a 4×8 piece of plywood.

The challenge of the inner cogs was to make them move smoothly and still mesh with the teeth of the outer ring. [hahabird] solved this by mounting casters on raised platforms, which double nicely as handles. Each inner cog has a series of PVC couplers that take the 1″ PVC chalk holder insert.

So far, [hahabird] has cut 22-, 35-, and 44-tooth cogs, all of which are painted in nice, bright colors. According to his reddit comments, he will have a video or gif of it in a few days. We hope he makes the plus sign cog and the tongue depressor piece, too.