Growing Silver Nanoprisms With Light

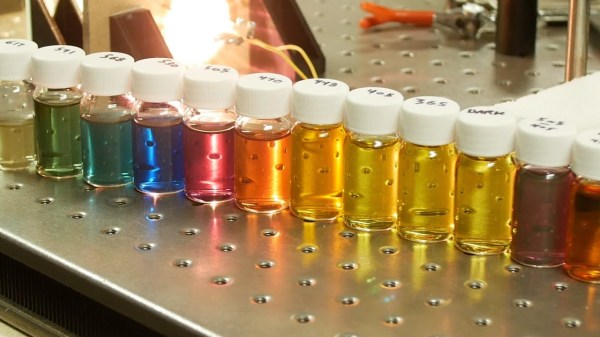
Nanoparticles sound a bit like science fiction to minds of your average hacker — too esoteric and out of reach to be something we might get to work with in our own lairs — but [Ben Krasnow] of [Applied Science] over on YouTube has proven that they most definitely can be made by mere mortals, and importantly they can be tuned. With light. That’s right, nano particle growth appears to be affected very strongly by being illuminated with specific wavelengths, which locks-in their size, and thus defines their light-bending properties. This is the concept of photo mediated synthesis, which causes nanoparticles to clump together into different configurations depending on the wavelength. The idea is to start with a stock solution of Silver Nitrate, which is then reduced to form silver nanospheres which are then converted to larger silver nanoprisms, sized according to the wavelength of the illuminating source.

The process seems simple enough, with a solution of Silver Nitrate and Sodium Citrate being vacuum degassed to remove oxygen, and then purged by bubbling argon or nitrogen. Sodium Borohydride acts as a reducing agent, producing silver metal nanoparticles from the Silver Nitrate solution. The Sodium Citrate coats the silver nanoparticles, as they are produced, preventing them clumping together into a mushy precipitate. PVP 
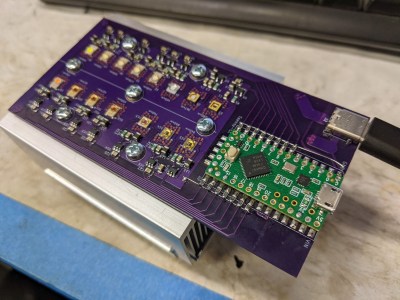
(Polyvinylpyrrolidone) is added, acting as a colloiding agent preventing the coated nanoparticles from clumping together, and helping keep the solution stable long enough for the photo mediated synthesis process to complete. Finally, the pH is adjusted up to 11 using sodium hydroxide. The resulting silver nanoparticle stock solution has a pale yellow colour, and is ready for the final particle size selection using the light source.

The light source was custom made because [Ben] says he couldn’t find something suitable off the shelf. This is a simple design using a Teensy to drive an array of PAM2804 LED drivers, with each one of those driving its own medium power LED, one for each of the different wavelengths of interest. As [Ben] stresses, the naïve approach of trying to approximate a specific colour with an RGB LED setup would not work, as although the human eye perceives the colour, the actual wavelength peak will be totally wrong, and the reaction will not proceed as intended. The hardware design is available on MultiSpectLED GitHub for your viewing pleasure.

Nanoparticles have all kinds of weird and wonderful properties, such as making the unweldable, weldable, enabling aluminium to be 3D printed, and even enabling the production of one of our favourite liquid toys, ferrofluid.

Continue reading “Growing Silver Nanoprisms With Light”

Eric Strebel peeks through his Pfaff 463 industrial sewing machine.

Simple Upgrades Make An Old Industrial Sewing Machine New Again

Well, this is a pleasant surprise: it seems that industrial designer [Eric Strebel] recently got a hold of an industrial sewing machine to tackle the softer side of prototyping. What doesn’t surprise us is that he did some upgrades to make it more user-friendly. Check them out in the video embedded below.

So, what’s the difference between a machine like this and what you might have around the house? Domestic sewing machines have a motor about the size of your fist, and it’s inside the machine’s body. Modern domestics can do light-duty work, but they can’t handle making bags and upholstery or sewing a bunch of layers of any material together. Industrial machines have either clutch or servo motors that are easily five times the size of a domestic’s motor, and are built into the table along with the machine.

Pfaff 463 industrial sewing machine with its new brushless DC servo motor.[Eric] found this Pfaff 463 on Craigslist. It was built somewhere around 1950, and it only does one thing — a single-needle, straight stitch, forward or reverse — but it will do it through damn near anything you want (unlike those computerized hunks of plastic made for home use nowadays). Again, these machines are always built into a table, and they come with a lamp.  While the machine itself may be a workhorse, the light is wimpy, so [Eric] replaced it with a goose-neck LED light that has a magnet for sticking it anywhere light is required around the machine.

No matter the size, electric sewing machines are driven with a foot pedal. On a domestic, the pedal is loose and you just put it on the floor wherever you want, but industrial foot pedals are built into the table frame. [Eric] drilled a bunch of new holes in the side of the pedal so he can move the connecting rod closer to the pivot point. This gives him better control with less footwork.

The biggest, baddest upgrade [Eric] did was to the motor. Although there was nothing wrong with the original  clutch motor, it makes the machine go very fast so that garment workers can fulfill their quotas. Because of this, it’s difficult to control. He upgraded to a brushless DC servo motor for greater precision and easier prototyping. He got really lucky, too, because it mounted directly into the old holes.

We agree wholeheartedly with [Eric]’s sentiment about old sewing machines, or any old machine for that matter. They tend to be overbuilt because planned obsolescence wasn’t a thing yet. If you can’t afford or find an industrial, an old Singer or something similar will likely serve your purpose, as long as you use the right needle.

If you already have an old domestic machine sitting around, you might be able to breathe new life into it with a 3D printer.

Continue reading “Simple Upgrades Make An Old Industrial Sewing Machine New Again”

Replacement LED Light Build Uses A Few Tricks

Microscopes have become essential work bench tools for hackers, allowing them to work with tiny SMD parts for PCB assembly and inspection. Couple of years back, mad scientist [smellsofbikes] picked up a stereo microscope from eBay. But its odd-sized, 12 volt Edison-style screw base lamp, connected to a 17 volt AC supply, burned off after a while. He swapped the burnt lamp with the spare, which too blew up after some time. Dumb lamps. Maybe the original spec called for 24 volt lamps, which were unobtanium due to the odd Edison screw base, but those would throw out a pretty yellow-orange glow. Anyhow, for some time, he worked with a jury-rigged goose neck lamp, but frequently moving the microscope and the lamp was becoming a chore. When he got fed up enough about it, he decided to Build a Replacement LED Microscope Light.

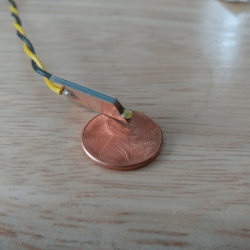
Usually, such builds are plain vanilla and not much to write in about, but [smellsofbikes] has a few tricks worth taking note of. He found a couple of high power, SMD LEDs in his parts bin. They were just slightly wider than 1.6 mm across the terminals. So he took a piece of double sided, copper clad FR4, and edge mounted the LED against one side of the PCB piece, twisting it slightly so he could solder both terminals. This works as a great heat sink for the LED while still having a very narrow profile. This was important as the replacement LED board had to fit the cylinder in which the original lamp was fitted.

The LED is driven by a constant current buck regulator, powered by the original 17 volt transformer. A bridge rectifier and several filter capacitors result in a low ripple DC supply, for which he used the KiCad spice functionality to work out the values. The LM3414 driver he used is a bit off the beaten track. It can run LEDs up to 60 watts at 1 amps and does not require an external current sense resistor. This was overkill since he planned to run the LED at just 150 mA, which would result in a very robust, long lasting solution. He designed the driver PCB in KiCad, and milled it on his LPKF circuit board plotter. The nice thing with CNC milled PCBs is that you can add custom copper floods and extend footprint pads. This trick lets you solder either a 0805 or a 1206 part to the same footprint – depending on what you can dig up from your parts bin.

Continue reading “Replacement LED Light Build Uses A Few Tricks”

Coin-Sized LED Control

EE and firmware developer [Enrico] had played with LEDs as a kid, burning out his fair share of them by applying too much current. With the benefit of his firmware chops, he set about creating a board that drives LEDs properly.

[Enrico]’s project centers around a Texas Instruments LM3405 buck controller. It accepts input voltage from anywhere from 3V to 20V and outputs up to 20V/15W to one or more LEDs. He built a ton of safety features into it like short-circuit and open-circuit immunity, temperature control, and auto-off switching when idle. He also created a LED board to test the maximum efficiency of the driver. It consists of four Luxeon Rebel ES diodes, one each RGB and W. The entire back of the LED board is copper, with a monster heat sink attached.

You can follow along with the Glighter-S project on Hackaday.io, or you can buy one of his boards from his Tindie store.

We’ve covered LED drivers extensively in the past, with posts on a simple 10-watt LED driver and how to design your own LED driver.

Reverse Engineering A BLE Service To Control A Light Bulb

So, you buy an Internet of Things light bulb, it’s a fun toy that allows you to bathe your environment in pretty colours at the touch of an app, but eventually you want more. You start to wonder how you might do more with it, and begin to investigate its inner workings. Then to your horror you discover that far from having bought a device with a convenient API for you to use, it has an impenetrable closed protocol that defies easy access.

This was the problem facing [Ayan Pahwa] when he bought a Syska Smartlight Rainbow LED bulb, and discovered that its Bluetooth Low Energy  interface used a closed protocol. But instead of giving up, he proceeded to reverse engineer the communication between bulb and app, and his write-up makes for an interesting read that provides a basic primer on some of BLE’s workings for the uninitiated.

BLE allows a device manufacturer to define their own device service specific to their functionality alongside standard ones for common device types. Using a handy Android app from Nordic Semiconductor he was able to identify the services defined for the light bulb, but sadly they lacked any human-readable information to help him as to their purpose. He thus had to sniff BLE packets directly, and lacking dedicated hardware for this task he relied on a developer feature built into Android versions since KitKat, allowing packets to be captured and logged. By analysing the resulting packet files he was able to identify the Texas Instruments chip inside the bulb, and to deduce the sequences required to control its colours. Then he was able to use the Bluez utilities to talk directly to it, and as if by magic, his colours appeared! Take a look at the video we’ve placed below the break.

Many of us may never need to reverse engineer a BLE device. But if we are BLE novices, after reading [Ayan]’s piece we will at least have some idea of its inner workings. And that can only be a positive thing.

Continue reading “Reverse Engineering A BLE Service To Control A Light Bulb”

Use The Force To Turn On This Lamp

Holocrons are holographic data storage devices used in the Star Wars universe by both Jedi and Sith as teaching devices or for storing valuable information. After the fall of the Jedi, they became rare and closely guarded artifacts. [DaveClarke] built one to light the room.

[DaveClarke] built the lamp around a Particle Photon – a STM32 ARM-M0 based microcontroller with a Cypress wifi chip. All [Dave] needed for the workings were an IR proximity sensor, a servo and a bunch of super-bright white LEDs. When the sensor detects something, it starts up the system. The servo rotates a gear which raises the lamp and fades in the LEDs. The next time the sensor detects something, the servo lowers the lamp and the lights begin to fade out. And since the Photon is connected to the cloud, the system can be accessed with a web interface as well.

Okay, so it’s just an IR sensor detecting reflected infrared light and not the Force that’s used to turn it on, but it’s still pretty cool. There are plenty of pictures and videos at [DaveClarke]’s site, along with a schematic, 3D printer designs, and the source code. The whole thing was designed using Autodesk Fusion 360 and 3D printed in about 30 hours and press-fits together. A very simple yet clever design. There have been some other great lamps on the site, like this blossoming flower lamp or this laser cut lamp with which also has a unique switch.

Continue reading “Use The Force To Turn On This Lamp”

Oak Lamp Glows Bright

Looking for a way to spruce up your place with a touch of rustic-future-deco? Why not embed LEDs somewhere they were never designed for? [Callosciurini] had a nice chunk of oak and decided to turn it into a lamp.

He was inspired by a similar lamp that retails for over $1,000, so he figured he would make his own instead (business idea people?). The oak is a solid chunk measuring 40x40x45cm and what he did was route out an angled channel across all faces of the cube. This allowed him to installed a simple LED strip inside the groove — then he filled it with an epoxy/paint mix to give it that milky glow.

To finish it off he sanded the entire thing multiple times, oiled the wood, and sanded it again with a very fine grit. The result is pretty awesome.

Now imagine what you could do design-wise if you could fold wood to make a lamp? Well with this custom wood-folding saw-blade, the sky is the limit!

[via r/DIY]