Tiny POV Turns Right Round For Volumetric Fun

Just when you think the POV thing has run out of gas, along comes [mitxela] to liven things up. In this, he’s taken the whole persistence of vision display concept and literally spun up something very cool: a tiny volumetric “electric candle” display.

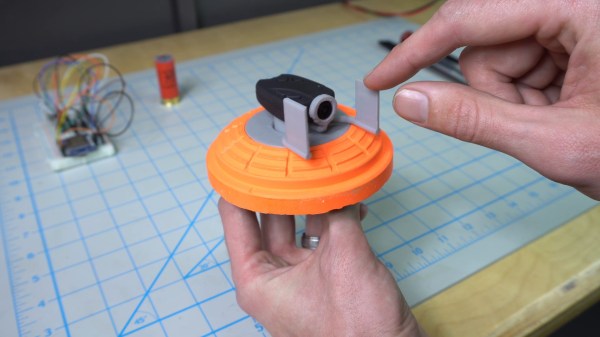
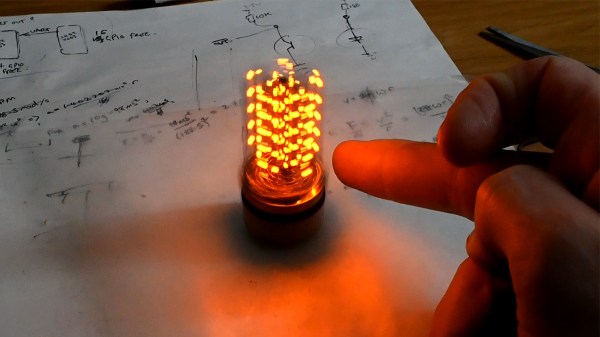
As he relates the story, the idea came upon him on a night out at the pub, which somehow led to the idea of an electric candle. Something on the scale of a tea light would fit [mitxela]’s fascination with very small and very interesting circuits, so it was off to the races. Everything needed — motor, LIR2450 coin cell, RP2040, and the vertical matrix of LEDs — fits into the footprint of the motor, which was salvaged from a CD drive. To avoid the necessity of finding or building a tiny slip-ring, he instead fixed everything to the back of the motor and attached its shaft to a Delrin baseplate.

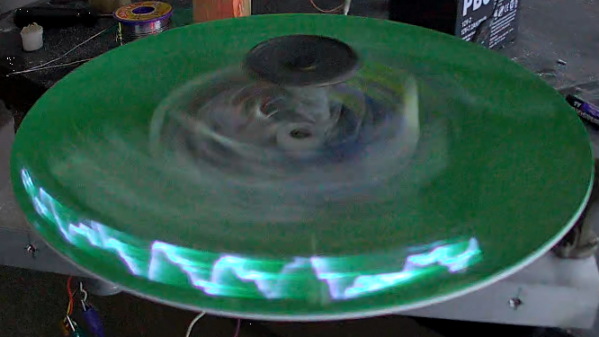
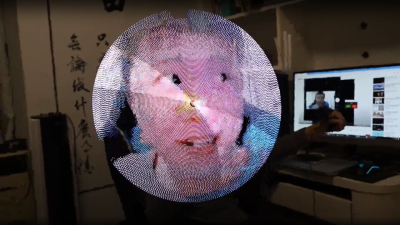
The 8×10 array of surface-mount LEDs stands atop the RP2040 with the help of some enameled magnet wire, itself a minor bit of circuit sculpture. There’s also a 3D-printed holder for a phototransistor and IR LED, which form a sensor to trigger the display; you can see [mitxela] using a finger to turn the display off and move it back and forth. It goes without saying that these things always look better in person than they do in stills or even on video, but we still think it looks fantastic. There’s also a deep dive into generating volumetric data in the write-up, as well as an unexpected foray into the fluid dynamics calculations needed to create a realistic flame effect for the candle.

All in all, this is a fantastic if somewhat fragile project. We love the idea of putting this in a glass enclosure to make it look a little like a Nixie tube, too.

Continue reading “Tiny POV Turns Right Round For Volumetric Fun”

Spinning CRT Makes A 360 Degree Audio Oscilloscope

A question for you: if the cathode ray tube had never been invented, what would an oscilloscope look like? We’re not sure ourselves, but it seems like something similar to this mechanical tachyscope display might worked, at least up to a point.

What’s ironic about this scenario is that the tachyscope [Daniel Ross] built actually uses a CRT from a defunct camcorder viewfinder as the light-up bit of what amounts to a large POV display. The CRT’s horizontal coil is disconnected while the vertical coil is attached to the output of a TEA205B audio amplifier. The CRT, its drive electronics, and the amp are mounted to a motorized plastic platter along with a wireless baby monitor, to send audio to the CRT without the need for slip rings — although a Bluetooth module appears to be used for that job in the video below.

Speaking of slip rings, you’d expect one to make an appearance here to transfer power to the platter. [Daniel] used a slip ring for his previous steampunk tachyscope, but this time out he chose a hand-wound air core transformer, with a stationary primary coil and secondary coil mounted on the platter. With a MOSFET exciter on the primary and a bridge rectifier on the secondary, he’s able to get the 12 volts needed to power everything on the platform.

Like most POV displays, this one probably looks better in person than it does in video. But it’s still pretty cool, with the audio waveforms sort of floating in midair as the CRT whizzes around. [Daniel] obviously put a lot of work into this, not least with the balancing necessary to get this running smoothly, so hats off for the effort.

Continue reading “Spinning CRT Makes A 360 Degree Audio Oscilloscope”

A Volumetric Display With A Star Wars Look And Feel

It may not exactly be what [Princess Leia] used to beg [Obi-Wan] for help, but this Star Wars-inspired volumetric display is still a pretty cool hack, and with plenty of extra points for style.

In some ways, [Maker Mac]’s design is a bit like a 3D printer for images, in that it displays slices of a solid model onto closely spaced planar surfaces. Sounds simple enough, but there are a lot of clever details in this build. The main component is a lightly modified LCD projector, a DLP-based machine with an RGB color wheel. By removing the color wheel from the projector’s optical path and hooking its sync sensor up to the control electronics, [Mac] is able to increase the framerate of the display, at the cost of color, of course. Other optical elements include a mirror to direct the projected images upwards, and a shutter harvested from an old pair of 3D TV glasses. Continue reading “A Volumetric Display With A Star Wars Look And Feel”

Cheap Camera Gives Clay-Pigeon’s-Eye View Of Trap Shooting

Speaking from experience, it’s always fun to build something with the specific intention of destroying it. Childhood sessions spending hours building boats from scrap wood only to take them to a nearby creek to bombard them with rocks — we disrespectfully called this game “Pearl Harbor” — confirms this. As does the slightly more grown-up pursuit of building this one-time-use clay pigeon camera.

The backstory on this build, which dates all the way back to 2017, is that [Thomas] was invited to a birthday bash at the local shooting range for a round of trap shooting. For the uninitiated, trap is a sport that involves launching a clay disc (known as a pigeon) into the air as a moving target and shooting it down with a shotgun. It’s a lot of fun, but [Thomas] was looking for a way to make it even more fun.

After toying with the idea of buying a cheap drone for aerial target practice, he settled on the idea of making a clay pigeon camera. After procuring a cheap keychain camera, he designed a simple wind vane mount for the camera, to keep it pointed in one direction rather than spinning with the pigeon. The wind vane was 3D printed and attached to the pigeon with a skate bearing, and the rig was ready for the range. The snuff film below tells the whole tale; the camera performed admirably and the wind vane did a good job of steadying the camera for all of about five seconds, until the inevitable and dramatic demise of the pigeon.

Watching this makes us feel like we need more projects designed for intentional destruction. Safety first, of course, but we’d be keen to see what everyone comes up with.

Continue reading “Cheap Camera Gives Clay-Pigeon’s-Eye View Of Trap Shooting”

Giant Spinning POV Christmas Tree

Spinning Holographic POV Christmas Tree Of Death

[Sean Hodgins] really harnessed the holiday spirit to create his very own Giant Spinning Holographic Christmas Tree (of Death). It’s a three-dimensional persistence-of-vision (POV) masterpiece, but as a collection of rapidly spinning metal elements, it’s potentially quite dangerous as well. As [Sean] demonstrates, the system can display other images and animations well beyond the realm of mere holiday trees.

Initial experiments focused on refining the mechanical structure, bearings, and motor. A 1/2 horsepower A.C. motor was selected and then the dimensions of the tree were “trimmed” to optimize a triangular frame that could be rotated at the necessary POV speed by the beefy motor.  A six-wire electrical slip ring allows power and control signaling to be coupled to the tree through its spinning central shaft.

The RGB elements are SK9888 LEDs also know as DotStar LEDs. DotStar LEDs are series-chainable, individually-addressable RGB LEDs similar to NeoPixels. However, with around 50 times the pulse width modulation (PWM) rate, DotStars are more suitable for POV applications than NeoPixels.  The LED chain is driven by a Raspberry Pi 4 single board computer using a clever system for storing image frames.

If deadly rotational velocity is not your cup of tea, consider this slower spinning RGB Christmas tree featuring a DIY slip ring. Or for more POV, may we suggest this minimalist persistence-of-vision display requiring only a few LEDs and an ATtiny CPU.

Continue reading “Spinning Holographic POV Christmas Tree Of Death”

Tidy POV Display Using The ESP32

Chinese Youtuber [corebb] presents the second version of his POV display. The earlier version used 5050-sized SMT addressable LEDs, which didn’t give great resolution, so he rev’d the design to use a much higher number (160 to be exact) of APA102 LEDs. These are 2mm on the side, making them a little more difficult to handle, so after some initial solder paste wobbles, he decided to use a contract assembly house to do the tricky bit for him. This failed as they didn’t ‘understand’ the part and placed them the wrong way around! Not to be deterred, he had another go with a modified solder stencil, and eventually got the full strip to light up correctly.

Based on an ESP32 (using the Arduino stack) and SDCard for control, and a LiPo cell charged wirelessly, the build is rather tidy. A couple of hall effect switches are mounted at the start of each of the two arms, presumably lining

Real-time video streaming? Check!

up with a magnet on the case somewhere, although this isn’t clear. The schematic and PCB appear to have been designed with JLCEDA, which is a repackaging of EasyEDA. We can see the attraction with the heavy integration of this with the JLC and LCSC services. It appears that he even managed to get streamed video working — showing a live video from a webcam — which is quite an undertaking to pull off when you think how much processing needs to happen in real-time. As he alludes to in the video, trying to increase the resolution beyond this point is not viable with the processing capability of the ESP32.

A resin-printed case finishes off the build, with a screw-thread mount added to the rear, to allow typical camera mounts to be used to hold the thing down. A smart move we think.

We love POV displays around here, this spherical POV display is especially fabulous, but you don’t need fancy hardware if you have a handy ceiling fan and a bit of protoboard spare.

Continue reading “Tidy POV Display Using The ESP32”

$1 POV Display Goes Round And Round

You don’t need much to do a persistence of vision display. A few LEDs and a processor is all it really takes. [B45i] made a simple PC board with five LEDs and an ATtiny CPU. There’s a battery and it connects to a fan to spin around.

While the project is pretty simple, we liked two aspects of it. First, he provides very detailed explanations about how to use an Arduino to program the Tiny using the Arduino IDE.

Continue reading “$1 POV Display Goes Round And Round”