Ultimate Bokeh With A Projector Lens

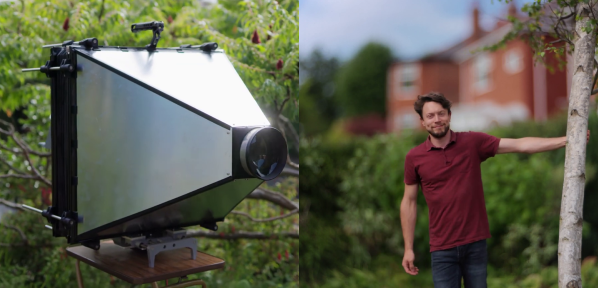
Bokeh is a photography term that’s a bit difficult to define but is basically soft, aesthetically pleasing background blur, often used to make a subject stand out. Also called “background separation” or “subject isolation”, achieving it optically requires a fast lens with an aperture below 2.8 or preferably lower. These lenses can get very expensive, but in the video after the break [Matt] from [DIY Perks] blows all the commercially available options out of the water. Using an old episcope projector, he built a photography rig with background separation equivalent to that of a non-existent 35mm f0.4 lens.

Unlike most conventional projectors used to project a prerecorded image, episcopes were used to project an image of physical objects, like books. To use this lens directly in a camera is impossible, due to the size of the imaging circle projected out the back of the lens. At a diameter of 500mm, there is simply no imaging sensor available to capture it. Instead, [Matt] built a projection screen for the image and photographed it from the opposite side with a normal camera.

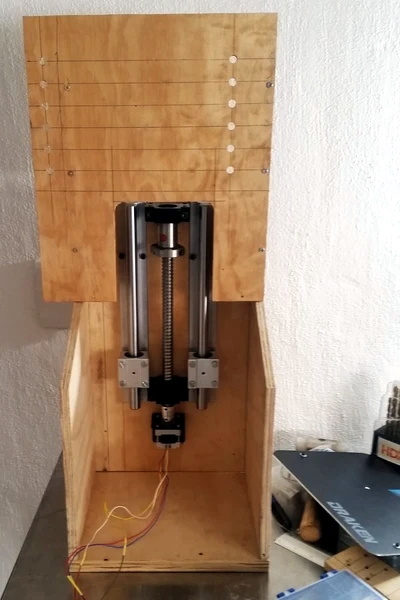
The projection screen was made by sandwiching a sheet of diffuser film between two sheets of clear acrylic held in a frame of aluminum extrusions. To block out all other light, [Matt] added aluminum shrouds on either side of the screen, which also serves to mount the lens and a camera. The shroud on the lens’ side is mounted on a separate aluminum frame, enabling the image to be focused by adjusting the distance between the screen and lens. Linear rods and bearings on 3D printed mounts allow smooth motion, while a motor-driven lead screw connected to a wired remote does the actual adjustment. The gap between the two halves was covered with bellows made from black paper. Continue reading “Ultimate Bokeh With A Projector Lens”

Making A Projector Screen Out Of Flex Seal Works Okay, Kinda

Watching movies on the big screen is fun, but getting out to the cinema or drive-in can be a hassle. It’s possible to get the same experience at home with a little creativity, as shown in this DIY projector screen build by [The Hook Up].

The build started with a giant motorized roller screen designed for a patio. It was scored on the cheap as it was salvaged after removal from its original home. Having seen a screen door turned into a boat with the help of Flex Seal, [The Hook Up] was confident that the flyscreen could be sealed up and used for projection.

Right away, the going got tough. Light applications weren’t really filling in the holes in the flyscreen, while thick applications had major issues with runs. Eventually, the screen was painted with 3 gallons of white Flex Seal and hung up to test.

The runs caused issues, as the lumpy screen texture was distracting when viewing movies. Additionally, the glossy finish was creating unsightly reflections. After some trial and error, the issues were solved by sanding the Flex Seal surface flat and using matte clear spray paint to dull the shine.

The result was a grand projection screen that rolls down at the touch of a button, the likes of which we’ve seen before, though at significant cost. [The Hook Up] readily admitted that the several hundred dollars invested might have been better spent on buying a pre-made screen. Nonetheless, it’s a cool project, and we respect the creator for putting in the work! Video after the break.
Continue reading “Making A Projector Screen Out Of Flex Seal Works Okay, Kinda”

A Portable Projecting Pi For Education

We cover a lot of cyberdeck projects here at Hackaday, custom portable computers often built around the Raspberry Pi. It’s not often that we cover a computer that perfectly achieves and exceeds what a cyberdeck is trying to do without being a cyberdeck in any way, but that’s what [Subir Bhaduri] has done. In addressing the need for Indian schoolchildren to catch up on two years of COVID-disrupted schooling he’s created the pπ, a Raspberry Pi, projector, and keyboard all-in-one computer in a neat sheet-metal case that looks as though it might be just another set of spanners or similar. At a stroke he’s effortlessly achieved the ultimate cyberdeck, because this machine is no sci-fi prop, instead it has a defined use which it fulfills admirably.

All the files to build your own can be found in a GitLab repository. The case is laser-cut sheet metal, and he’s put in a cost breakdown which comes out at a relatively healthy 17200 Indian rupees, or around 230 US dollars. We hope that it serves its purpose well and provides a rugged and reliable teaching aid for a generation from whom COVID has taken so much. You can see more in the video below the break.

Continue reading “A Portable Projecting Pi For Education”

Hexagonal Mirror Array Hides Hidden Message

[Ben Bartlett] recently got engaged, and the proposal had a unique bit of help in the form of a 3D-printed hexagonal mirror array, whose mirrors are angled just right to spell out a message with the reflections. A small test is shown above projecting a heart, but the real deal was a bigger version reflecting the message “MARRY ME?” into sand at sunset. Who could say no to something like that? Luckily for all of us, [Ben] shared all the details of what went into designing and building such a thoughtful and fascinating device.

Mirrors on the 3D-printed array are angled just right to reflect light into a message.

Essentially, the array of mirrors works a bit like a projector. Each individual reflection can be can be thought of as a pixel, and the projected position of each can be modified by the precise angle of each mirror. With the help of some Python code, [Ben] calculated the exact angles needed to spell out “MARRY ME?” and generated the necessary 3D model. A smaller-scale test (shown in the header image above) was successful, and after that it was just a matter of printing the array and gluing on some mirrors.

Of course, that’s the short version. In practice there were quite a few troublesome issues that demonstrated the value of using early tests to discover hidden problems. For one thing, mirror angle and alignment is crucial, which meant that anything that could affect the shape of the array was a potential problem. Glue that expands or otherwise changes shape as it dries or cures could slightly change a mirror’s angle, so cyanoacrylate (CA) glue was preferred. However, the tiniest bit of CA glue will mess up a mirror’s surface in a hurry, so care was needed during assembly.

The gleaming hexagonal mirrors are reminiscent of the James Webb Space Telescope.

Another gotcha was when [Ben] suddenly realized, twenty hours into printing the final assembly, that the message needed to be reversed! As designed, the array he was printing would project “?EM YRRAM” and this wasn’t caught during testing because the test pattern (a heart) was symmetrical. Fortunately there was time to correct the error and start again, but it was close. [Ben]’s code has an optional visualization function, which was invaluable for verifying that things would actually turn out as expected. As it happens, the project took right up to the last minute to complete and there wasn’t quite time to check everything 100% before the big moment, but it all turned out alright. What’s life without a little mystery and danger, anyway?

The pictures are great, but you won’t regret taking the time to read through the project page (don’t miss the annotated Python code) because [Ben] goes into just the right level of detail. The end result looks fantastic, and makes an excellent keepsake with a charming story.

Left: kids stomping spiders projected on a driveway. Right: the setup.

Make This Halloween A Spider-Stomping Good Time

We can count on one hand the number of times that we haven’t needed a coat on Halloween night around here. Even if it was fair and sunny the day before, you can count on Halloween being appropriately windy, cold, and spooky. Trick-or-treating only keeps a kid so warm, and we would have loved to happen upon a house with a spider-stomping sugar-burning good time of a game going on in the driveway.

[Kyle Maas] built this game a few years ago, and it has proved quite popular ever since. It’s so popular, in fact, that they have to have someone on duty with a vaudeville hook to yank spectators off the playing field. The point is to stomp as many spiders as you can in a set amount of time, though you only need to stomp one to win. It can handle one to four players, depending on the size of the projection, but [Kyle] says it’s kind of hard to track more than two at a time.

The setup is fairly simple, provided you can reliably affix your projector to something sturdy. [Kyle] used a Structure sensor for the 3D scanner, but you could easily use a Kinect instead. Conversely, the calibration was challenging. [Kyle] ended up using a DSP math trick known as the inverse bilinear transform to be able to calibrate the system using the 3D scanner itself.

If you’re more into scaring the children, just rig up a coffin bell. Either way, don’t forget about our Halloween Hackfest contest, running now through Monday, October 11th. There are more details over on IO. While you’re there, why not check out the list of entries?

Up Close And Personal With An Unusual 3D Printer Kit

While there are still plenty of folks out there tinkering with custom 3D printers, it’s safe to say that most people these days are using a commercially-available machine. The prices are just so low now, even on the resin printers, that unless you have some application that requires exacting specifications, it just doesn’t make a whole lot of sense to fiddle around with a homebrew machine.

As it so happens, [Nicolas Tranchant] actually does have such an application. He needs ultra-high resolution 3D prints for his jewelry company, but even expensive printers designed for doing dental work weren’t giving him the results he was looking for. Rather than spend five-figures on a machine that may or may not get the job done, he decided to check out what was available in kit form. That’s when he found the work of [Frédéric Lautré].

A look at the heavy-duty Z axis.

He purchased the unique “Top-Down” SLA kit from him back in 2017, and now after four years of working with the machine, [Nicolas] decided he would share his experiences with the rest of the class. The basic idea with this printer is that the light source is above the resin vat, rather than below. So instead of the print bed being pulled farther away from the resin on each new layer, it actually sinks deeper into it.

Compared to the “Bottom-Up” style of resin printers that are more common for hobbyists, this approach does away with the need for a non-stick layer of film at the bottom of the tank. Printing is therefore made faster and more reliable, as the part doesn’t need to be peeled off the film for each new layer.

[Nicolas] goes into quite a bit of detail about building and using the $700 USD kit, including the occasional modifications he made. It sounds like the kit later went through a few revisions, but the core concepts are largely the same. It’s worth noting that the kit did not come with the actual projector though, so in his case the total cost was closer to $1,400. We were also surprised to see that [Frédéric] apparently developed the software for this printer himself, so the tips on how to wrangle its unfamiliar interface for slicing and support generation may be particularly helpful.

Unfortunately, it sounds like [Frédéric] has dropped off the radar. The website for the kit is gone, and [Nicolas] has been unable to get in touch with him. Which is a shame, as this looks to be a fascinating project. Perhaps the Hackaday community can help track down this mysterious SLA maestro?

VGA PCB.

Running Six VGA Projectors From A Single ESP32

Today’s microcontrollers are high-speed powerhouses that can do absolutely wonderous things. By virtue of fast clock speeds and special DMA hardware, it’s often possible to achieve great feats that seem almost ridiculous at face value. [Bitluni] decided to demonstrate just that, running six (6!) VGA displays from a single ESP32.  (Video, embedded below.)

The ESP32 clocks in at 240 MHz at top speed. It also features some nifty DMA hardware along with GPIO mapping that makes it perfectly suited to this task. [Bitluni] was thus able to set it up to drive up to six VGA displays at one bit per pixel monochrome output. Alternatively, ganging up six output pins into two sets of three, he was able to run two VGA displays with 3-bit color. The resolution is an impressive 640 x 400 in both cases, and [Bitluni] demonstrated the hardware by driving six projectors with a starfield display.

Is it useful? Perhaps not yet, but there’s certainly a few applications we could think of. Share your own ideas in the comments. In the meantime, check out [Bitluni]’s other great works for the ESP32.

Continue reading “Running Six VGA Projectors From A Single ESP32”