Physical Control Panel Elevates Flight Sim Experience

Like so many of us, [pgsanchez] has been bitten by the flight simulator bug. It’s a malady that can only be treated, but never cured — and like so many hobbies, it has a nasty tendency to spawn more hobbies. A software developer by trade, [pgsanchez] is also adept with Arduino and electronics, and his blog post about the PGS-2 Flight Simulator Control Panel demonstrates his fine abilities well, as does the video below the break.

A player of Digital Combat Simulator, he grew tired of having to remember awkward key combinations to control the simulator. Flying a jet, even in a simulator, can require quick thinking bound with quick reflexes, so having a button to press, a switch to flip, or a knob to turn can be vastly superior to even the simplest keyboard based command.

An Arduino interfaces the buttons to the computer, and a white acrylic case is employed to keep all the parts flying in formation. Yes, a white case — with great care taken to allow the case to be backlit. The effect is excellent, and it looks like the panel would be right at home in the Sukhoi Su-25T that it’s designed to control in the game.

We appreciated the attention to detail in the panel, as even the gear status lights and flap indicators match those in the simulator, a nice touch! What more could [pgsanchez] build? We’d like to see! If you’re into flight sims and the like, you might be interested in this fully 3D printed flight sim controller.

Continue reading “Physical Control Panel Elevates Flight Sim Experience”

Keyboard Switch Is Really A Transformer

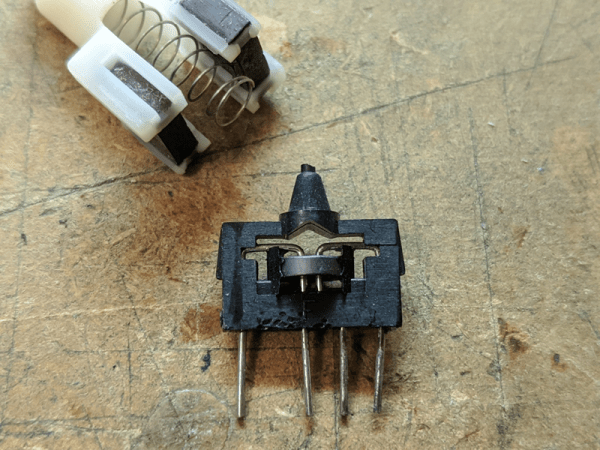
We don’t know why [TubeTime] decided to show off this oddball keyboard switch as a series of Twitter posts, but we were glad to see them somewhere. At first, the switch looks pretty conventional. But as the pictures reveal the insides, you’ll notice something unusual: a ferrite toroid! These switches operate as a transformer and are known as magnetic valve switches.

The switches have two sets of two pins — one set for the primary and one for the secondary of the transformer wound around the ferrite core. That transformer remains stationary, but a pair of permanent magnets move. When the key is up, the magnets are close to the core and cause the transformer to saturate, so there is little or no output at the secondary. When you depress the key, the magnet moves away from the core, allowing the signal to pass through the transformer. What that means is there is no mechanical contact, which is good for switch life. It is also important in environments where a small spark could cause an explosion. You can watch a video about a keyboard that used those switches, below.

Continue reading “Keyboard Switch Is Really A Transformer”

Make Your Own Reed Switches

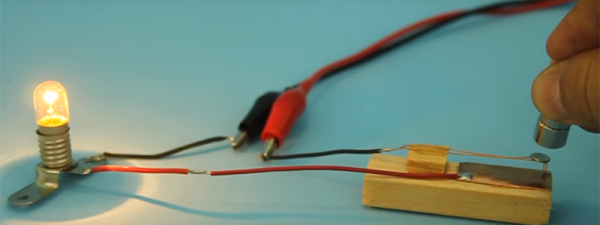
[Lucid Science] shows us how to make some simple reed switches. Reed switches are simple components that detect a magnetic field and can close or open a circuit once detected. While not really a thing of beauty, these DIY reed switches should help you out if you just can’t wait to order some or you fancied trying your hands at making some components from scratch.

Reed switches normally come in very small form factors so if you need something small then this may not be for you however the video does show you on a macro scale the fundamental workings of a reed switch. To make your own reed switch you need only a few parts: some copper, enamelled wire and magnets. They really are simple devices however sometimes it’s easy to overlook how simple some things are when they are so small that you can’t really see how they work.

Making your own components from scratch is probably the best way to understand the inner workings of said component. In the past we have seen some pretty awesome self built components from these beautiful DIY Nixie tubes to even making your own LEDs

Continue reading “Make Your Own Reed Switches”

Electronic Prototyping With A 3D Printer

It would be nice if your 3D printer could spit out PC boards. There’s been lots of work done to make that happen, mostly centered on depositing conductive material, although we’ve been surprised no one has worked out how to just 3D print a plastic resist mask.

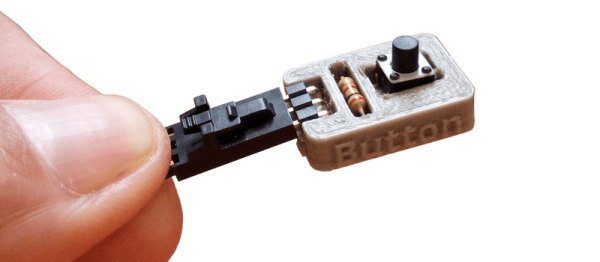
We recently found a GitHub group for [PCBPrints] which has small modules that would be useful in prototyping and breadboarding. They are really just carriers that create plug in modules for switches, LEDs, and the like. It looks like this is a aggregated list of other GitHub projects that realize these designs. The group is in Spanish, but Google Translate is your friend, as usual. You can see a video of one of the button modules in action, below.

Continue reading “Electronic Prototyping With A 3D Printer”

Automate Git And Upgrade Your Battle Station With A Custom Peripheral

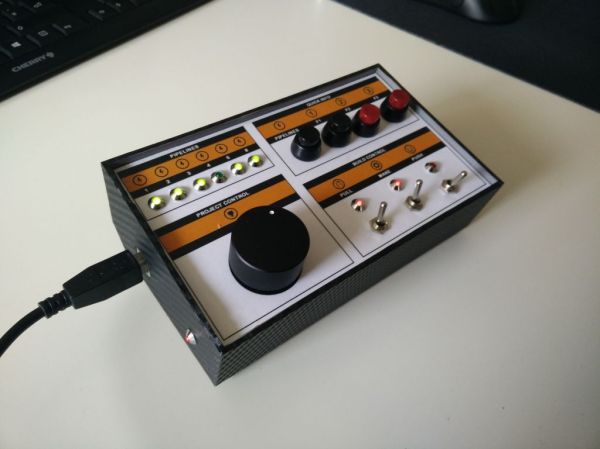
[mfaust] wakes up in the morning like a regular person, goes to work like a regular person, types in tedious commands for his software versioning utilities like a regular person, and then, as a reward, gets his coffee, just like rest of us. However, what if there was a way to shorten the steps, bringing us all closer to the wonderful coffee step, without all those inconvenient delays? Well, global industry is trying its best to blot out the sun, so mornings are covered there. [Elon Musk’s] thinktank proposed the hyperloop, which should help with the second step. [mfaust] built a control station for his versioning software. Raise your cup of joe high for this man’s innovative spirit.

He first laid out all the buttons, LED lights, and knobs he’d like on a panel to automate away his daily tasks. Using photoshop he ended up with a nice template. He laminated it to the top of a regular project box and did his best to drill holes in the right places without a workshop at his command. It’s pretty good looking!

Since this is the sort of thing an Arduino is best at he, in a mere two tries, wired everything up in such a way that it would all cram into the box. With everything blinking satisfactorily and all the buttons showing up on the serial out, he was ready for the final step.

Being a proficient and prolific enough developer to need a control panel in the first place, like a sort of software DJ, he wrote a nice interface for it all. The Arduino sits and waits for serial input while occasionally spitting out a packet of data describing its switch status. A Java daemon runs in the background of his computer. When the right bits are witnessed, a very nicely executed on screen display reports on the progress of his various scripts.

Now he can arrive at the hyperloop terminal during the appropriate work time slot in Earth’s perpetual night. After which he simply walks up to his computer, flips a few switches, glances quickly at the display for verification, and goes to drink some nice, hydroponically grown, coffee. Just like the rest of us.

Retrotechtacular: Robots, Robots Everywhere, With Kitschy Pronunciation

One of the great things about the human intellect is that we have the ability to build machines of varying complexity to do our bidding. As a major proponent of technology, the Chevrolet automobile corporation once dreamed of a future where the American housewife’s most mundane tasks are handled with the push of a button—one that sets a robot butler into action.

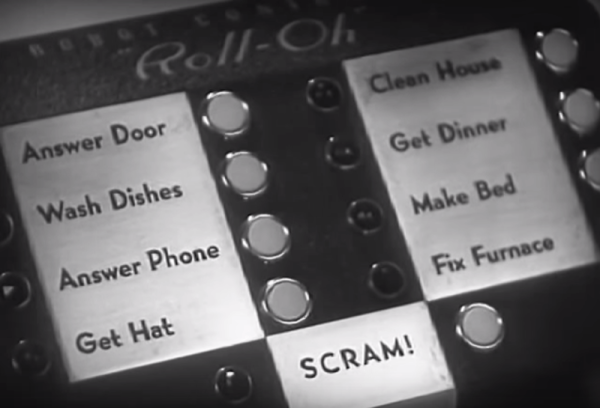
Chevy shows us what this future might look like in this short film, which they presented at the 1940 World’s Fair. A housewife’s faithful ‘robot’, pronounced throughout the picture as ‘robe-it’, has gone on the fritz. Naturally, she calls for a repairman. We see from the console controller that Roll-Oh the Robe-it can take care of all kinds of housewifely duties: he can answer the door and the phone, wash dishes, clean house, make beds, fetch hats, get dinner, and fix the furnace (and only the furnace). And that SCRAM! function? That’s never explained. We like to think it has to do with getting kids off the lawn, or could be used in conjunction with ‘get door’ to chase away would-be burglars. We get a glimpse of this when Roll-Oh answers the door and scares the daylights out of a young [Gary Sinise*] delivering flowers in a cop uniform.

Roll-Oh’s upper limbs have several Swiss Army knife-like implements in them. He uses a sharp one to cut the ribbon off of the flower box. Upon seeing the flowers, he gives them a gentle misting with his sprayer attachment. Dropped petals are no problem for Roll-Oh. He promptly vacuums them up from the thin industrial sound stage carpet with his big metal feet. Roll-Oh is then tasked with getting dinner. This amounts to him painstakingly opening a couple of cans and lighting candles with the torch hidden in his face.

While Roll-Oh the large ductwork butler is only a dream, Chevy wants you to know that smaller robe-its are all around us already. They’re regulating the heat in our stoves, browning our bread without burning it, and brewing our coffee in cool double-globe glass percolators. These tiny servants are capable of performing other tasks, like shutting off machinery when humans are too close, or sensing heat and engaging fire suppression systems. There is brief mention of something called the Petomat, an automatic dog feeding system which is essentially a bowl of food hidden in a latched box. The latch opens rather violently when the alarm clock connected to it goes off.

Robe-its are also performing more serious tasks, like keeping airplanes level and headed in the right direction. Of course, they’re also abundant in Chevrolet automobiles. A small one in the carburetor administers the proper mix of “gasoline calories and fresh air vitamins” to the engine. It’s rare to get to this level of technical detail, you know. Others watch over the spark, the intake manifold, and the voltage regulation. Up in the cab, friendly robe-its will happily traverse the AM dial at the push of a pre-set.

*Probably not actually [Gary Sinise].

Continue reading “Retrotechtacular: Robots, Robots Everywhere, With Kitschy Pronunciation”

Building A Resistor Substitution Decade Box

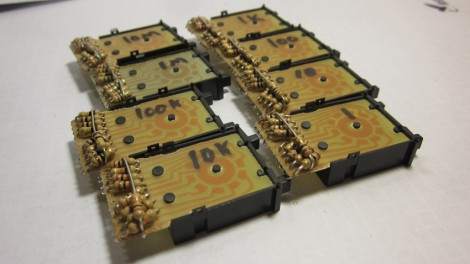
[George] built an incredibly tidy resistor substitution decade box. These devices feature a pair of connections and a way to select the resistance between the two of them. In [George’s] case it’s a pair of banana jacks and these eight thumbwheel switches.

What you see above is the side of each thumbwheel switch. These are panel mount devices which show one digit with an up and down button to change the setting. As you can see, the PCB for each provides connections to which a set of resistors can be mounted. This is the difficult part which he goes to great lengths to explain.

At this point he’s got the resistor groups for each digit soldered in place, the next step is to stack the switches next to each other and connect them electrically. From there it’s off to a project box in which they will be mounted.

This project does a great job of explaining the assembly process. If you’re interested in the theory behind a substitution box check out this other project.