Genaille’s Rods: When Paint Sticks Do Math

What is a hacker, if not somebody who comes up with solutions that other just don’t see? All the pieces may be in place, but it takes that one special person to view the pieces as greater than the sum of their parts. As [Chris Staecker] explains in the video below the break, Henri Genaille was one such person.

When French mathematician Edouard Lucas (himself well known for calculating the longest prime number found by hand) posed a mathematical problem at the French Academy, a French railway engineer named Henri Genaille developed the rods we’re discussing now.

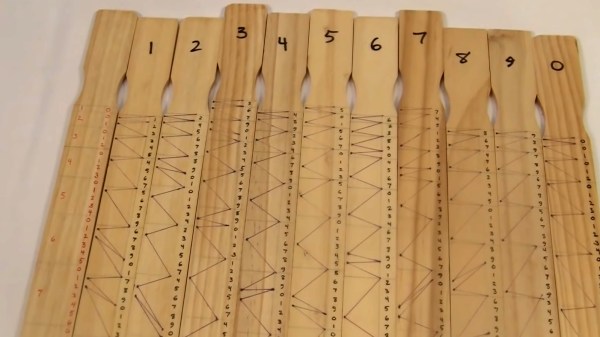
Genaille’s Rods are designed to perform multiplication. But rather than require computation by the user, the rods would simply need to be laid out in the correct order. The solution could readily be found by just following the lines in the correct pattern. This might sound a lot like cheating, and that’s exactly what it is. No manual math needed to be done. Genaille also created rods for doing long division, which we’re sure were every bit as enthralling as the multiplication rods. Demonstrations of both are included in the video below.

While Genaille’s Rods have gone the way of the slide rule, we can’t help but wonder how many engineers and scientists carried around a set of marked up wooden sticks in their pocket protector.

If designing and building manual mathematical machines is something that you think really adds up to a good time, check out this post on how to design and build your own circular slide rule!

Continue reading “Genaille’s Rods: When Paint Sticks Do Math”

Backyard with a squirrel maze

Fort Knutz – Squirrels Go All Mission Impossible

[Mark Rober] has a bird feeder in his back yard. Also, squirrels who eat the seed. So, as one does, he built a nine part squirrel obstacle course with a reward of walnuts at the end, and filmed them beating the course.

(Spoiler – this is all much better in the video, which we’ve placed below the break).

His four backyard squirrels enter a ‘Casino’ and avoid the plushie ‘security’.  From there it’s across a rod mounted on bearings, leap into a crate under a helicopter, which zip-lines to a brick wall with randomly moving bricks, and into their hideout.

A squirrel at a model buffet in a casino
Security is about to get him.

The hideout elevator shaft leads to a sewer, which leads to the famous room from Mission Impossible where [Tom Cruise] has to avoid the floor, but to get to the hatch in the top they have to lower a ladder by ‘hacking into’ the control system (by pushing a keyboard shaped button) and lowering a rope ladder.

Next they go through a tube maze to a room full of laser beams (3D printer filament) and finally they can jump onto the platform with Fort Knutz. If they get the vault door open, they’re rewarded with a shower of walnuts.

Continue reading “Fort Knutz – Squirrels Go All Mission Impossible”

Simple Photo Enlarger Makes Great Addition To Any Darkroom

Chemical-based photography can seem like a dark art at times, but it needn’t be so. [Dan K] developed the Simple Enlarger to help spread the idea that classical photographic darkroom tools are fundamentally quite easy to understand and build.

The assembled enlarger.

A photographic enlarger illuminates a negative with light, and focuses this light on a sheet of photographic paper which can then be developed. [Dan’s] enlarger design is intended to be built using materials readily available from any dollar store or stationer’s shop, and can be built in just a few short hours. It’s built to work with a single film format and with a fixed size of photographic paper for simplicity’s sake.

A simple M-mount camera lens is pressed into service for the main optic, with the ex-Soviet part chosen for its easy focusing and cheap price. A small plywood box makes a decent body, and a white phosphor LED provides  the light source. The final rig is designed to print 35mm negatives on to standard 8×10 paper.

If you want to get into developing your own negatives and don’t want to buy a commercial enlarger, [Dan]’s build could be just the way to go. We’ve seen some other similar builds before, too. Meanwhile, if you’ve got your own nifty darkroom hacks, be sure to drop us a line!

A Baudot Code Speaking Chatterbot With A Freakish Twist

[Sam Battle] known on YouTube as [Look Mum No Computer] is mostly known as a musical artist, but seems lately to have taken a bit of shine to retro telecoms gear, and this latest foray is into the realm of the minicom tty device which was a lifeline for those not blessed with ability to hear well enough to communicate via telephone. Since in this modern era of chatting via the internet, it is becoming much harder to actually find another user with a minicom, [Sam] decided to take the human out of the loop entirely and have the minicom user talk instead to a Raspberry Pi running an instance of MegaHal, which is 1990s era chatterbot.  The idea of this build (that became an exhibit in this museum is not obsolete) was to have an number of minicom terminals around the room connected via the internal telephone network (and the retro telephone exchange {Sam] maintains) to a line interface module, based upon the Mitel MH88422 chip. This handy device allows a Raspberry Pi to interface to the telephone line, and answer calls, with all the usual handshaking taken care of. The audio signal from the Mitel interface is fed to the Pi via a USB audio interface (since the Pi has no audio input) module.

Continue reading “A Baudot Code Speaking Chatterbot With A Freakish Twist”

2022 Sci-Fi Contest: Multi-Sensor Measurement System

Many sci-fi movies and TV shows feature hand-held devices capable of sensing all manner of wonderful things. The µ Spec Mk II from [j] is built very much in that vein, packing plenty of functionality into a handy palm-sized form factor. 

An ESP32 serves as the brains of the device, hooked up to a 480×320 resolution touchscreen display. On board is a thermal camera, with 32×24 pixel resolution from an MLX90640 sensor. There’s also a 8×8 LIDAR sensor, too, and a spectral sensor that can capture all manner of interesting information about incoming light sources. This can also be used to determine the transmission coefficient or reflection coefficient of materials, if that’s something you desire. A MEMS microphone is also onboard for capturing auditory data. As a bonus, it can draw a Mandelbrot set too, just for the fun of it.

Future plans involve adding an SD card so that data captured can be stored in CSV format, as well as expanding the sensor package onboard. It’s a project that reminds us of some of the tricorder builds we’ve seen over the years. Video after the break.

Continue reading “2022 Sci-Fi Contest: Multi-Sensor Measurement System”

Modern Wildfires And Their Effect On The Ozone Layer

The ozone layer is a precious thing, helping protect the Earth from the harshest of the sun’s radiative output. If anything were to damage this layer, we’d all feel the results in a very short order indeed.

In the past, humanity has worked to limit damage to the ozone layer from our own intentional actions. However, it’s not just aerosol cans and damaged air conditioning systems that are putting it at risk these days. The fierce wildfires we’ve seen so much of in recent years are also having a negative effect. Let’s take a look at why the ozone layer matters, and how it’s being affected by these wildfires.

Continue reading “Modern Wildfires And Their Effect On The Ozone Layer”

Stanislaw playing notes on his MIDI keyboard, with the LEDs on the LED strip lighting up right above the note he's playing, driven by the Raspberry Pi that runs a script based on the Pianolizer toolkit

Pianolizer Helps Your Musical Projects Distinguish Notes

[Stanislaw Pusep] has gifted us with the Pianolizer project – an easy-to-use toolkit for music exploration and visualization, an audio spectrum analyzer helping you turn sounds into piano notes. You can run his toolkit on a variety of different devices, from Raspberry Pi and PCs, to any browser-equipped device including smartphones, and use its note output however your heart desires. To show off his toolkit in action, he set it up on a Raspberry Pi, with Python code taking the note data and sending color information to the LED strip, displaying the notes in real time as he plays them on a MIDI keyboard! He also created a browser version that you can use with a microphone input or an audio file of your choosing, so you only need to open a webpage to play with this toolkit’s capabilities.

He took time to make sure you can build your projects with this toolkit’s help, providing usage instructions with command-line and Python examples, and even shared all the code used in the making of the demonstration video. Thanks to everything that he’s shared, now you can add piano note recognition to any project of yours! Pianolizer is a self-contained library implemented in JavaScript and C++ (which in turn compiles into WebAssembly), and the examples show how it can be used from Python or some other language.

[Stanislaw] also documented the principles behind the code, explaining how the note recognition does its magic in simple terms, yet giving many insights. We are used to Fast Fourier Transform (FFT) being our go-to approach for spectral analysis, aka, recognizing different frequencies in a stream of data. However, a general-purpose FFT algorithm is not as good for musical notes, since intervals between note frequencies become wider as frequency increases, and you need to do more work to distinguish the notes. In this toolkit, he used a Sliding Discrete Fourier Transform (SDFT) algorithm, and explains to us how he derived the parameters for it from musical note frequencies. In the end of the documentation, he also gives you a lot of useful references if you would like to explore this topic further!

What are you going to build with this? Maybe, a box that records you playing the flute and instantly turns it into sheet music? Or, perhaps, an AI that continues the song for you when you stop?

Continue reading “Pianolizer Helps Your Musical Projects Distinguish Notes”