Chainsaw Cuts More Than Timber

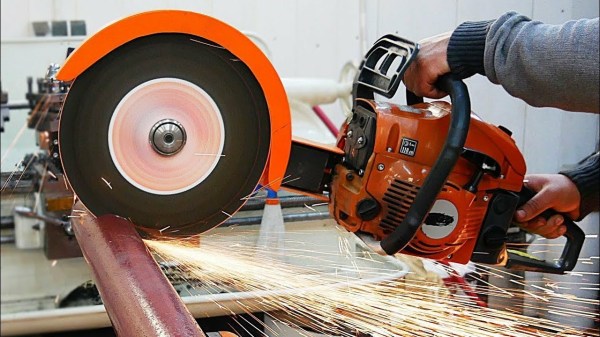
We often take electricity for granted, to the point of walking into a room during a power outage and still habitually flipping the light switch. On the other hand, there are plenty of places where electricity isn’t a given, either due to poor infrastructure or an otherwise remote location. To get common electric power tools to work in areas like these requires some ingenuity like that seen in this build which converts a chainsaw to a gas-driven grinder that can be used for cutting steel or concrete. (Video, embedded below.)

All of the parts needed for the conversion were built in the machine shop of [Workshop from scratch]. A non-cutting chain was fitted to it first to drive the cutting wheel rather than cut directly, so a new bar had to be fabricated. After that, the build shows the methods for attaching bearings and securing the entire assembly back to the gas-powered motor. Of course there is also a custom shield for the grinding wheel and also a protective housing for the chain to somewhat limit the danger of operating a device like this.

Even though some consideration was paid to safety in this build, we would like to reiterate that all the required safety gear should be worn. That being said, it’s not the first time we’ve seen a chainsaw modified to be more useful than its default timber-cutting configuration, like this build which turns a chainsaw into a metal cutting chop saw.

Continue reading “Chainsaw Cuts More Than Timber”

Zinc Fever: A Look At The Risks Of Working With Hot Metal

For as raucous as things can get in the comments section of Hackaday articles, we really love the give and take that happens there. Our readers have an astonishing breadth of backgrounds and experiences, and the fact that everyone so readily shares those experiences and the strongly held opinions that they engender is what makes this community so strong and so useful.

But with so many opinions and experiences being shared, it’s sometimes hard to cut through to the essential truth of an issue. This is particularly true where health and safety are at issue, a topic where it’s easy to get bogged down by an accumulation of anecdotes that mask the underlying biology. Case in point: I recently covered a shop-built tool cabinet build and made an off-hand remark about the inadvisability of welding zinc-plated drawer slides, having heard about the dangers of inhaling zinc fumes once upon a time. That led to a discussion in the comments section on both sides of the issue that left the risks of zinc-fume inhalation somewhat unclear.

To correct this, I decided to take a close look at the risks involved with welding and working zinc. As a welding wannabe, I’m keenly interested in anything that helps me not die in the shop, and as a biology geek, I’m also fascinated by the molecular mechanisms of diseases. I’ll explore both of these topics as we look at the dreaded  “zinc fever” and how to avoid it.

Continue reading “Zinc Fever: A Look At The Risks Of Working With Hot Metal”

Put The Perfect Point On Your Tungstens With This Die Grinder Attachment

Aspiring TIG welders very quickly learn the importance of good tungsten electrode grinding skills. All it takes is a moment’s distraction or a tiny tremor in the torch hand to plunge the electrode into the weld pool, causing it to ball up and stop performing its vital function. Add to that the fussy nature of the job — tungstens must only be ground parallel to the long axis, never perpendicular, and at a consistent angle — and electrode maintenance can become a significant barrier to the TIG beginner.

A custom tungsten grinder like this one might be just the thing to flatten that learning curve. It comes to us by way of [The Metalist], who turned an electric die grinder into a pencil sharpener for tungsten electrodes. What we find fascinating about this build is the fabrication methods used, as well as the simplicity of the toolkit needed to accomplish it. The housing of the attachment is built up from scraps of aluminum tubing and sheet stock, welded together and then shaped into a smooth, unibody form that almost looks like a casting. Highlights include the mechanism for adjusting the angle of the grind as well as the clever way to slit the body of the attachment so it can be clamped to the nosepiece of the die grinder. We also thought the inclusion of a filter to capture tungsten dust was a nice touch; most TIG electrodes contain a small amount of lanthanum or thorium, so their slight radioactivity is probably best not inhaled.

We love builds like this that make a tedious but necessary job a little quicker and easier to bear, and anything that stands to make us a better welder — from simple purpose-built fixtures to large-scale rotary tables — is OK in our book.

Continue reading “Put The Perfect Point On Your Tungstens With This Die Grinder Attachment”

Scratch-Built Rolling Tool Cabinet Is A Metalworking Skill-Builder

Yes, rolling tool cabinets in every conceivable shape, size, arrangement of drawers, and even color are readily available commercially, and you probably shouldn’t build your own. But as [Bob] from “Making Stuff” points out, where’s the fun in that?

Still, we can think of plenty of reasons to make your own rolling tool cabinets from scratch. Aside from the obvious benefits of practicing your metalworking skills and putting your tools to good use, rolling your own means you can get exactly what you want. Almost every tool cabinet we’ve purchased has ended up being just a bit sub-optimal in some way — too wide for the available space, or perhaps with drawers a touch too shallow to fit that one oddball tool. Being able to create your own cabinet means you can hit the specs exactly, and as [Bob] shows, it’s not even that hard if you have the right tools.

The build starts on [Bob]’s CNC plasma cutter, a shop-built machine that’s seen several upgrades over the years. The plasma cutter makes quick work of cutting the drawer blanks from sheet steel, complete with slots to make forming the sheets into drawers easy. The frame of the cabinet is steel tubing, which is welded up and filled in with more sheet steel. Full-extension ball-bearing slides are added to the sides to support the drawers; we have to admit that welding what appears to be zinc-coated steel makes us nervous, but we assume [Bob] took precautions against the potential for toxic fumes.

The video below shows the whole build process and shows off the very sharp-looking final product. It also puts us very much in the mood to build our own plasma cutter.

Continue reading “Scratch-Built Rolling Tool Cabinet Is A Metalworking Skill-Builder”

Upgrading An Old MIG Welder Wire Feeder With Arduino

Older industrial equipment is often a great option if you’re on a budget, and you might even be able to add some premium features yourself. [Brett] from [Theoretically Practical] has done with his old MIG welder, adding premium control features with the help of an Arduino.

The main features [Brett] were after is pre-flow, post-flow, and a spot welding timer. Pre-flow starts the flow of shielding gas a moment before energizing the filler wire, while post-flow keeps the gas going after the weld is complete. This reduces the chances of oxygen contaminating the welds. A spot welding timer automatically limits welding time, enabling consistent and repeatable spot welds.

The Miller S-22A wire feeder can have these features, but it requires an expensive and difficult to find control unit. All it does is time the activation of the relays that control the gas flow, power, and wire feeder, so [Brett] decided to use an Arduino instead. The welders control circuit runs at 24V, so an optoisolator receives the trigger signal, and relays are used for outputs. Potentiometers were added to the original control panel, and all the wiring was neatly fitted behind it. The upgrade worked perfectly and allowed [Brett] to increase the quality of his welds. See the video after the break for the full details.

Inverter welders can be picked up for ridiculously cheap prices, if you’re willing to live with the trade-offs. We’ve also seen some other DIY welder upgrades, on small and large machines.

Put A Hardened Edge On Mild Steel With Just A Drill Bit. Sort Of.

People have been working metal for so long that the list of tips and tricks is now nearly infinite. So it’s always a joy to pick up a new trick, especially one as simple as putting a hardened edge on mild steel using a drill bit as a filler rod.

This tip comes to us by way of [Jody], aka “The Weldmonger” on YouTube. Subscribing to his channel is a sure way to keep your welding ego in check; you may be good, but [Jody] is better, and he’s willing to share as much of his experience in video format as possible. For this tip, he starts with a cheap chipping hammer, the universal welder’s tool that helps remove the glass-like slag that forms during shielded-metal arc welding, or what’s commonly known as stick welding. The mild steel of the hammer makes it hard to keep an edge, so [Jody] pulled out his TIG welder and laid down a bead on the cutting edge using an old drill bit as a fill rod. The video below shows the process in all its simplicity.

The tool steel of the drill bit is far harder than the mild steel of the hammer, but still soft enough to take an edge, and the resulting tool is much improved. We’ve seen something similar to this before, when hard-facing filler rod was built up on the edge of a mild steel slug to make a cutter for internal weld seams. We liked that hack, but knowing the same thing can be done with something we’ve all likely got in abundance in the shop is a neat trick. Thanks, [Jody]!

Continue reading “Put A Hardened Edge On Mild Steel With Just A Drill Bit. Sort Of.”

A Motorized Rotary Shop Table From Scratch

As we’ve seen over the years, it’s possible to bootstrap your own metalworking shop using little more than a pile of scrap steel, a welder, and an angle grinder. With time and dedication, you can build increasingly complex shop tools until you’ve got yourself a nice little post-apocalyptic workshop. It’s the whole idea behind the [Workshop From Scratch] channel, and we never get bored of seeing his incredible backyard engineering.

But eventually, you’ll have built all the basic stuff. What then? Well, as [Workshop From Scratch] shows in a recent video, you can start working on the luxuries. Do you need a motorized table that will let you spin the workpiece and position it an at arbitrary angle? No, probably not. But as the video after the break shows, it’s certainly a handy thing to have around the shop. We especially like how he uses it to quickly and easily produce nearly perfect circular welds.

Note the welded standoffs used to hold on the lid.

From a technical standpoint, this is perhaps one of his more straightforward builds. But at the same time, the attention to detail that he puts into even this “simple” design is phenomenal. Nothing is wasted, and cutoff pieces from one section are often used in imaginative ways elsewhere.

[Workshop From Scratch] is truly a master of working with what you have, and this project is a perfect example. We especially like the tilt mechanism, which uses a massive leadscrew spun by a wiper motor salvaged from an Audi A8 B4. It looks like a fair amount of new hardware went into the control electronics, but even still, we have no doubt that the cost of this build is well below the purchase price of a commercial alternative.

Much like his hydraulic lifting table or motorized plasma cutter, not everyone is going to need something this elaborate in their home shop. But his magnetic vise and mobile drill press cart are far more approachable for the home gamer. Of course even if you don’t follow along and build your own versions of his tools, it’s always worth tuning in just to see him work.

Continue reading “A Motorized Rotary Shop Table From Scratch”