HDD Unlocking On The Mitsubishi Multi-Communication System

It’s a few years old, but [Brian360’s] method of unlocking the hard drive on his Mitsubishi Multi-Communication System is quite interesting. Mitsubishi describes their MMCS as a human-vehicle communication tool. It’s basically an in-dash screen and controls to display navigation maps and play music. [Brian] found that the hard drive for the MMCS in his 2008 Lancer was locked, and could not be cloned and swapped out for a larger drive. Sound familiar to anyone? Hard drive locking has been used in many systems, including the original Xbox, which we’ll get back to in a minute.

The setup seen above was used to grab the hard drive password from the system itself. A custom adapter card was built and plugged in between the hard drive and the MMCS hardware, with test points for each of the data line. [Brian] attached a digital storage oscilloscope, and after a bit of poking around, found a way to trigger the scope when the password was requested. He explains the process of converting the captured data into an ASCII string password.

With that in hand how would you unlock the drive? The favorite tool for this is hdparm, a tool which was used with early Xbox unlocking but which is still in use with other hardware today. Now brian has a disk image backup and the ability to swap out for larger hardware.

[Thanks Traitorous8]

A Beginner’s Guide To LED Matrices

led_tutorial

[Rajendra Bhatt] wrote in to share a tutorial he put together demonstrating the basics of using LED dot matrix displays. While this subject might be old hat to many out there, his helpful walkthroughs are geared more towards beginners who are exploring various electronics concepts for the first time.

He explains the theory behind LED displays using a PIC-driven 5×7 matrix as an example. He discusses persistence of vision and how tricking the human eye can save you quite a bit of time and a whole lot of pins. Multiplexing is broken down into its most basic steps, which [Rajendra] illustrates by showing how a letter would be drawn on the LED display one column at a time. The use of a ULN2803A Darlington Array is also discussed, and he details why it is used when pulling the five columns of LEDs to ground.

The only portion of the tutorial we thought could be expanded upon was the programming section. While he does show how each letter of the alphabet can be displayed via a series of five hex values, he does not cover the “why” part of the process. Obviously while anyone familiar with binary and hex can figure it out in pretty short order, we think that it would be a great place to pause and expand the readers’ knowledge even more.

Overall it’s a useful tutorial, and most beginners would likely find it quite helpful.

[Phillip Torrone] Pleads For Companies To Open Source Discontinued Projects

[PT] just published an editorial calling on manufactures to transfer knowledge about products they are discontinuing by making them open source. He makes his case on the basis that millions of dollars and innumerable man hours go into developing these products, only to be lost when the company decides that the project is no longer (or maybe never was) profitable. We have to say he’s got a point. Granted the answer to “why not?” is that companies don’t want to give any help to their competitors. But just think of the opportunities lost to society when we can’t build on the work of others.

Now [Phillip] doesn’t stop with his plea for new policies. He goes on to list and defend a few products that are already dead and buried, for which he wishes the secrets had first been shared. These include the Palm V personal data assistant, IBM’s Deep Blue, Sony’s robotic toys/pets, and several others. For what it’s worth, we can think of one company that’s a shining example of this; the source code for Doom, which id Software released for non-profit use more than a decade ago. Good for you id!

ChronoTune: Listen To Radio By Year, Not By Frequency

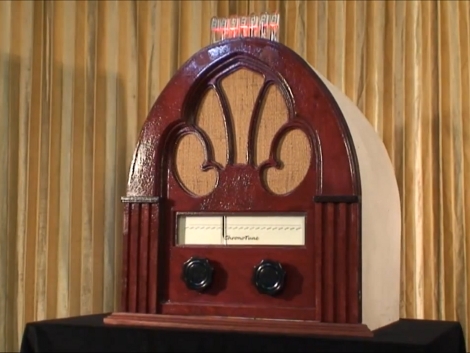
The ChronoTune is a radio that plays sounds from different eras. This project was developed as an entry for the Redbull Creation Challenge by some members of i3Detroit, a hackerspace in the motor city. It allows a user to turn the dial to tune in a new moment in history, but they can also listen in on the present day. They’ll be greeted with the sounds of a tuning radio, followed by music or audio clips common to the period displayed on the dial.

As you know from the last contest entry, each project must use an Arduino to qualify. It reads a rotary encoder attached to one of the knobs on the front of the case. This doesn’t directly move the tuning needle. Instead, it’s attached to the guts of an inkjet printer to move it back and forth. This lets the radio tune itself if need be.

The audio is played from several sources. There is an MP3 module that allows for longer clips, but there are also some ISD voice recorder chip modules that play back shorter clips. If the dial is tuned to present day, an FM radio module tunes in a station over the air.

Having trouble reading that dial? Don’t worry, there’s a simulated Nixie tube display sticking out the top of the case to provide a digital readout of the currently selected time period. Check out the video after the break to see the team walk us through each part of the ChronoTune.

Continue reading “ChronoTune: Listen To Radio By Year, Not By Frequency”

The Start To Finish Of An Interactive Exhibit

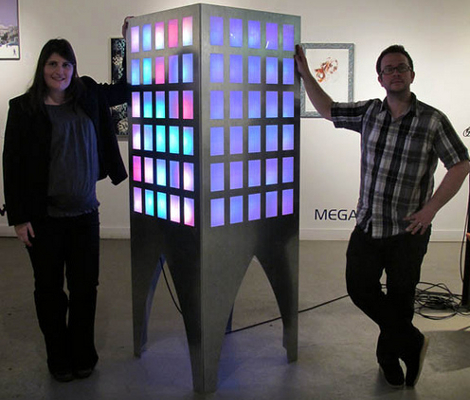
[Andrew & Deborah O’Malley] were tapped to created an interactive exhibit. The mission was to show that social problems take continual support from a lot of people before they can be solved. The piece needed to be architectural in nature, and they ended up building this touch-sensitive model building with individually lighted windows.

The project log that the [O’Malleys] posted shows a well executed battle plan. They used tools we’re all familiar with to achieve a highly polished and pleasing result. The planning stages involved a virtual mock-up using Google SketchUp. The details needed to order the shell from a fabricator were pulled from this early work, while the team set their sights on the electronics that shed light and that make the piece interactive. The former is provided by a Shiftbrite module for each window, the latter comes from the Capacitive Sensing Library for Arduino. Despite some difficulty in tuning the capacitive grid, and getting all of those Shiftbrites to talk to each other, the exhibit went swimmingly. It’s not hard to imagine how easy it is to start a conversation once attendees are attracted by the seductive powers of touch sensitive blinky lights.

A Visual History Of The Computer Mouse

mouse

As we all go about our day to day activities, it’s easy to get lost in technology and take for granted things that have slowly evolved over long periods of time. Take for instance the mouse on your desk. Whether it’s a standard 2-button mouse with a scroll wheel or a magic mouse with no buttons at all, we’re all a bit spoiled when you think about it.

Dvice recently published a visual history of the computer mouse, which is quite interesting. The first pointing device that relied on hand motions to move a cursor was created by the Royal Canadian Navy in 1952. This trackball device, which is predates all other mechanical pointing devices, was crafted using a 5-pin bowling ball and an array of mechanical encoders that tracked the ball’s movement.

As time went on, other mouse-type devices came and went, but it was 30 years ago yesterday that Xerox unveiled the world’s first optical mouse at its PARC facility. The mouse used LEDs and optical sensors along with specialized mouse pads to track the user’s movements. The tech is primitive compared to today’s offerings, but it’s a nice reminder of the humble beginnings something you use every single day.

Be sure to swing by the Dvice site and take a look at how the mouse has evolved over the years – it’s a great way to kill a few minutes.

Wooden Bike Hopes To Set World Record, Not Catch Fire

splinterbike

[Michael Thompson] has been hard at work for well over six months building a bicycle made entirely of wood. The project started as a bet between two friends, and has become much more over the last few months. The SplinterBike, as it is being called, has been constructed solely from wooden parts, as well as glue and paint – but not much else.

The bike uses many different woods in its construction, each chosen to fulfill a particular purpose. The axles are made from hardwood ekki, while all of the gears, wheels, and frame parts were constructed from birch plywood. Oiled ironwood was chosen to serve as a replacement for metal bearings wherever moving parts came together due to its durability. Other parts were constructed with random scraps that [Michael] had sitting around in the shop, such as the handlebars which were cut from an old broomstick.

Now that the bike is complete, [Michael] and his friend [James] are gearing up to set a wooden bike land speed world record. It should be doable, as they have calculated that the bike should hit about 31 miles per hour provided [James] can pedal fast enough. A date for the record attempt has yet to be set, but keep an eye out – it’s likely to be an entertaining show.

[via Gizmodo]