Cypherbot Uses Older UC And Retro-controller

[PJ Allen] has been working on a little robot which he calls Cypherbot. The control circuitry is quite familiar; a Board of Education which features the Basic Stamp 2 microcontroller. This is an older and slower microprocessor, but it works quite well for this application since there’s no need for speed or heavy number crunching. The wheels of the bot are made out of plastic lids (we’re thinking peanut butter jars) with rubber bands for traction that are each driven by a servo motor. The third wheel is tiny and swivels as needed.

The front of the bot has a PING ultrasonic sensor mounted on a servo motor which lets the bot scan back and forth for a wider obstacle avoidance angle. In addition to the autonomous mode there’s an Xbee remote control. [PJ] picked up an Atari keyboard and is using that as the user input. Check out the little guy driving around the house in the video after the break.

Continue reading “Cypherbot Uses Older UC And Retro-controller”

The Firebird32, A New Dev Board On The Block

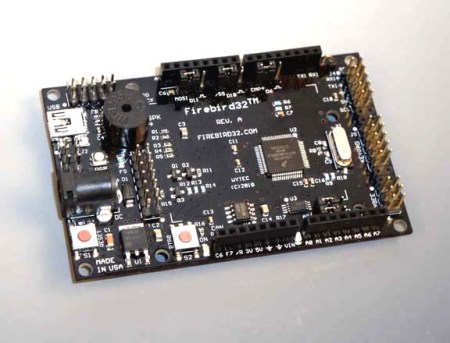
Here is yet another development board to add to your list (If you are into keeping lists), introducing the Firebird32. There seems to be no end to the production of new development boards, following the current style the Firebird32 comes in the familiar Arduino form factor to fit all of your Arduino shields.

The Firebird32 from [Wytec] is build around the 32bit Freescale Flexis MCU [MCF51JM128] running the Coldfire V1 core commonly found in industrial and medical equipment. We were kindly donated a board before release, the first thing that we noticed was  the onboard 8×2 segment LCD which makes the perfect debuging tool. The board along with fitting standard Arduino shields has extra input headers for a keypad, an accelerometer and an extra communication header (IC2/SPI/SCI). It’s also sporting 8 x 12bit analogue inputs, external 32k EEPROM, an RGB LED, a buzzer and an extra push button. The Flexis chip along with the beefy 32bit processor can run at a clock rate up to 48Mhz using PLL and has an integrated USB port, all of this for under $30.

Continue reading “The Firebird32, A New Dev Board On The Block”

Frustrating Fun With Magnetic Levitation

[Andrey Mikhalchuk] built his own magnetic levitation device and you can too… if you have the patience. He’s not using electromagnets, like the Arduino levitator or the floating globe. Instead, a pair of ceramic ring magnets and a few hours are all it takes.

The base of his device is a couple of very large ring magnets that would most often be used in speakers. It’s hard to see them in the image above because there’s an inverted plastic container obscuring them. A second (or third depending on how you’re counting) ring magnet is selected because it is smaller than the circular void in the magnetic base. It’s impossible to simply balance the magnet in the air, but spinning it is a different story. By creating a perfectly balance magnetic top, then spinning it inside the magnetic field of the base, you can leave it floating in mid-air.

Check out the video after the break. It’s a neat effect, but you really do have to have a perfect setup for it to work. [Andrey] mentions that it takes a couple of hours to fine-tune. And if the ambient conditions change slightly, it throws the whole thing off.

Continue reading “Frustrating Fun With Magnetic Levitation”

Apple Laptop Batteries Vulnerable To Firmware Hack

dead_and_busted_macbook_batteries

When you think about hacking laptops, it’s highly unlikely that you would ever consider the battery as a viable attack vector. Security researcher [Charlie Miller] however, has been hard at work showing just how big a vulnerability they can be.

As we have been discussing recently, the care and feeding of many batteries, big and small, is handled by some sort of microcontroller. [Charlie] found that a 2009 update issued by Apple to fix some lingering MacBook power issues used one of two passwords to write data to the battery controllers. From what he has seen, it seems these same passwords have been used on all batteries manufactured since that time as well. Using this data, he was subsequently able to gain access to the chips, allowing him to remotely brick the batteries, falsify data sent to the OS, and completely replace the stock firmware with that of his own.

He says that it would be possible for an attacker to inject malware into the battery itself, which would covertly re-infect the machine, despite all traditional removal attempts. Of course, replacing the battery would rectify the issue in these situations, but he says that it would likely be the last thing anyone would suspect as the source of infection. While using the battery to proliferate malware or cause irreversible damage to the computer would take quite a bit of work, [Charlie] claims that either scenario is completely plausible.

He plans on presenting his research at this year’s Black Hat security conference in August, but in the meantime he has created a utility that generates a completely random password for your Mac’s battery. He says that he has already contacted Apple to in order to help them construct a permanent fix for the issue, so an official patch may be available in the near future.

[Thanks, Sergio]

Radio Shack Will Now Stock Cellphones, Cellphone Accessories, Arduinos

A few months ago, we covered Radio Shack’s efforts to suck less, and the Radio Shack DIY team has now come back with the top ten suggestions submitted. Of course Arduinos make the list at number 1, which we somewhat expected for beginner projects.  Here’s the entire list in order:

  1. Arduino
  2. More kits and project suggestions
  3. More introduction/instructional books
  4. Larger LED selection
  5. Larger resistor selection
  6. TONS more capacitors
  7. DIY audio and speaker equipment
  8. HAM radio gear
  9. More competitive pricing
  10. Stronger sales force

Adding Video Out To The Open Pandora

There’s very few users out there who actually have their hands on an Open Pandora Console. But the ones who do might find this hack useful for getting TV out up and running. It’s actually not hard at all, but if you don’t want to alter the hardware on the device you’ll first have to find a cable plug that will fit the EXT jack. This proved more difficult than it needed to be, since TI carries the connector but only sells them in multiples of 2200. A group buy was organized and we’d bet you can still get in on that action.

The connector in question carries TVout1 and TVout2 conductors. These correspond to the Luminance and Chrominance signals needed for the S-video protocol. But [MarkoeZ] wanted to use a composite connection. Turns out that’s not hard either, he hooked up the ground from the plug to the ground of the RCA jack, then connected both video lines to the center conductor, making sure to add an inline 470pf capacitor on the Chrominance side. Check out the demo video embedded after the break to see the final product.

Continue reading “Adding Video Out To The Open Pandora”

Using Binary Code Modulation To Control LED Brightness

Pulse Width Modulation is definitely the preferred method of dimming an LED with a microcontroller, but we were interested in hearing about a different method called Binary Code Modulation. BCM does the same thing as PWM, it turns the LED on and off very rapidly so that your eye cannot detect a flicker. The brightness level is a result of the average amount of time the LED is on versus when it is off. This is called duty cycle and although it can be the same percentage for both PWM and BCD, there is a fundamental difference.

While PWM usually uses a cyclical on/off cycle (30% on, 70% off, repeat) BCD uses a cumulative cycle. As you can see above, each successive bit of binary code carries double significance compared to the previous bit. Now just assign a duty cycle based on your precision, and have an interrupt fire for each bit of the counter. The graph above shows some highs and some lows combining to reach the target duty cycle. An interrupt is used for each bit, and pin changes are made in the service routine.

The benefit of this system is that it is scaleable without adding overhead. You’re already running the interrupts so servicing 8 or 128 LEDs doesn’t have vastly different needs as it would with PWM. The big downside is that the more bits of precision you use, the faster your processor must run so that the eye doesn’t detect the lengthy on or off cycles of the higher bits as visible flickering.

Thank you [Yetihehe] for tipping us off about a link that [Tomas Martinsen] left when commenting about an Arduino library for up to 768 PWM outputs.