Using A Router As A Linux-based PID Controller

espresso_machine_pid

[Nathan] had an small router kicking around and thought that he might as well put it to good use. He had always been interested in getting a better handle on his espresso machine, and figured that the router would be a perfect Linux-based PID controller.

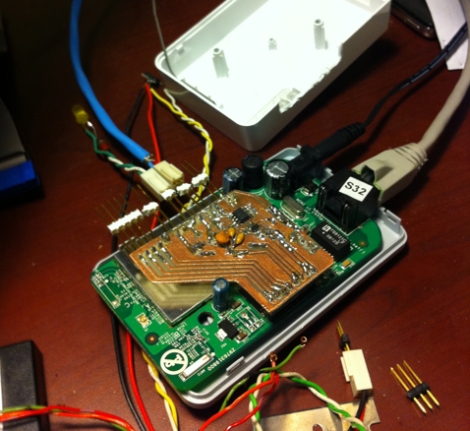
He installed OpenWRT on the router, then disassembled it in order to get access to the router’s GPIO pins. He built a small PCB that allows him to get temperature info from the machine to the router using i2c. [Nathan] put together a PID package for OpenWRT, allowing him to control the machine over SSH, though he may build in a user-friendly web interface sometime in the future.

He says that most espresso machine PID controllers he has seen come in the form of big ugly boxes slapped on the side of the machine’s case, though we have to disagree with him on that point. Opinions aside, he is going for a minimalist design, and while he says that he is only about half way through the project, we think things are looking promising so far.

When everything is said and done, we hope to get a much closer look at all of his code, schematics, and more information on the router he used as well.


Followup: Portable SID Player Is Now PC Output

When we first covered [Markus]’ portable SID player we starting dreaming about an alternative universe circa 1987 that included a pocket-sized music player called the Commodore ePod. [Markus]’ updated firmware that connects his SID player to a PC will have to do for now, we suppose.

Continue reading “Followup: Portable SID Player Is Now PC Output”

Amazing Pipe Organ Desk Features Secret Compartments And An All-wood Logic Board

wood_organ_desk_with_secret_compartment

Feeling pretty good after putting together your brand new standing computer desk? Step aside please, [Kagen Schaefer] has something he’d like to show you.

His Pipe Organ Desk is undoubtedly one of the coolest pieces of furniture we have seen in a long time. The project took [Kagen] over three years to complete, which sounds about right once you see how much attention was put into every last detail.

This desk is amazing in several ways. First off, the entire desk was constructed solely from wood. The drawers, the supports, knobs, screws, and even the air valves – all wood. Secondly, when one of the desk’s drawers are pushed in, air is directed to the organ pipes at the front of the desk, which plays a note.

A small portion of the air is also directed into the desk’s pneumatic logic board, which keeps track of each note that has been played. When someone manages to play the correct tune, a secret compartment is unlocked. The pneumatic logic board is an unbelievable creation, consisting of well over 100 wooden screws which can be tuned to recognize any number of “secret tunes”.

Sure a well-placed axe can open the compartment too, but who would destroy such a fine piece of work?

[via Make]

Roomba Used To Map Indoor Air Quality

roomba_based_air_quality_tester

The next time you set off for a long day in the coal mines, forget the canary – bring your Roomba along instead!

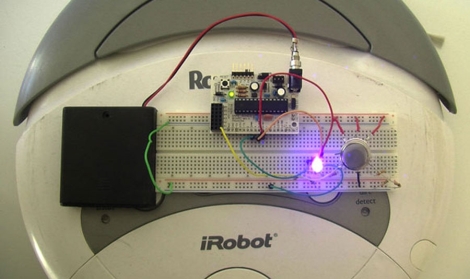
While we are pretty sure that canaries are no longer used in the mining industry, this Roomba hack could make a suitable replacement if they were. A team from the Public Laboratory for Open Technology and Science (PLOTS) recently showed off a Roomba which they modified to test an area’s air quality. Using an Arduino and a volatile organic chemical (VOC) detecting air quality sensor, the Roomba goes about its normal business, lighting an LED any time it encounters overly contaminated air. When captured via a long exposure image, the process creates a “bad air” map of sorts, with the polluted areas highlighted by the glow of the LED.

While the Roomba currently only detects VOCs, the team plans on adding additional sensors in the near future to expand its functionality. The Roomba is merely a proof of concept at the moment, but we imagine that similar technology will be adapted for use in unmanned explorations of chemically hostile environments, if that hasn’t happened already.

[via DVice] [Image via TechnologyReview]

Output Up To 768 PWM Signals From One Arduino

Here’s an Arduino library that will let you drive a very large number of LEDs. [Elco Jacobs], an electrical engineering student, is the author of the library. He has a work-study job that has him helping out others with their electrical projects and he was constantly being solicited for methods to control droves of light emitting diodes. This was the motivation that led him to produce the dazzling 16 RGB LED example seen in the video after the break.

His setup doesn’t use expensive LED drivers, but instead utilizes 595 shift registers which are both common and cheap. He calculates that it is possible to control up to 96 of these shift registers, each driving 8 LEDs, with reasonably satisfying results. This is thanks to his well-optimized code that manages to drive the clock pin of the registers at 1.33 MHz. This optimization is done by writing each command in assembly, which allows him to precisely count the cycles. Each individual pin takes 12-13 cycles to address, totally 9984 cycles at worst when addressing the maximum number of outputs.

[Elco] thinks this is as fast as he can make the routine run, but he is asking for help with testing. If you think you know how to squeeze out a few more cycles, make sure you join in on his forum thread.

Continue reading “Output Up To 768 PWM Signals From One Arduino”

Hackaday In The Social Tangle

Like any other organization out there, we’re always trying to find new ways to reach our audience. Admittedly, we’re not the fastest when it comes to adopting a new social communication site. We’re working on it though, trying to be a bit more interactive … or just plain active.

So, if you’re looking for other ways to get your hacking fix, or see some interesting commentary, find us on facebook, twitter, our own forums, and now G+. We just signed up to G+ and our name is “Hackie Smith”. If you need an invite, email us at theofficialhackaday@gmail.com see below.   Sometimes there’s good discussion in those places that doesn’t end up here on the site.

You can also find several of us spattered across the web in sites like Reddit and Slashdot.

[Update: Our g+ page got shut down. Feel free to find any of the writers on g+. I’ll give out invites, look for “Caleb Kraft” or 60mango@gmail]

Beat707 LE: A Button Pad-based Standalone MIDI Sequencer

sparkfun_button_pad_midi_controller

[Guilherme] picked up a SparkFun Button Pad and was taking a closer look at the device when he noticed that it was based off the ATMega328 microcontroller. Since he loves working with MIDI, he thought that the Button Pad would make a slick yet compact standalone MIDI controller.

Since his ultimate goal was to create a completely standalone controller aside from the power plug and MIDI interface, it forced him to work quite closely with the ATMega chip. He and his partners spent a good deal of time working through some serial communications issues so as not to block the LEDs or MIDI block timer during operation. Ensuring that the Arduino doesn’t block any other functions is obviously important when you are building a MIDI timer, and it seems [Guilherme] was successful in his quest.

The MIDI controller works quite nicely as you can see in the videos below, great job!

Continue reading “Beat707 LE: A Button Pad-based Standalone MIDI Sequencer”